How to update Android on a phone or tablet: simple and not so simple ways. How to update Android on a phone or tablet: simple and not so simple methods Instructions for checking for updates in a “clean” version of Android
Receiving updates is a joyful event for every owner of an Android smartphone and tablet. Since the new version of the system includes: expanded functions, improved capabilities, correction of previously identified errors and vulnerabilities. However, some devices are not configured for automatic Android updates, so they require activation or manual installation of the firmware. In our article we will tell you in detail how to update Android in the simplest and most accessible way.
Methods to update Android OS
There are four main ways to update the system:
- FOTA (Firmware Over The Air).
- Update via PC.
- The standard recovery mode is Recovery Mode.
- Third-party recovery mode – TWRP or CWM.
Literally from English, FOTA translates as: firmware over the air. For most manufacturers, this is the primary method of delivering the OS and remotely updating the system. The good thing about this method is that it eliminates user intervention, does not require a PC, and does not force you to go to a service center. All you need to do is find wireless internet access.
The method using a PC involves installing the system through the manufacturer’s proprietary utility. This allows you to receive the update before the OTA mailing or if there is no access to wireless Internet. In some cases, if the device has an unlocked bootloader and/or ROOT rights, this method will avoid software damage.
The standard recovery mode – Recovery Mode, allows you to update official versions of the OS, similar to the “using a PC” method. In this case, the file with the firmware must first be placed in the device’s memory, start boot mode and “flash” the system.
Third-party recovery mode TWRP or CWM is designed to install custom or modified versions of Android OS. This method allows you to receive unofficial updates after the manufacturer ends support.
Important! Each update method carries the risk of damage to the device: due to unforeseen circumstances, non-compliance with the conditions or user errors. We will talk in more detail about the problems that you may have to encounter when considering a specific update method. Also, the methods are arranged according to complexity, where 1 is the simplest, requiring a minimum of effort and knowledge; 4 – the most complex, recommended for experienced and knowledgeable users.
Before updating Android on your phone, you need to prepare your device and follow the general recommendations:
- Get feedback from other owners. Often a hastily released update contains critical errors that lead to deterioration in the performance of the device.
- Perform a backup. Transferring application data and files will prevent the loss of important information and, if necessary, quickly configure the device after the update. If possible, make a backup copy of the entire firmware.
- Charge the battery to 75% or more. The installation process of a new system takes on average 5-20 minutes. If there is not enough energy, the system will not be updated completely, which may lead to the device not working.
- Use the original cable and USB connectors of the motherboard. It is not recommended to connect the device, if it is a PC, through hubs/splitters/extensions and use the connectors on the front panel.
- It is advisable to take care of a self-powered source. To prevent sudden power outages, it is recommended to use a laptop/netbook or uninterruptible power supply (UPS).
- It is important to remember that updates take up to 2 GB, so it is recommended to download files via a Wi-Fi connection without traffic limits.
- During the installation process, do not touch the device. It may seem that the device is frozen, but it is not.
For a better understanding, we suggest that you read the articles below:
Method 1: Installing updates via FOTA
Often a notification about the availability of an update comes automatically. This allows you to immediately proceed to downloading and installing the new system. If this does not happen, the check must be performed manually.
Instructions for checking for updates in a “clean” version of Android:
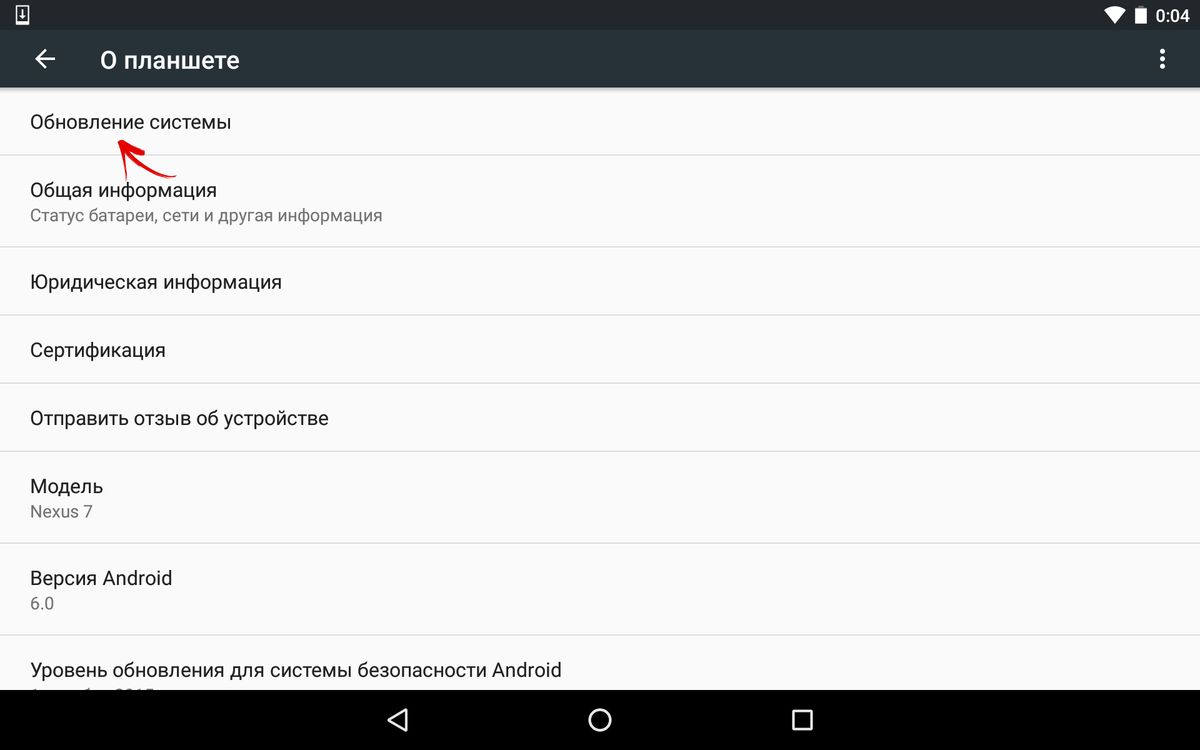
- Open the settings section.
- Scroll down and select “About device”; in some devices, “System update” is included in the settings.
- Click on the line “System update”.
- In the new window, select the line “Check for update” or “Download” - if the update is available.
- We are waiting for the firmware file to download. The process runs in the background, so it is not necessary to keep the update window open.
- After the download is complete, you will receive a notification that the installation is ready. You need to click “Restart and install”, after which the update will begin.


Instructions for checking for updates in Xiaomi devices:
- Let's go to settings.
- We go down to the very bottom, select the “About phone” item.
- In the new window, select the “System Update” button.
- In the next window that appears, click on the “Check for update” button. We are waiting for the information to be updated, and then click the “Update” button if updates are available.


Important!
- When using FOTA, user data is not deleted.
- You cannot use FOTA if your device has an unlocked bootloader, ROOT rights, or installed third-party or modified firmware or kernel. There is a high probability of software or physical damage to the device.
- Often, using FOTA leads to software corruption due to the fault of the manufacturer. In this case, you need to contact a manufacturer-certified service center or store where the purchase was made.
- If an update is available but you are not notified, you need to clear your Google Services Framework application data and cache. To do this, go to settings, then applications, then switch the display of system programs, select GSM, clear the cache and data. After this, you need to check the update again. Often the notification does not appear immediately, you have to wait several minutes or hours.
Method 1.1: FOTA update of Xiaomi smartphones
Xiaomi releases updates for its own MIUI devices every week. These are test versions where previously found errors are corrected, but stability is not brought to its optimal level. At the same time, each owner has the opportunity to try out the intermediate update, which is installed in the same way as the stable version.
Instructions for installing the “stable” and/or “weekly” update:
- Go to the official website of the manufacturer.
- Select the device type to use from the list.
- Click on the green button to download the firmware – “Download Full ROM”.
Please note that “Stable ROM” is a stable update, and “Developer ROM” is a test update. Often the test build version is higher, there may be new features or additional bugs fixed. It is recommended to download the stable version, due to fewer bugs.
If the firmware is downloaded via a smartphone, you should specify the initial partition or download folder for saving, so as not to waste time searching for the firmware later. If via a PC, then it is also better to place the file in the root folder. In this case, the free amount of flash memory must be at least 1 GB.
- Next, you need to open the settings section, select “About device”, and then “System update”.
- A prompt for checking FOTA will appear in a new window.
- You need to click on the button with three dots to open a drop-down list, where you select the “Select firmware file” item.
- In the open file manager window, specify the firmware file.
- After confirming the action, the device will start in recovery mode, after which the further process will take place without user intervention.


Method 2: Update using PC
To install the update, you need a PC and a proprietary utility for a specific brand of device. For Motorola, RSDLite is used, for Samsung - Smart Switch, etc.
General instructions for updating Motorola smartphones via RSDLite:
- Install drivers and RSDLite program.
- Download and unzip the appropriate firmware file for the device you are using.
- We connect the smartphone/tablet to the PC via a USB cable. Launch the RSDLite program.
- We wait for the device to be successfully detected.
- Click on the button with three dots and specify the XML file in the unzipped folder.
- Click “Start” and wait for the operation to complete.
Very important! Before installing the firmware, it is necessary to clarify whether the “XML” file needs preliminary editing, where part of the code needs to be removed. For example, in the Razr M model, you need to erase the lines with the “tz” and “gpt” sections, otherwise you will not be able to flash the device. Read more about this in a separate article below.
Instructions for updating Samsung devices via the Smart Switch program:
- Download Smart Switch utility on PC official website .
- Launch the program, connect the device to the PC via a USB cable. Internet access for PC is required.
- If an update is available for the connected device, you will be prompted to download it. Otherwise there will be no notification.
- You need to click on the “Update” button, after which the file will begin downloading.
- Then follow further instructions and confirm the action.
- The device will reboot into recovery mode where the installation will begin.
- Once finished, it is recommended to make a backup and perform a factory reset. This will lead to the deletion of data on the internal drive, as well as on the external one if Adoptable storage is used.


Method 3: Using the standard recovery mode – Recovery
Recovery Mode allows you to not only reset settings and clear data, but also install updates. To switch to this mode you need:
- Turn off the device, then turn it on while simultaneously holding down one of the combinations of physical buttons. On a specific device, the correct combination is different:
- Power and volume “+”.
- Power and volume “-”.
- Both volume and power buttons.
- Volume “-”, home and power buttons.
- As soon as a picture with a green robot and an exclamation mark appears, you need to simultaneously hold down both volume keys.
- If everything is done correctly, a list of commands will be displayed. The volume buttons are used for navigation, and the power key is the “select” action.
It is difficult for novice users to get into Recovery Mode the first time. There is nothing wrong with this, just try again. To leave the mode, you need to select “reboot system now” or hold down the power button to reboot the device.
Android update algorithm via Recovery Mode:
- First download the firmware file via a smartphone, tablet or computer. In the latter case, the archive must be transferred to the device on an SD card.
- Reboot the device and enter recovery mode.
- Select the item “Apply Update from SD card”, then find the firmware file.
- We wait for the procedure to complete, after which we select “reboot system now”.
Important!
- Be sure to download the firmware with the appropriate region for the device. Since due to different versions of the modem, there is a high probability of being left with a device that does not boot the system.
- Using Recovery Mode does not void the warranty, as this is the standard mode of any Android device.
Method 4: Using a third-party recovery mode – TWRP or CWM
TWRP and CWM are similar to the standard recovery mode, due to the same purpose, but they have advanced capabilities. The user can create the current version of the system, restore; installation of third-party firmware, kernels, applications, etc.
Installing updated versions of third-party firmware is similar to the previous point:
- First download the firmware file.
- Turn off the device and go to TWRP.
- Create a backup copy of the current system, click “Save”. To confirm any action, you must always swipe the right arrow from below.
- Next, click on the “Clear” button to erase data and cache.
- We return to the main menu and click the “Install” button, specify the firmware file.
- We confirm the action and wait for the operation to complete. After that, clear the cache and reboot the system.
Important! Updating Android using TWRP or CWM is quite simple. We have placed this method last due to the fact that to use the method you first need to obtain ROOT rights, and to do this, unlock the bootloader. And this automatically deprives the owner of the warranty. Additional difficulties are that for some models there are no effective ways to unlock the bootloader, the OS version is not initially suitable for hacking, or you need to pay for unlocking.
Conclusion
If you follow the described recommendations, follow the instructions and first clarify all unclear questions, updating Android to Android with a new version will go smoothly and without problems. It is worth remembering that errors cannot be ruled out, not due to the user’s fault, but due to the manufacturer’s haste, the developer’s incompetence, or for other reasons.
Therefore, in the absence of sufficient knowledge and experience, it is recommended to start with a simple update method and move gradually to the most complex one, if this makes sense. Don't forget to read the recommended articles to better understand the topic.
(4 ratings, average: 3,75 out of 5)
After purchasing a modern smartphone, owners discover new possibilities of digital devices. At the same time, along with new products, there is also a special category of applications that can be called “classic”. An example of a program known since the era of push-button telephones is the notorious T9 or automatic spell check system. The previous version provided correct replacement of letters from a functional point of view, as well as correction of the entered word if its individual parts were missed or entered incorrectly. Modern settings allow, if necessary, to replace the entire word at once, which can become not only a real help, but also an additional headache for phone owners. What is the T9 keyboard for Android, is it necessary on modern devices and how to install it - the information provided will tell you.
The T9 keyboard for Android is available in the Google Play section in Russian for free. Having chosen the appropriate application based on reviews and program ratings, you can safely download and open it on your phone. This method is good in everything, except that often such applications may be incompatible with some smartphone models, which causes further problems in operation. That is why, before trying your luck in stores, you can use the already built-in automatic replacement and spell check functions.
How to set up T9 on Android
The Android operating system uses standard patch parameters, which are improved as new versions and updates are released. Nowadays, such a program bears little resemblance to T9, used to facilitate message entry in push-button telephones. Even the name of this option now sounds different, namely Smart type, which literally means “speed dial”.
The options of this program really allow you to enter text as quickly as possible and not worry about your spelling. The system will independently analyze the entered characters and offer the best option to continue. In addition, when typing letters, you will be able to see the full word at once, so your typing speed will increase noticeably. This function is a godsend for lovers of correspondence in chats and social networks, but it also has pitfalls.
In what cases will T9 become useless:
- If abbreviations are used frequently. In this case, the proposed autocorrect options may be, to put it mildly, unacceptable.
- The use of compound words, surnames and titles unknown to the standard dictionary. The solution will be to independently add the necessary terms to the dictionary. This is long and tedious, but subsequently it will make your life much easier and allow you to avoid many awkward situations.
- When the system settings produce unexpected results and do not allow you to correct the text manually. There are cases when a smartphone literally forcibly replaces unknown words with something completely unacceptable. The best option in this case would be to completely disable the function, or a separate T9 program for Android.
Whether or not to disable T9 mode is entirely up to you. If you are completely confident in the literacy of your messages and are not afraid of getting into trouble, it is best to refuse additional help. If typing is a tedious and boring task for you, or you may accidentally make a grammatical error in a letter, it is better to play it safe and connect T9, but only according to your own rules.
How to install T9 on Android

System settings allow you to enable the necessary parameters for checking and replacing text without using superuser rights and without deep intervention in the smartphone’s operating system. To do this, you need to find the keyboard settings and select the “Language and input” item. In the section, select the virtual keyboard settings and see the suggested autocorrect options. Typically, modern versions of Android offer the ability to disable some options, for example, filter titles and names. Having established the optimal mode of use, you don’t have to worry about the “classic” incidents for which T9 is usually blamed.
How to update T9 on Android
A convenient and popular settings function is the T9 dictionary for Android. You can replenish it yourself, or you can choose a ready-made application that uses many modern terms and designations. Updates for such an application can also be found on Google Play, and you can unsubscribe from unnecessary attention.

For the convenience of quick messaging, the Android OS provides a built-in function for autocorrecting and correcting entered text. This makes typing easier and also helps correct typos and typos. At the same time, there is a very high risk that the settings could cause an absurd incident, fortunately, there is enough such evidence on the Internet. To prevent this from happening, it is recommended to independently select the settings for entering autocorrect parameters, as well as supplement the standard dictionary with all frequently used terms. How to set up T9 on Android, as well as possible disadvantages of automatic word replacement are discussed in the information provided in our article.
Android update doesn't arrive over the air? Is it possible to update the device, is there a new official firmware for it, and how can I install it myself? You will learn the answers to all these questions from this article.
It seems that updating Android is the simplest action that even a person who does not understand the system can handle. In general, this is true, but there are several important nuances that even many professionals have not heard about.
How do smartphones and tablets receive updates?
Users often wonder: how often do updates come? Unfortunately, there is no universal answer - it all depends on your manufacturer. Only gadgets from the Google Nexus line are updated regularly and in a timely manner.
It is simply impossible to update all other devices in such a short time - you need to wait until the manufacturers create their firmware based on the new version of Android, test them and only then start updating. Typically this process can take from 1 month to six months.
Often, many versions are simply “skipped”, that is, the device does not receive everything in order: for example, not Android 5.0, 5.1, 5.1.1 and 6.0, but only 5.0 and then 6.0. You must understand that each manufacturer has to support up to 30 models at the same time, and purely physically, company developers cannot have time to roll out new updates for each smartphone or tablet.
How long will it take for your gadget to be updated? Only the manufacturer knows the answer to this question. It is impossible to predict this when choosing a new device. It is logical that the more popular the model, the more advantageous it is in terms of updates. It is beneficial for the manufacturer to satisfy a larger number of users, so that they, in turn, remain loyal to the brand and buy its products again next time.
But how can you find out about the release of new system updates for your smartphone or tablet before the corresponding notification appears on the device? Just follow thematic sites, forums or groups on social networks, and also check the manufacturer’s official website for new images for manually updating the device (this process is described below in this article).
Checking and installing Android updates
After the announcement of a system update, it may not arrive to you immediately. Typically this process takes from 2-3 days to 2 weeks. The fact is that the manufacturer sends out updates gradually, so it turns out that your friend with the same smartphone received an update instantly, but it only reached you after some time.
When it’s your device’s turn, a new Wi-Fi connection will prompt you to receive a notification asking you to update the system.


Select System Update.
Click the "Check for updates" button.

And if an OTA update is available for the device, the “Download” button will appear.

System Update will download to your phone or tablet, after which you will need to click on “Restart and install”.

The installation process will begin, after which the device will reboot with the updated system.
How to speed up (force) receiving OTA updates
If the owners of your device have updated for a long time, and you still receive an update, you can resort to a method that few people know about.
Go to Settings → Applications → All tab. Open Google Services Framework. Select the "Erase Data" option.

After that, check again for updates according to the instructions above and most likely you will be pleasantly surprised. Sometimes it doesn't work the first time, and sometimes it takes several minutes before the OTA update appears.
How to update Android manually
In order not to wait for an update over the air (and it happens that it doesn’t arrive at all), I recommend installing the official firmware manually via Recovery.
First, a ZIP archive with this very firmware must be downloaded from the manufacturer’s official website to a smartphone, tablet and placed in any convenient place in memory. After that, go to the Recovery menu and follow the instructions.
1. To enter the Recovery Menu, first turn off the device.
2. Then turn it on, but simultaneously hold down certain key combinations. Depending on the manufacturer, this combination differs, but the most common are (in general, it is better to find information on the Internet on how to enter Recovery on your model):
- Volume up + power button
- Volume down + power button
- Volume up/down + power button + “Home”
- Volume up + volume down + power button
Navigation through Recovery (if it is not touch-sensitive) is carried out using the volume keys, and selection is made using the Power/Lock button.
The names of the options may be slightly different, but I'm sure you can figure it out.
3. Select “Apply update”.

4. Then select “Choose from internal storage” if you saved the archive with the firmware in the internal memory or “Choose from sdcard” if on a memory card.

5. After that, go to the desired folder where you saved the firmware and select it.

The update installation process will begin.

Once completed, return to the main Recovery menu and select “Reboot system now”. Your device will reboot with the updated firmware.
This is how I told you everything you need to know about Android update. If you are interested in any questions on this topic, ask them in the comments.