Setting up BIOS to boot from HDD or optical drive. How to set the BIOS to boot from disk How to boot from disk on a computer
Does not cause any problems, while the reverse procedure (installation of the hard drive with the system as the primary carrier) is sometimes not very obvious. Sometimes installing a system from a flash drive is also unavailable for some reason, and you have to use an optical drive. Today we want to describe the method for setting up the BIOS for booting from an HDD or CD/DVD.
It goes without saying that to configure the BIOS you will need to enter it. In most systems, this is done using the keyboard: while the computer is booting, press the function keys (F1, F2, F8) or Delete / Insert. The most common combinations, as well as other methods, can be found in a separate article.
We also note one important point - both “regular” BIOS interfaces (two- or three-color text-only tools) and graphical UEFI options (a full-fledged shell with both keyboard and mouse control) coexist. There are quite a lot of variations of both the first and second; It seems impractical to consider everything in one article, so we will focus on the most common options.
Text BIOS
Outdated text-based firmware interfaces are now only available on old or budget PCs or laptops, but are still relevant.


As you can see, the procedure for text BIOS is very simple.
UEFI GUI
The more popular option today is the UEFI shell, which makes it much easier for users to interact and configure the firmware. Improvements have also been made to bootable media installation methods.


Gigabyte


Laptop BIOS
In general, the BIOSes of most laptops use the solutions mentioned above, such as AMI, Award, Phoenix or UEFI from the manufacturer, so the instructions for these shells are also suitable for laptop versions. Let's look separately at the BIOS of devices from Hewlett-Packard.
New option
- Enter BIOS and go to the "System Configuration", on which select "Boot Options".
- First of all, enable the option "Legacy Support".

Confirm your wish by clicking on "Yes", for which use the arrows and key Enter.
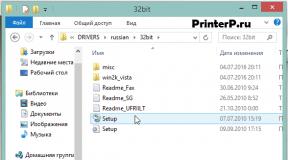
- You can now change download lists - options "UEFI Boot Order" And "Legacy Boot Order" edited identically. Select the desired disk (the hard drive corresponds to the position "OS Boot Manager"/"Notebook Hard Drive", optical disc drive – "Internal CD/DVD ROM Drive") and move it to the top of the list with the key PageUp.
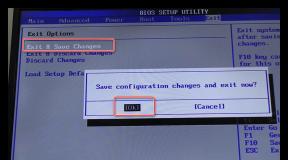
- Go to the tab "Exit" where use the option "Exit Saving Changes".


Old version
- After opening the BIOS, go to the section "System Configuration".
- Open section "Boot Options".

Scroll through the list of options and check the boxes "CD-ROM".
- Next in the block "Boot Mode" check the option "Legacy".
- Scroll down to the bottom of the page to the block "Legacy Boot Option" and press Enter. Use the arrows to highlight the desired media and the keys + /— to move it up or down respectively. Once you have established the desired order, press Enter.
- Return to section "File", in which use the item "Exit Saving Changes".


Conclusion
We looked at the methodology for enabling booting from disks on the main BIOS models of desktop computers or laptops. The procedure is quite simple in most cases, especially considering the similar names of the parameters and their locations.
It will not be possible to run from one operating system to another for a long time if there are two of them installed on the computer. After carefully studying both, sooner or later you will have to choose only one of them - main, with which the work will be carried out primarily. If for the most part only one Windows system is used, its other versions or editions located on other disk partitions, does not have to be deleted. Of course, provided that the hard drive space is not limited in size.
The ability to work in the future with other computer systems can be left, but for convenience, it is possible to simplify the entrance to the main one by removing temporarily unused ones from the boot. In this case, starting the computer will be simplified by automatically loading only the required operating system. Another option to make it easier to get started with your computer is not to remove the window for choosing to boot all systems, but to designate the desired version of Windows as the default boot one and reduce the time it takes to select other options in the boot loader window.
How to edit the boot process of several Windows operating systems installed on one computer - more on this below.
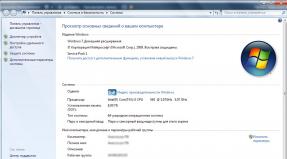
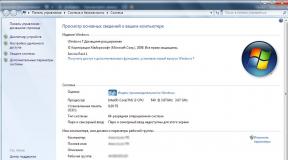
So, in our case, we have a computer with installed versions of Windows 7 and 8.1. When you turn on the computer, you see a bootloader window with a list of systems to select.
Every time you boot your computer, you can get to the desired system by making the appropriate selection. Otherwise, after a certain time has elapsed - and by default this is 30 seconds– Windows will automatically load, first on the list. In our case it is Windows 7, since it is the last one installed on the computer, and it is its bootloader, as we see, that greets us after the computer starts.
Well, let's change that. Let's set up automatic loading of the main system - Windows 8.1. To do this, of course, you need to enter it.
We need a settings section, and in Windows 8.1 you can get to it using the context menu on the button.

In the system window select Extra options.

You can also get to the settings section in Windows 7 using the context menu, but called up on the icon "Computer" in Explorer. Among the commands you must select .

In Windows 7 we also select Extra options.

The further steps in both systems are identical.
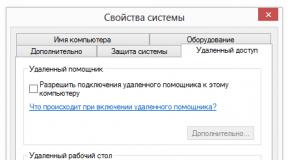
In the system properties window that appears, in the tab "Additionally" Click the parameters button in the last section.

Now you can start editing the boot of multiple systems. Change the default Windows boot from the options in the drop-down list. In our case, we change the pre-installed Windows 7 to Windows 8.1.

As mentioned, by default the Windows boot loader waits half a minute so that the user can select the operating system.

If work is primarily carried out in only one system, there is no point in leaving half a minute waiting for it to automatically load. Another operating system may not be prevented from starting, but the preset time for selecting boot options may be reduced. In displaying the list of bootable systems, in our case we will install 5 second Waiting before Windows 8.1 main system boots automatically. This time will be more than enough to make a choice if you ever need to log into Windows 7.

To completely remove another system from the boot list, you need to uncheck the option display system list. In this case, only the system selected for booting by default will boot without any time delay.

If a second operating system is ever needed, you can enter it by making this option active again.
After making changes, click "OK" at the bottom of this window, as well as at the bottom of the system properties window.

That's it - the list of loading operating systems has been edited.
Above we looked at editing the boot of existing operating systems. But often, when starting a computer, we can see a list of operating systems that are already on the computer No. This is a natural development after the second operating system was removed by simply formatting the disk partition or manually destroying system files, but at the same time The entry about the possibility of loading it in the system configuration was not removed. The boot loader may also display the option to start a non-existent main Windows after the system has been reinstalled. This, by the way, is not the main one, but one of the reasons why system specialists advise performing a so-called clean installation of Windows - without saving the files of the previous system and formatting the disk partition.
It is better to completely remove the existing operating system from the boot options so that it does not delay the process of starting the main Windows.
In the main system we call the command. In Windows 8.1, quick access to it is provided in the context menu on the button.

We need system configuration section. Enter the value in the command field:
Click "OK".

In Windows 7, you can launch the system configuration window more easily by entering a key query in the menu search field.

The system configuration window will appear, go to the tab. Select the entry about loading a non-existent system and delete it.

In our case, the download list contained different versions of Windows, and deciding which one to remove "Seven" It obviously wasn't difficult for us. But if the download list contains entries for two identical versions of Windows, the system descriptions will help you orient yourself with the one you want to remove. The Windows we are actually in will be designated as current.
Save the changes made with the button. After clicking "OK" the system will offer reboot.

After restarting the computer, we can observe immediate startup of the main system.
From time to time, PC and laptop users need to make sure that the computer boots not from the hard drive, but from a flash drive or CD/DVD. This need arises when you have to reinstall the operating system or you need to start the computer from LiveCD, LiveDVD or LiveUSB. Live images are usually downloaded from the Internet specifically for these purposes. The software from these media allows you to start your computer without installing the OS. This is very convenient in cases where the main OS has stopped working and you need to save important files remaining on the hard drive.
Before booting from a flash drive or disk, you need to go into the BIOS and switch the boot priority to a flash drive or CD/DVD drive.
A set of programs integrated into the motherboard. He is responsible for many operations, such as starting the computer, booting from a flash drive, setting up equipment and testing all systems.
There are several versions of BIOS. To a greater or lesser extent, they differ from each other in interface and functionality. Main BIOS versions:
- AWARD;
- Phoenix;
- Intel;
- UEFI.
AWARD and Phoenix
Earlier AWARD And Phoenix were different companies, but then merged into one, but BIOS continues to be produced under different brands. However, all versions are practically no different from each other. Their shell is traditionally blue, navigation is located in two vertical columns. In some versions, the names of menu items differ, but the functionality is the same. Some options may be located in other places, but if you know what exactly is required, then you can find the option without any problems.
Only version Phoenix-Award, made for laptops, is distinguished by its gray color and horizontal menu layout. All the parameters in them are similar, and if you know how to set boot from disk to AWARD, the same can be easily done on Phoenix.

Both of these versions have a rich set of settings; many functions are not available in some other BIOS versions. They also differ in audible warning signals. This has been the most popular brand in recent years and is used on most PC motherboards.
AMI
This is one of the oldest BIOS developers. For a while AMI were considered leading manufacturers, but then lost primacy to the company AWARD. However, they are most often installed on laptops.
Bios AMI Available with a shell in blue and gray colors, the menu layout may vary - it can be found both vertically and horizontally. The horizontal menu opens immediately, as soon as you hover the cursor over it, and to open the vertical menu, you need to confirm the opening with the Enter key.

The interface is similar to AWARD and on Phoenix, and at first glance they can be confused if you do not pay attention to the name. The principle of operation in them is almost identical. If you don’t know how to set the parameters in this BIOS, just remember how you did it in AWARD or Phoenix.
Intel
Company Intel developed a BIOS modification based on the version AMI. She installs only this modified version on her computers. Over time, the developers redesigned the interface, and it became more convenient and logically understandable. The interface of older versions is gray and the same as AMI, there are two types - with a horizontal or vertical menu.
Latest BIOS versions Intel They do not have a text interface, but a graphic one, they called it Visual BIOS. It has become even more convenient, and it is easy to set it to boot from a disk or from a flash drive. The new shell is made in dark colors, from dark gray to black.

This version retains all BIOS functions, and also adds the ability to use a fast startup driver, which reduces OS boot time. However, this option has disadvantages - when the driver is enabled, it is impossible to enter the BIOS using the button, and the mouse and keyboard will only work after the system is fully loaded.
UEFI
UEFI- is no longer BIOS in the direct sense, but its successor. The shell is very different from standard programs. If AMI, AWARD and even the latest versions Intel have standard, purely functional graphics, then this BIOS has a beautiful graphical interface. It is used on new machines with modern operating systems. This is a kind of software shell for all types of BIOS.

The functionality in this set of programs is much more powerful than a regular BIOS. In addition to the convenient and visually understandable interface in the running UEFI can be controlled with the mouse. The multi-language system allows you to select any language, including Russian. She also has the ability to access the Internet without booting up her computer. It is installed on new machines and works only with the latest versions of operating systems. In the options of this BIOS you can easily configure booting from a disk or flash drive.
Enter BIOS
Before setting the BIOS to boot from a flash drive or disk, you should find out how to enter it. In older machines, a common key was used to enter the BIOS and change parameters in it. But over time, many different manufacturers have appeared, and now many computers do it differently.
To enter the BIOS, you should start the computer and, without waiting for the operating system to start loading, press and do not release or continuously press a certain key. At this time, the BIOS self-test procedure occurs. A working computer usually boots up very quickly, especially the latest versions of Windows, so you should be able to do this in a few seconds.
On different computers you have to press different keys. Some BIOS versions give a hint about which one to press, but the splash screen quickly disappears from the screen. If more than one operating system is installed on the hard drive, then when selecting the OS, you can enter the BIOS. The main buttons when starting BIOS for PCs are Esc or Del, and for laptops - F2. There are other buttons or combinations of them depending on the manufacturers.
Entering UEFI mode in Windows 10
In Windows 10, it is possible to change the boot in the BIOS in UEFI mode. But only if the OS was installed taking this mode into account. Without this, you will only be able to log in in simple mode.
To enter, you must press a key during startup. However, this OS starts up very quickly and often, in order to enter the BIOS, you must first disable the fast boot options. To do this, you need to go to the Power Options Control Panel.

It is also possible to configure automatic login to UEFI. To do this you need to use the menu Start go to the folder " All parameters" and select " System update", and then click the link " Recovery" Then click on the button Reboot now and in the window that opens, select the menu “ Diagnostics» - «».

There you must select UEFI options and reboot the system. As a result of these actions, you can get to the UEFI menu after a reboot.
How to install boot from a flash drive or disk in AWARD
After you have launched the BIOS, you can begin to act. The only controls here are arrows to move the cursor, Enter keys to select and Esc to exit. If you must boot from a flash drive, then first of all you should make sure that the USB controller is turned on. Use the keys to move to the section " Integrated Peripherals" There you need to select the item “ USB Controller" It should be remembered that " Disabled" means disabled, and " Enabled" - included. Select USB Controller 2.0 and enable it if it is disabled. To exit this tab, press the Esc key.

Then select the download. Open the tab " Advanced BIOS Features" In different BIOS versions, this item may be called differently, for example, simply “ Advanced" or " Features Setup" In it we open the section “ Hard Disk Boot Priority" The media from which the computer will boot first will be indicated there. By default, this is the system hard drive. Using the cursor, select the flash drive that should be in the USB port, preferably not in the front, but in the back, and move it up using the + sign on the keyboard. Press the Esc key. Then in the line " First Boot Device" you should switch the parameter to " USB-HDD" or " USB-FDD"if the first option doesn't work.

Then you need to exit the BIOS, saving the changes. If you set the boot priority to " CDROM"in the BIOS, then it will boot from the disk.

After turning on, the computer will begin to execute the command loaded onto the flash card when selecting USB-HDD or CD/DVD.
After finishing working with the flash drive or disk and before starting the laptop or computer in normal mode, you need to repeat the procedure. In this case, you will again need to make a priority boot from the hard drive, return all parameters through the BIOS and save them.

Setting up other types of BIOS
To understand how to boot a computer from a disk or flash drive using AMI or other types of BIOS, just repeat the steps described above.
BIOS settings in Phoenix, AMI and Intel are practically no different, except that the menu may be located differently and the tabs may have different names. For example, the tab " USB Controller" in AMI is called " USB Configuration", and the tab itself is located in the menu " Advanced", but not " Integrated Peripherals", as in AWARD.

And the Phoenix-Award BIOS differs from all others in that the “ Advanced BIOS Features» contains all boot disks and many other functions at once, so there is no need to move to other partitions. In some versions, loading from a flash drive and disks is located in the “ Boot».
How to load programs from a flash drive into UEFI BIOS
When you enter a modern version of the BIOS, a program with good graphics will open. It is controlled by both cursors and the mouse. The first thing you do is set the Russian language, and a lot will become clear even for those who have little knowledge of computers.
UEFI also has several versions, and they may also differ in menu layout, but in general everything is clear and understandable. Before you set priority boot from a flash drive or DVD, you need to go to the “ Boot"in some versions, or in " Device boot priority"in others. In some versions, you can simply drag the icon of a flash drive or disk with the mouse to designate it as a priority boot device.

In general, everything is done in the same way as was described using the AWARD example. First, we check whether the DVD drive or flash drive is turned on, then we set priority boot, save the settings, and after that the computer reboots. In UEFI BIOS, after the computer has booted from a flash drive or disk, you will also need to return the settings to default.
Conclusion
This article reviewed the main BIOS versions from different manufacturers. There are situations when the computer must boot from a flash drive or disk. The boot priority is set in the BIOS. The question of how to boot a computer from a flash drive was considered. The computer is booted from a disk in the same way.
Video on the topic
Reading time: 6 minutes. Views 854 Published 02/02/2017
In order to install the operating system on your computer, you need to configure it to boot from a flash drive or disk. Therefore, in today’s article we will look at how to enable booting from a flash drive in the BIOS. This must be done to begin installing Windows. Because if you just insert a bootable USB flash drive with the system, nothing will happen. Your old OS will start loading. If you have not yet downloaded the latest version of the operating system, then read the article - How. Let's now proceed directly to the setup process itself.
We use the Boot Menu to boot from a flash drive.
After restarting the computer, it is not always necessary to go into the motherboard BIOS for configuration. First, let's try to use the Boot Menu. To do this, before the system starts to boot, you must press the “F8” key, thereby a special window should appear with a list (boot menu) of connected drives. In this menu you need to select our flash drive with the OS recorded on it.
After this, it should begin, namely copying the installation files to the hard drive. After the computer reboots itself, Windows installation will begin from the hard drive.
If for some reason you are unable to open the boot menu, then let’s start figuring out how to set the BIOS to boot from a flash drive. But first, I want to briefly tell you what a BIOS is. 
BIOS (basic input/output system - “basic input/output system”)- a special set of embedded software that implements the application programming interface necessary for working with computer components and devices connected to it. 
In order to get into the BIOS settings, you need to have time to press the “Delete” or “F2” button or any other button, depending on when the computer is initially booting. At this point in time, the monitor will display the logo of the motherboard manufacturer or information about the processor, memory and hard drives. In this case, something like this will be written at the bottom of the screen:
- "Press Del to enter Setup"
- “Press F2 for Settings” or similar.
After clicking one of the buttons, you will be taken to the BIOS settings. Depending on the board, the software of the basic I/O system may vary. I propose to consider the most popular options, and also configure them to boot from a flash drive.
If your board has an AMI BIOS installed, then in order to set the disk loading order, you and I need to perform the following steps:

Note! The flash drive must be connected before you enter the BIOS, otherwise it will not be detected for you.

If your motherboard has AWARD or Phoenix BIOS, then to configure Windows boot from a flash drive, follow these steps:

Many modern laptops have the InsydeH2O BIOS installed, and many are faced with the problem of setting the disk boot order. Let's look at this problem together. We will carry out everything point by point so as not to make mistakes.

Note! If you need to install booting from a CD or DVD, then you need to put “Internal Optic Disc Drive” in the first place.
- After the settings have been made, go to the “Exit” menu section and select the “Save and Exit Setup” item, thereby we will save the changes made and exit the BIOS.
Currently, many motherboard manufacturers install, instead of the usual BIOS, UEFI software, which has a graphical interface, as well as support for mouse control and a Russified menu. This makes it easier for us to solve the problem of how to set the BIOS to boot from a flash drive.
If you are lucky, and when you go into the BIOS you see that the graphical interface has loaded in front of you, then you need to go to additional settings by pressing the “F7” key or the corresponding button in the main window. In the menu that appears, you need to go to the “Loading” tab and in the “Disk loading order” item, put our bootable flash drive in first place. 
After the changes have been made, press the “F10” key and select “Save settings and restart the computer.”
Let's summarize.
In today's article, we looked at how to set the BIOS to boot from a flash drive. At the same time, I tried to show in as much detail as possible how this is done in different BIOS versions. As a rule, all settings boil down to placing the bootable USB flash drive or disk with the system first in the queue. Many users have difficulties with this, since the interface is in English. But as you can see, developers are doing everything possible to adapt the BIOS for all users. This is clearly visible in the new UEFI software.