Installing hp laserjet 1020 drivers. If drivers have already been installed on your PC
Get rid of old unsuccessfully installed drivers:
— Open Print Management (START -> Administration -> Print Management).
- Right-click on any instance of the HP 1020 driver and click the “Uninstall Driver Package...” button. If a message appears that the printer is in use and cannot be removed, restart your computer and try again.
Download Vista x64 drivers: Selecting software and drivers - choose from the two available, use a print driver package, not a Plug And Play package
Make sure the printer is not connected. Run the driver installer so that you remember the folder where the files are installed (usually “C:/Program Files (x86)/Hewlett-Packard/Laserjet 1020_1022 drivers”)
Connect the printer. Windows 7 should detect the printer and then state that it was not installed successfully.
At this point the HP 1020 should show up in Device Manager
Right click on it -> Properties
- On the "General" tab, click the "Change" button (or any button at the bottom of the window... I can't restore it after the printer is installed correctly). This will make the “Update Driver” button active in the second “Driver” tab.
- Click the "Update Drivers" button and then select "Browse this computer for driver software" and specify the folder path (step 4), then click OK
After this, the HP 1020 should be fully functional on your Windows 7 x64.
Now you need to get it working correctly for your entire network
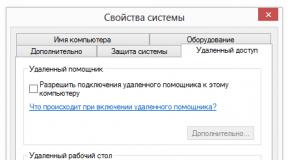
Go through the Control Panel to the "Printers" section, right-click on the HP 1020, and select "Printing Preferences" (not just "Properties", they are different). Go to the “Access” tab and make sure that the “Sharing this printer” and “Rendering print jobs on client computers” checkboxes are both checked.
If you are working on a network with Vista x86 or Windows 7, make sure that you have installed x86 drivers by clicking the "Additional Drivers" button in the same "Access" tab. Click on the "x86" checkbox, then click OK. In the next window, go to the folder containing x86 drivers for HP 1020 (They should already be downloaded and unpacked in some folder in advance).
Here's the tricky part... It looks like HP Print Monitor is interfering with the printer's access to other Vista/Win7 computers on the network and their printing is just hanging in the queue. This should be disabled:
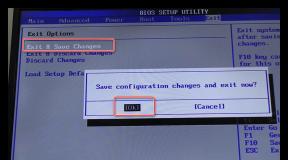
- Open the registry editor (click Start - Run and type "Regedit"
— Go to the next section:
“HKEY_LOCAL_MACHINE/SYSTEM/CurrentControlSet/Control/Print/Monitors”
and then delete the folder "HPLJ1020LM"
- Close Registry Editor, and then in Windows Explorer, navigate to the “C:/WindowS/system32” folder. Rename the file "ZLhp1020.dll" to something like "ZLhp1020old.dll".
— Restart your computer
You are now ready to install shared printer drivers on computers on your network. If you have already tried to install drivers on other computers, completely remove them according to step 1 in the previous paragraph before continuing
If you use Homegroups, a computer on the Windows 7 network should find the printer and give you the option to install it right away. If not, or if you are using a Vista computer, use a network browser to navigate to the shared printer and double-click it. You should be prompted to install the driver. Click OK or the drivers will be installed.
If all is well, you should have a working HP 1020 over the network. I noticed, however, that the HP driver's "duplex" control worked when HP Print Monitor was disabled. I can't help it...will have to wait for HP to release Windows 7 x64 Drivers.
Phew... I hope I told you everything I wanted to say! Good luck. Good luck.
Taken here http://ddriver.ru/kms_forumd+topic+forum-15+ids-598.html
Many users, when purchasing additional hardware for their PC, neglect to configure it. As a result, it does not work or works, but not as we would like. This article will focus on the HP Laserjet 1020, a popular model of printing devices. By following simple instructions, you can quickly install a new device.
The user can install and configure the HP Laserjet 1020 printer independently.
The word “install” should not mean placing the printer in a treasured place on the table next to the computer, but the installation of special software - drivers. Without them, nothing will be printed. “Firewood” can be supplied in several ways:
- from disk;
- from the official website;
- through a special utility.
You don't always have to do it yourself. HP Laserjet 1020 printer is a new generation. It is possible that after connecting it to the network and to the PC via USB, the download will start automatically. If this does not happen - the documents do not want to be printed - we do it manually.
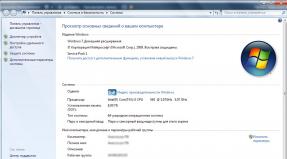
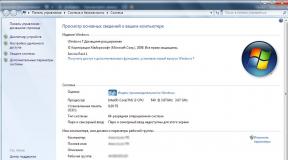
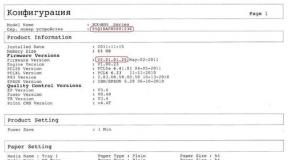
Before you start installing the “firewood”, you need to find out the version and . They can be viewed through the Control Panel in the “About the System” section. This is required so that the program can install the appropriate software.

Installation from disk
This is the easiest way if you purchased a completely new machine and have not connected similar ones to your PC before. All that is required is to insert the CD that comes with the kit and follow the installer's instructions. Important note: you need to load “firewood” only when the device is disconnected from the PC. Otherwise, the programs may not load correctly and you will have to reinstall them.
Via HP website
You can install the required software without a disk. It is not always included with the printer, especially if you bought it secondhand or didn’t buy it at all. In this case, the right solution would be to download the necessary files through the official resource. We go to the HP company website and find our HP Laserjet 1020 there, using the search.

Select “Drivers”, then our system and download the software, which we then install.

You can use the auxiliary utility that will be offered on the site.
If drivers have already been installed on the PC
It happens that the computer already has the necessary software, but in an outdated version. It slows down the installation of new “firewood”; however, the device does not function in this mode. Therefore, the old software must be removed. A special utility will help with this - HP Print and Scan Doctor. Download it again for free from the official HP website. The utility will clean your PC of old auxiliary programs and install new ones in their place.
This completes the basic installation and setup of the HP Laserjet 1020. After this, you will be able to print all files without any problems. To make it the default, you should check the required box on this device through the Control Panel in the “Printers and Faxes” section.
HP LaserJet 1020 Driver is not a software upgrade. It is a full software solution for your printer. If a prior version software is currently installed, it must be uninstalled before installing this version.
Drivers for / Treiber für / Drivers for / Ovladače pro / Sterowniki do HP LaserJet 1020 Printer.
Release details:
Driver: HP LaserJet Full Feature Software and Driver
Version: v1601
Filename: hp_LJ1020_Full_Solution-v2012_918_1_57980.exe
File size: 80.2 MB
Updated: Jan 6, 2016
Released: Jan 6, 2016
HP LaserJet 1020 Driver Windows 10: Free
Utility – Diagnostic Tools
The HP Print and Scan Doctor is a tool designed and developed by HP to provide users with troubleshooting and problem-solving features.
Utility: HP Print and Scan Doctor for Windows 10
Version: 5.2
Filename: HPPSdr.exe
Size: 10 MB
Why do you need this Driver?
You need a printer driver to control the functionality of your HP printer from your PC, Laptop or tablet. Without drivers either your printer won’t work or it will not work smoothly with all features. If you bought a new printer or you are upgrading your operating system, you need the latest printer driver to utilize all features of your printer.
How to install HP LaserJet 1020 Driver?
- Close all HP software/programs running on your computer.
- Uninstall your current version of HP Print Driver for HP LaserJet 1020 Printer.
- Click on the above download link and save the file to your hard disk.
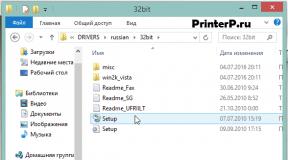
- Double click on the downloaded file. This will extract all the HP LaserJet 1020 driver files into a directory on your hard drive.
- Follow the on-screen instructions proved by HP to proceed installation.
HP LaserJet 1020 is an affordable monochrome laser printer for home users. If you have limited printing requirements every month then this is for you. For its price, it is a printer that delivers the job.
It comes with a 234 MHz processor and just 2 MB of on-board memory. The Processor and on-board memory are not the best among its competition. You can get a better configuration by spending $20-50 more.
The LaserJet 1020 measures just 370 mm (14.6 inches) wide, 242 mm (9.5 inches) deep, and 209 mm (8.2 inches) tall. It weighs a light 11 pounds and with 2000 page cartridge installed 13.0 lb. Samsung ML-2250 has a default 300-sheet capacity with a maximum of 550 sheets. Even HP's own LaserJet 1022, which is $20 dearer, holds 250 sheets.
One can keep 150 sheets of regular weight 75 g/m2 (20-lb paper) in the main input tray of the HP LaserJet 1020 printer. Its priority feed slot capacity is 10 sheets of paper up to 163 g/m 2 (43 lb). The Top output bin can hold up to 100 sheets of regular weight 75 g/m 2 (20-lb paper).
It prints text at a rate of 14 pages per minute (A4 Pages). The first page comes out in as low as 10 seconds. As compared to Samsung ML-2571N text printing speed is slow, while faster than . HP LaserJet 1020 printer uses a black cartridge (print cartridge number Q2612A) with 2000-page capacity.
If you have a problem/issue with HP Laserjet 1020 comment on this page, our experts will get back to you with solutions.
These instructions are intended for those who want to start using the HP LaserJet 1020 printer and cannot understand why it is not working. The reason is the lack of special software. For the device to work, you need to download the HP LaserJet 1020 driver and install it. You can get the distribution from this page. Use the download link located a little higher.
Now you need to run the saved program. You will see the first window where the text of the license agreement is presented. You can study it, but you don't have to. You need to click the mouse in an empty square. A check mark will appear there and you can click on “Next”. Do it.

The program will be installed. Wait until this process finishes. A new window will appear on its own.

Now connect the printer to your computer, connect it to a power outlet and turn it on using the button on the case. To connect the device to a computer and the network, wires are included in the kit. When the equipment is turned on, the system will “see” it and complete the installation itself. You will understand that you can print when the installer window closes. If problems occur, restart Windows. Enjoy your use.

There is no need to press anywhere; when the system “sees” the printer, it will finish the settings and the window will close itself. You can use new equipment.