I can't find secure boot in the BIOS. Fixing Secure Boot errors
Hello admin, the question is, on a new laptop Acer Aspire V5 I want install the Windows 7 operating system instead of Windows 8.1, I know that to do this you need to disable the Secure Boot option in the BIOS and enable the Legacy extended boot mode.
I act like this, insert the Windows 7 installation flash drive into the laptop and reboot, press F2 when loading and enter the UEFI BIOS, but the Secure Boot option is blurred (grayed out), that is, inactive, and it is not clear how to switch it to Legacy mode.My bootable USB flash drive is not visible in the BIOS.If you press F12 when booting the laptop and enter the boot menu, the flash drive is also missing there.
Hi all! I want to restore my new Acer Aspire laptop to factory settings, but before that I need to remove my files from the Windows 8.1 desktop, because restoring the factory configuration from the drive (C:) will delete everything. I boot the laptop from a flash drive on which the Linux operating system is located, but there is no flash drive in the boot menu (F12). On your website they say that you must first set the administrator password in the BIOS, then disable the Secure Boot option, and only then will you be able to boot the laptop from a flash drive. All this is somehow tricky, can you tell me how to do everything correctly?
How to disable Secure Boot on an Acer Aspire laptop. How to remove the password on the BIOS of an Acer laptop
Hello friends! I want to dissuade the author of the first letter from replacing Windows 8.1 with Windows 7, in my opinion there are not so many disadvantages of the eight that it would be so easy to remove it from a new laptop at once, but, as they say, the master is the master and the solution After you.
But the author of the second letter will have to disable Secure Boot, because most Linux distributions will not be able to pass the secure boot protocol! By the way, here’s a good one, which Secure Boot will not be a hindrance.
By pressing a key F2 When loading, go to the UEFI BIOS, go to the tab Main, set the option F12 Boot Menu in Enabled, with this action we allow the laptop boot menu to appear when you press the F12 key.

Next, go to the tab Security, go down to the option Set Supervisor Password and press the Enter key, enter the password in the upper field (we will reset it later) and press Enter In the lower field, enter the same password and click again Enter. To message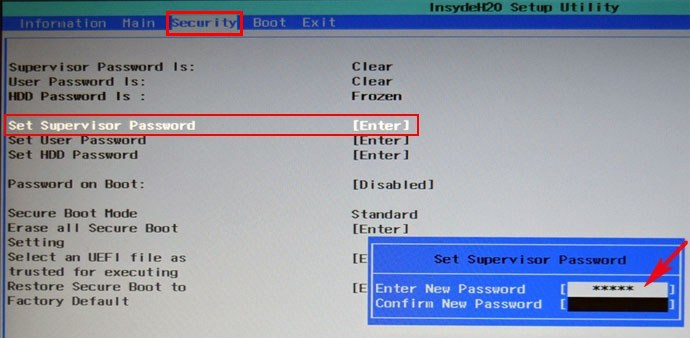


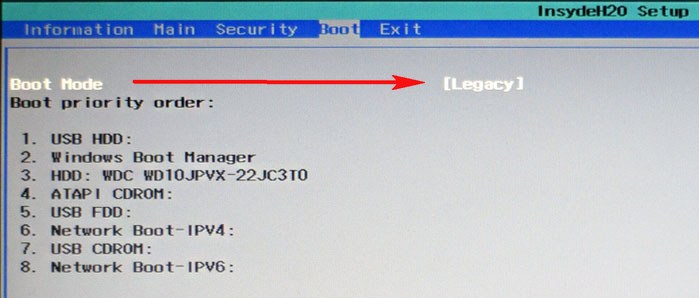
Now let's go to the tab Boot. Select the option Boot Mode(located in position UEFI), choose Legacy
And Confirm your choice. 

We remove the password on the BIOS of an Acer laptop, the ability to disable/enable Secure Boot remains
There is one unpleasant moment in this whole story: if you suddenly want to get into the BIOS of the laptop, you will have to enter the password you created,

as they say, nafik is necessary, because you can forget it.
We enter the BIOS, go to the tab Security , go down to the option Set Supervisor Password and press the Enter key, enter the password we created in the first field, and press Enter.


message comes out
Changes have been saved, confirm.
That's it, the password has been reset.
Press the F10 key to save the settings changes and reboot; the ability to disable/enable Secure Boot remains.
Having penetrated a computer, most malicious programs usually begin to do their dirty work after the main components of Windows have started, but there are also viruses that launch even before the system starts. This is what bootkits do - malicious programs that change the boot sector on a hard drive. It is not always possible to detect the presence of a bootkit using the usual methods used by most antivirus tools. Having acquired maximum privileges in the system, bootkits gain control over many processes and easily bypass protection.
However, there are ways to protect against bootkits. One of the most effective technologies for protecting against this type of malware is Secure Boot technology, part of the UEFI 2.2 specification. The essence of its work is to prevent the downloading of uncertified software code. When any program or operating system tries to load into the computer's memory, Secure Boot compares the boot code signature with the keys hardcoded directly into the BIOS and, if the boot code does not pass the signature check, the boot is immediately blocked.
The appearance of Secure Boot, however, was met with mixed reactions. In particular, much controversy was caused by the introduction of this technology in Windows 8 by Microsoft in 2012. There were concerns that due to Secure Boot, it would be impossible to install another operating system on a computer with Windows 8 preinstalled. This is, of course, not true. All desktop computers and laptops certified for installation support disabling Secure Boot at the BIOS level. The only exceptions are tablets with ARM architecture and pre-installed Windows 8. You cannot disable Secure Boot on them.
How to disable Secure Boot
Depending on the device manufacturer, the Secure Boot option may be located in different BIOS/UEFI sections. On Asus computers, this option is most often located in the Boot or Security section. In another option, you need to go to Boot -> Secure Boot -> OS Type and select Other OS. On HP machines, the Secure Boot option is usually located in the System Configuration -> Boot Options section; on Dell laptops, look for the setting in the Boot -> UEFI Boot section.

On Lenovo and Toshiba laptops, the option to disable Secure Boot is most often located in the Security section. But with Samsung laptops everything is a little more complicated. Secure Boot in them is disabled in the Boot section, but you will also need to agree to the warning about a possible error when booting the computer, then select the OS Mode Selection parameter that appears, press enter and set it to CMS OS or UEFI and Legacy OS. And one last thing. After disabling the Secure Boot function, regardless of the device model, you will need to find and enable Legacy compatibility mode.
Happy owners of modern laptops running the Windows 10 operating system may unexpectedly encounter errors that arise in the operation of various applications due to the Secure Boot feature enabled on the device by default. Problems may also arise when trying to boot from an installation flash drive or disk. Let's figure out together what this function is and how to disable Secure Boot in Windows 10 if you need to reinstall the pre-installed OS, or if you have problems launching games and programs on the device.
So, at the beginning I will give a little theory so that you understand what we are dealing with.
Secure Boot
The Secure Boot protocol, or “safe boot” in Russian, is part of the UEFI (Unified Extensible Firmware Interface) specification. The meaning of its action is quite simple. The system storage contains signatures of executed UEFI images. When loading the operating system, the signatures are compared with the reference ones and, if they do not match, the loading does not occur. Roughly speaking, UEFI is an intermediate interface between the operating system and special low-level firmware, designed to correctly initialize the hardware when the PC is turned on and then transfer control to the Windows bootloader.

Despite the fact that initially the protocol is not mandatory for implementation by manufacturers, back in 2011, in connection with the release of Windows 8, Microsoft included Secure Boot using a Microsoft key in the requirements for certification of computers running its operating systems. Therefore, you shouldn’t be surprised why most modern laptops from Acer, Asus, HP, Lenovo, MSI, etc. I can't just reinstall the system.
Disabling Secure Boot in BIOS UEFI
When you turn on a modern laptop, the operating system usually starts immediately. The black screen, like on old computers, with the invitation to press a button to enter the BIOS does not appear. What to do and how to disable Secure Boot in Windows 10?! That's how!
Open System Settings and go to the section Update and Security >> Recovery. There will be a point here Special download options.

Here you will need to click on the “Restart now” button. After the computer restarts, a blue window will appear with a choice of action options:

We need to select an item Diagnostics >> Advanced options, then click on the tile and agree to reboot. Only after these steps in Windows 10 will you be able to get into the laptop’s BIOS.

Now you will need to open the “Boot” section and find the item there Secure Boot and give it a value Disable.
Note: Despite the fact that the BIOS menu may vary slightly for different laptops, do not be alarmed! The principle of operation is the same everywhere!
Video tutorial: How to disable Secure Boot in BIOS on an Acer laptop
BIOS is a menu through which you can manage your computer's system configurations, and you can also access all information about your computer, from the drive model to the real-time temperature inside the processor. It is important to remember that if you are not confident in your abilities, it is better to trust any procedures with your device to specialists Acer laptop repair.
The BIOS shell also controls the startup of the computer and loading of the operating system. One of the configurations that is responsible for loading Windows is Secure Boot. This option prevents unauthorized software products from running on your computer. But, as a rule, there are situations when this configuration prevents the launch of the necessary components, for example, an installation flash drive. In this case, Secure Boot must be disabled. We will tell you exactly how to do this.
Manual for disabling Secure Boot in BIOS on an Acer laptop
- To disable Secure Boot in the BIOS, first you need to open this menu. To enter it, you need to restart your laptop computer, and during startup, before starting the operating system, press the F2 function key or the DEL button, depending on the device model.
- You are now in the BIOS menu. Next, use the right and left arrows to navigate to the “Security” tab, then select “Set Supervisor Password” and press Enter. In the field that appears, set the password, then repeat it in another window and press Enter.

- Go to the “Secure Boot” item and set the value to “Disabled” so that the parameter is not active. To, on the contrary, enable the Secure Boot parameter, you need to set the value to “Enabled”.

- Next, in the “Boot” section, find the “Boot Mode” parameter and change the “UEFI” mode to “Legacy”.

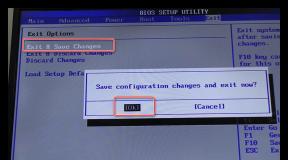
- After completing all the steps, you need to save the changes and exit the BIOS menu.
After changing this configuration, you will be able to boot from any removable media.