How to set boot from disk in BIOS or uefi. Selecting a boot disk in bios Is it possible to boot without BIOS
Often, when repairing a computer, it is necessary to change the boot device. For example, you need to install Windows with CD/DVD or with flash drives,
To change the boot priority of a particular device there is nothing complicated, just follow the instructions and everything should work out.
The first thing you need to do is get into the BIOS itself, you can do this when you turn on the computer and click on DEL (delete), other login buttons can also be used BIOS, please note at the bottom of the screen there is a hint Press BUTTON to enter SETUP. In most cases these are the DEL (delete) and F2 keys, rarely F1,
Let's look at two bios options AMI and Award.
There is a window in front of you
There is a window in front of you

Select an item BOOT then select Boot Device Priority.


1st Boot Device – First device
2nd Boot Device – Second device
3rd Boot Device – Third device and so on
The priority of loading devices is displayed sequentially; if it is not possible to boot from the first device, then boot from the second device will proceed, and so on.
To change the order of devices, select the first item and click ENTER, then use the arrows to select the device that needs to be loaded first.
Having made all the necessary changes, exit the item (button ESC), then select EXIT. The last two actions can be performed by pressing F10- is to get out of BIOS and save changes. To the question “Save configuration changes and exit now?” We answer OK (press Enter).
The computer will reboot and start booting from the device you installed first.
To change the loading order, select with arrows Advanced BIOS Features.

The sequential boot order of the devices is also displayed here

First Boot Device
Second Boot Device - Second device
Third Boot Device - Third device
Select the first device and click ENTER, select the required device from the list, press again ENTER.
Next we leave the point Advanced BIOS Features go to the save and exit point - Save & Exit Setup. Or just click F10. When asked to save the changes we have made, we answer Yes, the letter Y. The computer will reboot and start booting from the first device you set.
If something goes wrong for you, you can always use the “Restore default settings” option. Load Optimized Defaults or Load Setup Defaults.
More from my site
More from my site
If you are just starting to master the computer and don’t even know yet, how to install the program, then I’m sure after reading this article you will no longer have questions on this topic. Installation of different programs may differ, but it is almost the same everywhere, and in fact, installing a program is much easier than some beginners think at the beginning of their journey.
In general, it is worth saying that if you do nothing, but simply follow the usual instructions in the windows when installing programs, that is, simply click the available buttons: “Next”, “Next” or “OK”, then you can easily install the program. But we decided to learn, right? And we need to know what actions lead to what when installing programs.
Installation of programs. Example!
Now, using the example of installing a real program, let's look at how this is done correctly.
Then from the Internet or from some disk, we usually have a file like this on our computer.

First of all, you need to launch it by double-clicking the left mouse button. The first window will open. In 99% of cases this window " Software Installation Wizard", where we are greeted. There we can see the name of the program, and sometimes we are reminded that it is advisable to close other applications before installation. In this window we need to click the “Next” button.

Almost always when installing programs, we need to check the box “ I accept the terms of the license agreement", well, that means that we agree with the rules for using this program. Here's an example:

The next window that is always present during installation is folder selection. During the installation process of the program, a window should appear indicating where the files will be copied for its full operation.
Usually the program is installed on the system drive “C” in the “Program Files” folder. You can of course change this path by clicking the "Browse" button and selecting the folder where you want install the program. I usually leave it as is, that is, by default! And all the installed software is in the “Program Files” folder on the “C” drive.

Very often when installing free programs, they are trying to install some additional applications for us, or change the start page in the browser. Pay attention to this, and if you don’t need such additions, then uncheck the extra boxes, and only then click “Next”.

Another window that is always present, and usually after installing the program, is a window in which you need to leave checkboxes next to the items that interest us. For example, this could be creating a shortcut on the desktop, or a program folder in the start menu, and so on. Read and everything will be clear.

The most important stage is the one itself, during which the necessary files are copied.

In the last window, after everything has been copied and installed, we are prompted to click the “Finish” button and the program will start if we have not unchecked the corresponding box.

We have now described the main windows that appear when installing programs. In different cases they may differ, but the essence remains the same. There are also other issues: windows for selecting the program language, installing an add-on, where you need to uncheck it, etc.
After installing 5 – 10 different programs, thoughtfully and independently, you will no longer have questions about which window to do what, and roughly speaking, the brain itself will develop the necessary actions.
And a shortcut to launch the installed program usually appears on the desktop.
From time to time, PC and laptop users need to make sure that the computer boots not from the hard drive, but from a flash drive or CD/DVD. This need arises when you have to reinstall the operating system or you need to start the computer from LiveCD, LiveDVD or LiveUSB. Live images are usually downloaded from the Internet specifically for these purposes. The software from these media allows you to start your computer without installing the OS. This is very convenient in cases where the main OS has stopped working and you need to save important files remaining on the hard drive.
Before booting from a flash drive or disk, you need to go into the BIOS and switch the boot priority to a flash drive or CD/DVD drive.
A set of programs integrated into the motherboard. He is responsible for many operations, such as starting the computer, booting from a flash drive, setting up equipment and testing all systems.
There are several versions of BIOS. To a greater or lesser extent, they differ from each other in interface and functionality. Main BIOS versions:
- AWARD;
- Phoenix;
- Intel;
- UEFI.
AWARD and Phoenix
Earlier AWARD And Phoenix were different companies, but then merged into one, but BIOS continues to be produced under different brands. However, all versions are practically no different from each other. Their shell is traditionally blue, navigation is located in two vertical columns. In some versions, the names of menu items differ, but the functionality is the same. Some options may be located in other places, but if you know what exactly is required, then you can find the option without any problems.
Only version Phoenix-Award, made for laptops, is distinguished by its gray color and horizontal menu layout. All the parameters in them are similar, and if you know how to set boot from disk to AWARD, the same can be easily done on Phoenix.

Both of these versions have a rich set of settings; many functions are not available in some other BIOS versions. They also differ in audible warning signals. This has been the most popular brand in recent years and is used on most PC motherboards.
AMI
This is one of the oldest BIOS developers. For a while AMI were considered leading manufacturers, but then lost primacy to the company AWARD. However, they are most often installed on laptops.
Bios AMI Available with a shell in blue and gray colors, the menu layout may vary - it can be found both vertically and horizontally. The horizontal menu opens immediately, as soon as you hover the cursor over it, and to expand the vertical menu, you need to confirm the opening with the Enter key.

The interface is similar to AWARD and on Phoenix, and at first glance they can be confused if you do not pay attention to the name. The principle of operation in them is almost identical. If you don’t know how to set the parameters in this BIOS, just remember how you did it in AWARD or Phoenix.
Intel
Company Intel developed a BIOS modification based on the version AMI. She installs only this modified version on her computers. Over time, the developers redesigned the interface, and it became more convenient and logically understandable. The interface of older versions is gray and the same as AMI, there are two types - with a horizontal or vertical menu.
Latest BIOS versions Intel They do not have a text interface, but a graphic one, they called it Visual BIOS. It has become even more convenient, and it is easy to set it to boot from a disk or from a flash drive. The new shell is made in dark colors, from dark gray to black.

This version retains all BIOS functions, and also adds the ability to use a fast startup driver, which reduces OS boot time. However, this option has disadvantages - when the driver is enabled, it is impossible to enter the BIOS using the button, and the mouse and keyboard will only work after the system is fully loaded.
UEFI
UEFI- is no longer BIOS in the direct sense, but its successor. The shell is very different from standard programs. If AMI, AWARD and even the latest versions Intel have standard, purely functional graphics, then this BIOS has a beautiful graphical interface. It is used on new machines with modern operating systems. This is a kind of software shell for all types of BIOS.

The functionality in this set of programs is much more powerful than a regular BIOS. In addition to the convenient and visually understandable interface in the running UEFI can be controlled with the mouse. The multi-language system allows you to select any language, including Russian. She also has the ability to access the Internet without booting up her computer. It is installed on new machines and works only with the latest versions of operating systems. In the options of this BIOS you can easily configure booting from a disk or flash drive.
Enter BIOS
Before setting the BIOS to boot from a flash drive or disk, you should find out how to enter it. In older machines, a common key was used to enter the BIOS and change parameters in it. But over time, many different manufacturers have appeared, and now many computers do it differently.
To enter the BIOS, you should start the computer and, without waiting for the operating system to start loading, press and do not release or continuously press a certain key. At this time, the BIOS self-test procedure occurs. A working computer usually boots up very quickly, especially the latest versions of Windows, so you should be able to do this in a few seconds.
On different computers you have to press different keys. Some BIOS versions give a hint about which one to press, but the splash screen quickly disappears from the screen. If more than one operating system is installed on the hard drive, then when selecting the OS, you can enter the BIOS. The main buttons when starting BIOS for PCs are Esc or Del, and for laptops - F2. There are other buttons or combinations of them depending on the manufacturers.
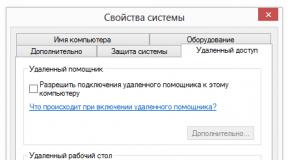
Entering UEFI mode in Windows 10
In Windows 10, it is possible to change the boot in the BIOS in UEFI mode. But only if the OS was installed taking this mode into account. Without this, you will only be able to log in in simple mode.
To enter, you must press a key during startup. However, this OS starts up very quickly and often, in order to enter the BIOS, you must first disable the fast boot options. To do this, you need to go to the Power Options Control Panel.

It is also possible to configure automatic login to UEFI. To do this you need to use the menu Start go to the folder " All parameters" and select there " System update", and then click the link " Recovery" Then click on the button Reboot now and in the window that opens, select the menu “ Diagnostics» - «».

There you must select UEFI options and reboot the system. As a result of these actions, you can get to the UEFI menu after a reboot.
How to install boot from a flash drive or disk in AWARD
After you have launched the BIOS, you can begin to act. The only controls here are arrows to move the cursor, Enter keys to select and Esc to exit. If you must boot from a flash drive, then first of all you should make sure that the USB controller is turned on. Use the keys to move to the section " Integrated Peripherals" There you need to select the item “ USB Controller" It should be remembered that " Disabled" means disabled, and " Enabled" - included. Select USB Controller 2.0 and enable it if it is disabled. To exit this tab, press the Esc key.

Then select the download. Open the tab " Advanced BIOS Features" In different BIOS versions, this item may be called differently, for example, simply “ Advanced" or " Features Setup" In it we open the section “ Hard Disk Boot Priority" The media from which the computer will boot first will be indicated there. By default, this is the system hard drive. Using the cursor, select the flash drive that should be in the USB port, and preferably not in the front, but in the back, and move it up using the + sign on the keyboard. Press the Esc key. Then in the line " First Boot Device" you should switch the parameter to " USB-HDD" or " USB-FDD"if the first option doesn't work.

Then you need to exit the BIOS, saving the changes. If you set the boot priority to " CDROM"in the BIOS, then it will boot from the disk.

After turning on, the computer will begin to execute the command loaded onto the flash card when selecting USB-HDD or CD/DVD.
After finishing working with the flash drive or disk and before starting the laptop or computer in normal mode, you need to repeat the procedure. In this case, you will again need to make a priority boot from the hard drive, return all parameters through the BIOS and save them.

Setting up other types of BIOS
To understand how to boot a computer from a disk or flash drive using AMI or other types of BIOS, just repeat the steps described above.
BIOS settings in Phoenix, AMI and Intel are practically no different, except that the menu may be located differently and the tabs may have different names. For example, the tab " USB Controller" in AMI is called " USB Configuration", and the tab itself is located in the menu " Advanced", but not " Integrated Peripherals", as in AWARD.

And the Phoenix-Award BIOS differs from all others in that the “ Advanced BIOS Features» contains all boot disks and many other functions at once, so there is no need to move to other partitions. In some versions, loading from a flash drive and disks is located in the “ Boot».
How to load programs from a flash drive into UEFI BIOS
When you enter a modern version of the BIOS, a program with good graphics will open. It is controlled by both cursors and the mouse. The first thing you do is set the Russian language, and a lot will become clear even for those who have little knowledge of computers.
UEFI also has several versions, and they may also differ in menu layout, but in general everything is clear and understandable. Before you set priority boot from a flash drive or DVD, you need to go to the “ Boot"in some versions, or in " Device boot priority"in others. In some versions, you can simply drag the icon of a flash drive or disk with the mouse to designate it as a priority boot device.

In general, everything is done in the same way as was described using the AWARD example. First, we check whether the DVD drive or flash drive is turned on, then we set priority boot, save the settings, and after that the computer reboots. In UEFI BIOS, after the computer has booted from a flash drive or disk, you will also need to return the settings to default.
Conclusion
This article reviewed the main BIOS versions from different manufacturers. There are situations when the computer must boot from a flash drive or disk. The boot priority is set in the BIOS. The question of how to boot a computer from a flash drive was considered. The computer is booted from a disk in the same way.
Video on the topic
Let's look at how to boot from a flash drive to install Windows or restore the system.
Insert the bootable USB flash drive into the USB port and restart your computer. Your main task at this stage is to change the boot priority so that the flash drive starts first, not the hard drive. This is done in two ways:
- Selecting a device through the Boot Menu (called by pressing the F8, F11, F2 or Esc key pressed immediately after starting the computer).
- Changing the boot priority in BIOS BIOS is a program built into the motherboard that allows you to change some hardware parameters (for example, disk boot priority) at the hardware level..
The first method is much more convenient, since it does not require subsequent rebooting from the hard drive. You only need to select a device (DVD or USB) from the list to start loading it and press Enter. It looks something like this:
Press F10 and get to the boot menu:
However, on some older computers the Boot Menu does not start, so just in case, let's take a closer look at how to change the boot priority through the BIOS. Open the Start menu and restart your computer. When the logo appears, you must press a certain key.
On some models of motherboards, to enter the BIOS, not Delete is used, but another key - F1, Esc, F10, Ctrl + Alt + S. A reasonable question arises - how to find out the right button? There are several ways:
- Find information on the Internet about entering the BIOS for your motherboard.
- Read the instructions from the motherboard manufacturer.
- Pay attention to the message that appears immediately after turning on the computer. This message looks like “Press…. to run setup". Instead of an ellipsis, a specific key (Del, F1, Esc) will be indicated, pressing which launches the BIOS.
Keys to enter BIOS
Here is a table of keys to enter the BIOS for most motherboard manufacturers:
By the way, you need to press the button many times until the BIOS window appears, otherwise you may skip the stage of launching it.
Examples
Attention!
Depending on the manufacturer, the BIOS interface differs significantly. However, this should not scare you: the procedure remains the same in all versions.
Unfortunately, the mouse does not work in the BIOS, so navigation is carried out only using the keyboard: arrows are used to move, and the Enter key is used to select a specific option. To better understand how the BIOS works, let's see how to change the boot priority in two different interfaces.
If you have an old BIOS interface, then to change the boot priority you need to go to the section "Advanced BIOS Features".
- Find the line "Hard Disk Boot Priority" or "First Boot Device".
- Press Enter and use the arrows to select a value "USB-Flash"(“Removable”, “USB-HDD0”, “Name of flash drive”).
- To save settings click "Safe and exit SETUP" in the main menu.
After successfully installing Windows, you will need to repeat this operation, returning the HDD (boot from hard disk) to first place.
Newer computers have a BIOS version from AMI installed (although more and more often motherboard manufacturers are installing BIOSes of their own design).
The operating principle remains the same:
- Go to the tab "Boot" on the top panel.
- Open section "Boot Device Priority".
- Get on the line "1st Boot Device" and press Enter.
- Use the arrow keys on your keyboard to set the value "USB"(or "CDROM", if you are installing from disk. There is no CD/DVD-ROM in the picture above because it is not on that computer at all).
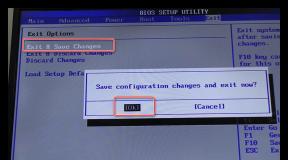
- Click F10 and select an option "OK" to save changes and exit BIOS.
Do not be alarmed if you have a BIOS with a different interface and do not have the names of tabs and sections described above. Just find a tab that has the word "Boot" in its name. Inside it, you will definitely find the boot priority, which can be changed by installing a USB flash device with a Windows distribution in first place.
To select and launch the operating system when the computer boots, a specialized program is used - the boot loader. The most popular bootloader is Grub. When installing multiple operating systems, for example, Linux over Windows, the most recently installed OS will be the first in the bootloader menu.
This will not cause problems for users who use Linux as their main system, for them it is even a more preferable option. But if you are still a beginner and want to use Linux as a second system, and Windows is still the main one, until you get the hang of it, you probably want Windows to be the first. In this article we will look at how to make Windows boot first in Grub. Let's consider two ways: using the Grub Customizer program and manually, through the Grub boot loader configuration files.
Grub Customizer
Grub Customizer is a program that allows you to customize various settings of the Grub boot loader. Including the position and order of loading points. You can install the program from the official repositories. For example, on Ubuntu you need to use ppa:
sudo add-apt-repository ppa:danielrichter2007/grub-customizer
$ sudo apt-get update
$ sudo apt-get install grub-customizer
To run the program, open a terminal (Ctrl+Alt+T) and type grub-customizer:
To run the program you need root rights; on some systems you may have to use the following command:
gksu grub-customizer
The program can also be launched from the main menu. The main window looks like this:
A few seconds after launch, the program will scan installed operating systems, then in the same window we will be able to move the Windows boot to the first place. To do this, right-click on the desired item to open a context menu:

From the menu, select Move up. This step will need to be repeated several times until Windows is first on the list. Windows will now boot to the default grub.
If you later want to lower Windows back down, there is a reverse action - Move down.
To save your settings, simply click the Save button. Ready. You can restart your computer and see what happens.

But I want to touch on a couple more settings that may be useful. Instead of making Grub boot Windows first, you can change the default startup item. Go to the tab basic settings:
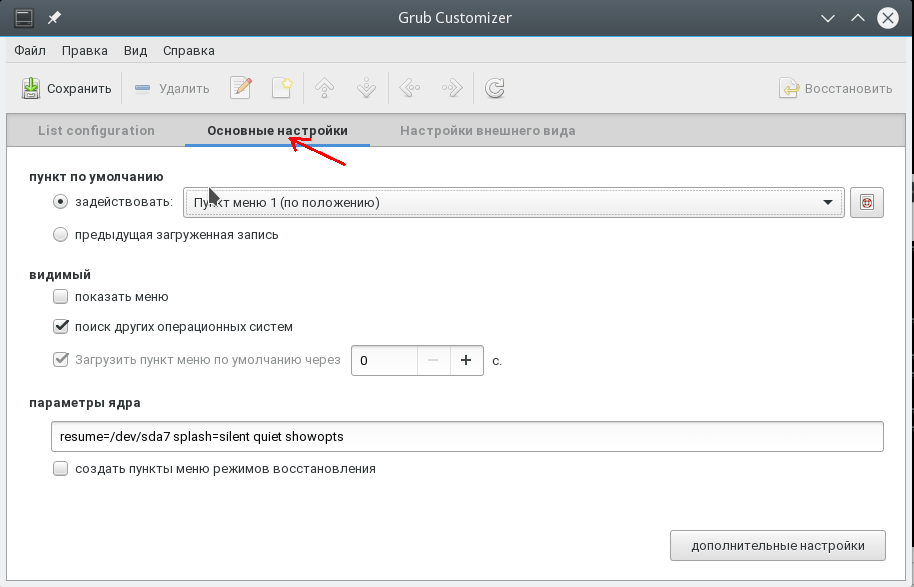
There is a list here to select the default item used by default Engage:

In addition, you can load the last loaded OS by default; there is a checkbox for this:

Changing Grub boot order via terminal
As I promised, now we will look at how to make WIndows boot first into Grub using configuration files. The Grub configuration is located in the /boot/grub/grub.cfg file.
gksu gedit /boot/grub/grub.cfg
Typically, menu bars look like this:
menuentry item_name --options (
...
For example, Windows item:
menuentry "Windows 8 (loader) (on /dev/sda1)" --class windows --class os $menuentry_id_option "osprob
er-chain-FC324E26324DE66C" (
....
Now, to change the order of menu items, just cut everything up to the back closing bracket, along with this line, and paste it before all other items. Then you can save the file and you're done. Reboot and watch. Windows boots by default. The only downside of this method is that when updating the Grub configuration, all settings will be lost.
Similar to how we configured the default loaded item in Grub Customizer, this can also be done in the terminal.
Open the file /etc/default/grub.
gksu gedit /etc/default/grub
Here we are interested in the line:
Replace 0 with the desired item to load; you can also specify the name of the item instead of a number, for example:
GRUB_DEFAULT="Windows 8 (loader) (on /dev/sda1)"
You can view available download points without opening the configuration file with the command:
sudo grep menuentry /boot/grub/grub.cfg
You can also configure the loading of the last loaded system; to do this, add the line
GRUB_SAVEDEFAULT=true
And in GRUB_DEFAULT specify saved:
GRUB_DEFAULT=saved
The obvious advantage of this method is that the settings will not be lost when updating the Grub configuration, since during the update the information is taken from this file. Now let's update the configuration and save the settings with the command:
This option does not work on all systems, so you can use another command:
grub2-mkconfig -o /boot/grub/grub.cfg
That's all. Now you know how to make Windows boot first in Grub. But the information presented in this article can be used for broader purposes. It will be useful not only for Windows, but also for any other several systems whose boot order needs to be controlled.
Related posts: