Instructions for creating a bootable USB flash drive on Windows. Applications for creating bootable flash drives Utility for writing a bootable flash drive
I recently wrote an article on how to create a multiboot flash drive. I think there is no point in writing about this a second time, just follow the link and you will see an effective method, believe me.
Now I’ll tell you how to make a multiboot drive with several systems and completely different programs, most likely the article will turn out to be long, but this doesn’t matter, because all the effective options will be in one place.
How to create a multiboot flash drive using WinToHDD
An interesting program that, in addition to creating bootable flash drives, also has functions for copying the system and installing a new one. So that users understand how to use it, I will try to describe everything in simple and understandable language.
Before the process, you should move important files from the drive to another location, for example, to a hard drive.
You can download WinToHDD from here. Launch the utility and click on the “Multi-Installation USB” section.
A window will open where you need to select the flash drive from the drop-down menu. A message about formatting the flash drive will pop up, be sure to transfer important data. Next, select the system and boot partitions, although there is only one flash drive, so they will be the same. Click on the “Next” button.

The writing of files related to the bootloader to the flash drive begins, an important operation in which it is better not to touch anything, but just wait.

What do you think needs to be done now? I hope you have already prepared operating system images. They need to be moved to a USB drive. That's it, we made a multiboot flash drive.

What to do with a flash drive made in WinToHDD
We created a bootable USB flash drive with multiple operating systems, which is very exciting. You should now boot from it. This can be done through the BIOS or Boot Menu, whichever is convenient for you.
The download manager appears, where you select one of the presented items - 64-bit system or 32-bit.

The WinToHDD utility window will appear with the name of the system image. Let's start a new installation and select the desired system from the list. Now click Next.
Next, we are asked to select or create the following partitions - boot and system. Here you must be a more experienced user and not mess anything up. If necessary, convert partitions to MBR or GPT.

If your BIOS is not UEFI, but the Legacy boot type, then you should convert the partitions to MBR and also format them to NTFS.
If you use BIOS UEFI, then convert the partition to GPT. All this is done on the command line.
Once you have specified the required partitions, you can click “Next” and wait for the system to install. You can experiment on a PC with this program if these instructions seemed a little complicated to you, but we managed to create a multiboot flash drive.
Creating a multiboot flash drive using Easy2Boot
First you need to download several files; we will need them during our work:
RMPrepUSB– download from here: http://www.rmprepusb.com/documents/rmprepusb-beta-versions
Easy2Boot– download from here: http://www.easy2boot.com/download/
We launch the RMPrepUSB utility and look at the interface. Lots of functions and nothing is clear. It follows from this that the method will be a little complicated for novice users, but you should not give up this option. Don't forget to connect the flash drive.

Let's first look at those interface items that will be useful to us.
- We mark the option “Do not ask questions” - that is, no notifications with requests will appear;
- In the “Size” fields – enter MAX, “Volume Label” – enter any;
- In the boot sector, select the first option related to Windows;
- In the File system section, check the “NTFS” and “Boot as HDD” items. You can also choose FAT32, but the option is slower and only supports a maximum of 4 GB file sizes.
- In the fifth section you need to select the path to Easy2Boot. Attention! There is no need to unpack the archive; we leave it as is.
- Press the button "Prepare disk". You should have a drive inserted and displayed in the very top field; if there are several disks there, then make no mistake and select the desired flash drive.
- After completing the operation of preparing the flash drive (it was formatting), you need to click "Install Grub4Dos". If a warning window appears, select “NO”.
It is advisable not to close the utility, because it will be useful to us later. When we open the flash drive, we will see several folders there. There is an “ISO” folder, and in it there are supposed folders for operating systems and some utilities.

What do we do next? You need to take the necessary images and transfer them to the WINDOWS directory; you can also move anti-virus utilities, programs for creating backup copies, working with disks, and checking for RAM errors to the appropriate folders.
The images do not have to be placed only in the WINDOWS folder. You can drop them into the root or ISO folder. When loading from a flash drive, they will still be displayed.
Now that you have copied the necessary files to the drive, you need to return to the main RMPrepUSB window. Open the “Drive” tab and click on the option "Make All Files on Drive Contiguous", or press Ctrl+F2.


Create a multiboot flash drive using WinInstall4Grub4DOS
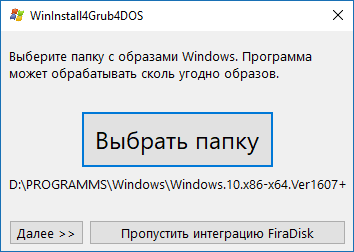
From this link you can download the WinInstall4Grub4DOS tool. Unzip it and run the file. A welcome window will appear, where we click on the “Next” button.

It’s very good if you have prepared the necessary images. You can select them by clicking on the “Select folder” button; the OS images must be located in some folder, the name must not have Russian letters.
Having specified the path to the system images, click “Next”.

After the next click on the “Next” button, you will see operations for copying, driver integration, and other things. The process can be lengthy and we are even offered to go have tea, thanks for that.

To add data to system images, the FiraDisk script will run. In the window that appears, click OK.

The command line will automatically open, where the necessary images will be written independently.


Now let's see what's in the folder with all the images. Copies of them appeared there with the note “FiraDisk”.

Let's go to the WinInstall4Grub4DOS utility and select the “Save files” option. In Explorer, create an additional folder and name it, for example, “Utilities,” since this is where they will be written. You need to create it in the folder where the folder with the images is located.

If you are interested in what these utilities are, then click on the “Why are these files needed?” button.
Finally, we connect the flash drive to the PC, run HPUSBFW, located in the folder with the utilities, as administrator. A window will appear with a choice of flash drive, file system, preferably NTFS, and a checkbox for quick formatting. Start the formatting process. When finished, close the window.

In the utilities folder we find the archive with the GRUB4DOS_GUI tool. Let's run this file.
Move the checkbox to the “Disk” position and select the flash drive next to it. If nothing happens, then run the utility with elevated privileges. Click “Install”.

A command line will open, press the “Enter” button.

In the utilities folder, copy the MENU.LST and GRLDR files to the USB flash drive. If they are not there, then download them from the Internet, they are easy to find. Here's the link so you don't have to search.
Let's create a folder on the flash drive with some name and move the images there with the FiraDisk annotation. We haven't been able to create a multiboot flash drive yet because there are a couple of steps that need to be completed. Go!

Using the Wincontig program
One more thing. It is necessary to defragment the copied images. This can be done using WinContig, located in the utilities folder. Launch it and select images using the “Add files” button.

Click on the “Action” section and select “Defragmentation”. We are waiting for the process to complete.
The status should not be fragmented, this means something is wrong with the files, or you need to take a larger flash drive.

In the WinInstall4Grud4DOS window, click “Next”, so we will find ourselves in the section where we will do something.

In the “Menu generator for Grub4DOS” field, you need to specify the path to the disk where you have Windows images. Detailed instructions are written in the file, which is opened by clicking on the “What to do?” button.
After that, click “Make”.

After waiting a little, we will see the code that needs to be copied, for which there is a corresponding button. 
We have created a multi-boot media with multiple operating systems. This process turned out to be long and hardly anyone will use it, but for general development it will do.
When booting from a flash drive, the GRUB4DOS bootloader will appear, with a black background and a list of operating systems. You can work on the design of the bootloader using ZXBFM__2.1b, but this is optional.

RESULTS
So, friends. I have created such a voluminous article for you. Now you know how to create a multiboot flash drive that has not only operating systems, but also various kinds of utilities. Some methods turned out to be simple, while others were complex or took a long time to implement. In any case, they are all effective if done correctly. Beginners may have problems, as there are a lot of pitfalls here. If you have a problem, be sure to write in the comments, I will try to help.
Introduction
At the time of buying Windows 7 in the shop Microsoft (Microsoft Store), you will be able to download an ISO image of this product. allows you to create copies of Windows 7 ISO files on a disk, USB Flash or DVD. To create a bootable DVD or USB Flash drive, download the ISO file and then run Windows 7 USB/DVD Download Tool. After this, you can install Windows 7 directly from a USB flash drive or DVD.If you are not sure how many bits Windows 7 is (32-bit) x86) or 64-bit ( x64)) you will need for the upcoming installation, then you can learn more about the difference between Windows 7 x32 and Windows 7 x64. An ISO file contains all the Windows 7 installation files combined into one uncompressed file. When you download an ISO file, you must save it on your hard drive to install Windows 7. To install Windows 7 on a USB Flash or DVD, all you need to do is insert the USB Flash into a free USB port or insert the DVD into your DVD -drive and start Setup.exe Windows 7 USB / DVD Download Tool programs from the root folder on the disk.
Note: You will not be able to install Windows 7 using Windows 7 USB/DVD Download Tool if the ISO file is saved on a USB disk or DVD.
A copy of the Windows 7 ISO file created using the USB/DVD Download Tool is bootable. A bootable disk allows you to install Windows 7 without first running the existing operating system on your computer. If you change the boot order of the disks in BIOS your computer, you will be able to run Windows 7 installation directly from a USB flash drive or DVD when you turn on your computer. Please refer to your computer's documentation for information on how to change the boot priority of drives through the BIOS.
Once you accept the Windows 7 license terms, you will only be allowed to make one copy of the ISO file onto a disk, USB flash drive, or other media as a backup for reinstallation on the licensed computer. If you do not delete the copy of the ISO file that you made to install the software on your computer, then this copy of the ISO file will be your backup copy.
Installation
For installation Windows 7 USB/DVD Download Tool You need:
Step 1. Click here to download Windows 7 USB/DVD Download Tool installation file .
Step 2. When prompted to save the file to disk or run it, select Execute.
Step 3. Follow the installation instructions. You can determine where to install the Windows 7 USB/DVD Download tool and whether to create shortcuts in the menu Start or at Desktop.
You must have administrator rights on the computer where you are installing Windows 7 USB / DVD Download Tool. This requires Microsoft NET Framework 2.0 or higher. If this tool is not on your computer, the program will install it for you. In this case, you may need to restart your computer to complete the installation.
System requirements
- Windows XP SP2, Windows Vista or Windows 7 (32-bit or 64-bit);
- recommended Pentium 233 MHz or higher ( 300 MHz);
- 50 MB free disk space on your hard drive;
- DVD-R disk or removable USB-Flash no less 4GB.
Burning an ISO Image
Before launch Windows 7 USB/DVD Download Tool Make sure you have already purchased Windows 7 and downloaded the Windows 7 ISO file to your hard drive. If you bought Windows 7 but haven't yet downloaded the ISO image, you can download the file from your Microsoft account.To record ISO-file with Windows 7 you need:
Step 1. Click the button Start and select Windows 7 USB/DVD Download Tool from the list "All programs".
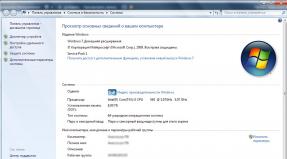
 Figure 1. Windows 7 USB / DVD Download Tool - program window
Step 2. Enter the name and path of your original Windows 7 ISO file or click the button "Review" and select the file in the dialog box "Open".
 Figure 2. Window for selecting a file with a Windows 7 image
Step 3. Select "USB device" to create a copy on a USB flash drive or "DVD" to create a copy to a DVD disc, and then click "Further".
 Figure 3. USB or DVD recording selection window
Step 4. If you are writing a file to a USB flash drive, select the USB device from the drop-down list and click the button "Start copying".
If you are copying files to DVD, click the button "Begin" to start recording.
 Figure 4. Selecting a USB flash drive
After your ISO- the file with Windows 7 will be recorded on the selected media, you can start installing Windows 7, to do this, go to the root directory of your DVD or USB flash drive and run Setup.exe.
FAQ
Below are some of the most frequently asked questions about using Windows 7 USB/DVD Download Tool:- What size USB Flash Drive is required?
You need a USB Flash Drive with at least 4 GB of free disk space. - Can I use my own disk or flash drive with an ISO file on it to install Windows 7 on someone else's computer?
No. The disk or flash drive containing your burned ISO file is intended for installation of Windows 7 only on the licensed user's own computer. - Can I backup to CD-R?
No. The Windows 7 ISO file is too large to fit on a regular CD. - Can I use Blu-Ray DVD for backup?
Yes, as long as your DVD drive can write to Blu-Ray DVD. - If I have some files on a USB Flash drive, will Windows 7 USB/DVD Download Tool delete them?
This program requires a completely empty USB Flash drive to copy files from Windows 7. This ensures that the device will be bootable after the copy is complete. - Can I make a backup using an iPod, camera, or other device with enough free disk space?
Yes, but it's not recommended. The device must be formatted in order for the media on which recording will be made to become bootable. A dedicated USB Flash Drive would be the best option. - Can I use Windows 7 USB/DVD Download Tool to backup other files?
This tool is designed to burn only ISO files with Windows 7 from the Microsoft Store.
Troubleshooting
The following tips may help you if you encounter any problem while using this tool.- My USB device is not in the list of available devices.
If you do not see your USB Flash device in the list of available devices, make sure the drive is inserted into the USB port or click the Refresh button next to the list of available drives. - I inserted a blank DVD-R disc into my DVD drive, but Windows 7 USB/DVD Download Tool cannot recognize it.
If there are several DVD drives in the system, then select the first one that can burn DVD. If you have multiple DVD-R discs, try inserting a blank DVD-R into another DVD drive. If this does not help, please verify that your disc is not damaged and that your DVD-R disc is usable, or contact product support.
Hello dear readers or first time guests, today we will talk about how to burn an image to a flash drive, namely ISO and IMG formats using portable programs. Which will do everything for you, you just need to choose the image itself!
How to easily burn an image to a flash drive
First we will talk about the popular ISO image, which is now used almost everywhere, especially its popularity on the Internet. To do this, download the program:
The program is free and portable, i.e. does not require installation, which is very convenient. You can tolerate it and it is from which very often. We launch it and see this window: 
If you want to burn the image to a blank flash drive, then .
Now I’ll explain how to write:
1. Select that this is a disk image, i.e. our flash drive.
2 Select the image itself.
3. We indicate that this is not a hard drive, but a flash drive.
4. You may have another flash drive inserted, so we’ll find out which one it is.
5. Click OK and after a while the recording will be completed successfully.
This the best program for burning an image to a flash drive, which I found.

Once completed, a reboot is not necessary. Press exit. During the recording process, the program may offer to overwrite the file. Click yes.
How to burn an IMG image to a USB flash drive
Open it and see a simple interface:

1. Select an image (There should be no Russian characters in the path, otherwise the program may swear).
2. Select the device (Before recording, it is advisable to format the device where you are going to record the image).
3. Click White and the image will be recorded.
Now all that remains is to store these programs and do writing an image to a flash drive, or a link to my site, and you shouldn’t have such a problem.
One of the most popular tools that allows you to prepare an installation flash drive with Windows or Linux in just a few clicks. In addition to the main function, it can check disks for integrity, as well as add useful testing utilities to the boot image.

- Price: free.
A cross-platform application with a simple and user-friendly interface that will help you deploy the installation image to a memory card or . All you need to do is select the image file, the target drive and click the Flash button. After writing, Etcher can check the readability of the disk and automatically unmount it.

- Price: free.
- Platform: Windows.
A proprietary Microsoft utility that was originally designed to record images of Windows 7. However, it also supports newer versions of this operating system and is still relevant. Thanks to the ascetic interface, it is simply unrealistic to make any mistakes during the work process.

- Price: Free / $29.95.
- Platform: Windows.
Unlike the previous ones, this program is designed to create disks from which the OS will boot and work without installation. The sources can be images in various formats, DVDs, or Windows installed on the computer.

- Price: free.
- Platform: Windows.
An extremely simple tool for burning bootable discs with a minimum number of settings. In addition to deploying ready-made images, it can create full disks and memory cards for subsequent quick recovery.

- Price: free.
- Platform: Windows.
The functional utility creates a bootable USB flash drive for installing the system. Supports all versions of Windows and numerous Linux distributions. At the same time, it can not only use ready-made images, but also automatically download them from the Internet.

- Price: free.
- Platform: Windows.
A powerful application that allows you to burn a Windows or . WinSetupFromUSB supports BIOS and UEFI, as well as images of various formats and has many useful tools for working with disks.

- Price: free.
- Platforms: Windows, macOS, Linux.
A cross-platform open source utility that will help you create a boot disk for almost any Linux distribution. To record, you can use an existing image or download it from the Internet directly through UNetbootin.

- Price: free.
- Platform: macOS.
A very simple utility for burning bootable flash drives with macOS, which even the most inexperienced user can handle. Install Disk Creator automatically recognizes the downloaded installer from the Applications folder, and all that remains to be done is to select the flash drive to which it needs to be deployed.
Hello.
No matter what anyone says, the popularity of optical disks is rapidly falling: not even all computers and laptops have a drive for them anymore. And, perhaps, this is not surprising: after all, an ordinary flash drive that fits in any pocket can easily replace them.
To install Windows, it is also more convenient to use a USB flash drive (there is a USB port on any computer!). But for this it needs to be written down/prepared correctly.
In this article, I will consider all the typical issues related to creating installation flash drives: programs for this operation, step-by-step settings before recording, the process of creating flash drives with multiple OSes (multi-boot), UEFI flash drives. But first things first...
Note!
You might find this article useful on how to download an ISO image from Windows 10 [officially and legally] -
There are quite a lot of programs of this kind. To cover them all in one article is a thankless and unnecessary task. I will give below those programs that I used (and use) myself repeatedly when recording my bootable media.
Note : How to use this or that program will be discussed in the second part of this article.
Table No. 1 (main)
| Program name / website address | Description | Screenshots |
|---|---|---|
| Ultra ISO
|
One of the best programs for working with ISO disk images. Allows you to edit them, extract files from them (or add), write images to a flash drive/disk, etc. In general, it is an indispensable program for working with the ISO format, and I have repeatedly recommended it in my articles (and, by the way, almost all Windows operating systems are distributed in this format). |
(main program window) |
| Rufus
|
A small free utility that can create almost any bootable flash drive, memory card, etc. It also allows you to prepare flash drives for UEFI. Another advantage of the utility: it works somewhat faster than other analogues. Note: there is both a portable version (which does not require installation) and a classic one. Works on all Windows OS: XP, 7, 8, 10. |
(Rufus settings for writing a bootable USB flash drive) |
| One of the most famous programs for burning bootable media. Allows you to create bootable media with OS: Windows 2000, XP, 7, 8, 10, etc. The program also allows you to create multiboot flash drives (i.e. on which there are 2-3 or more Windows operating systems and when loading you can choose which one to install). In general, indispensable software if you need to create installation media from time to time. |
(setting before writing a flash drive) | |
| WintoFlash https://wintoflash.com/ |
A simple and convenient program for creating bootable media. A wizard will accompany you during the creation and configuration process: the whole process goes step by step, which is very convenient if you have never used such programs before. Possibilities:
|
(WintoFlash main window) |
| Windows 7 usb dvd download tool | A simple and convenient utility for writing bootable flash drives from Microsoft itself (therefore it could not be included in this review). You can burn a bootable USB flash drive with the following Windows operating systems: 7, 8, 10. The entire recording process is divided into several steps: selecting a flash drive, selecting an image, confirming, recording... By the way, there is nothing superfluous in the program: the design is in a minimalist style. In general, I recommend it! Among the disadvantages: it is not always possible to write an ISO image with Windows to a 4 GB flash drive (the program asks for 8, although other similar utilities write this image to the same flash drive...). |
(the first step is choosing an ISO image) |
Support programs
A small free* program for working with images (supports a huge number of different formats: ISO, MDS/MDF, CCD, etc.). After installing this program, you will have a virtual drive in “my computer” (their number can be increased) in which you can open any of the images. For the computer, it will all look as if you had opened a real CD/DVD disc in the drive.
In addition to opening images, you can also create them from various disks. In general, an indispensable program on a PC (especially with the development and popularization of disk images).
*Note: in addition to the free version, you can find a paid version (with advanced functionality) on the developer’s website.
An analogue of Daemon Tools, it has the same functions: creating and opening images, supporting protected disks, etc. Alcohol 120% is a paid version of the program, there is a free version - Alcohol 52%.
In principle, you can work with both Daemon Tools and Alcohol. The choice is a matter of taste!
Step-by-step creation of a bootable USB flash drive
Windows XP
Once one of the most popular OS from Microsoft. Now, of course, its popularity is falling and yet quite a large number of PCs run on this OS. Therefore, I decided to include it in this article...
WinToFlash
In my opinion, the easiest way to burn a bootable USB flash drive with Windows XP is to use the WinToFlash utility. The fact is that it has a built-in wizard that will guide you through all the thorns... (by the way, the Lite version is enough for the job).
After launching the utility, click on the green checkmark (screen below) - " Windows Setup to USB Wizard".

WintoFlash - getting started with the wizard

Next step: you need to specify the path to the image file with Windows XP and select the flash drive on which this image will be written.

Actually, in the next step the program will warn you that all information will be deleted from the disk and will offer to continue. You agree and wait until all the files are copied to the flash drive.

To help! I have more detailed instructions for working with WinSetupFromUSB -
This program is slightly different from the previous one. Firstly, there is no wizard who will guide you step by step (you need to enter all the settings yourself), secondly, there is no support for the Russian language...
First, insert the USB flash drive into the USB port and run WinSetupFromUSB and as administrator.
- select the inserted flash drive;
- Click the "Auto format it with FBinst" checkbox, file system - NTFS;
- specify the path to the folder with the Windows XP distribution (the ISO image can be unzipped using the WinRar program, or open it in Daemon Tools (links to the programs are provided above));
- The final touch is to press the “GO” button.

In the next step, the program will warn you that all data on the flash drive will be deleted during the process of writing data to it. You're just confirming it.

If the flash drive was successfully written, you will see the “Job Done” window.

Windows 7, 8, 10
In principle, you can use the same utilities to record these OSes - the whole process is identical. Using the example of several utilities, I will show the whole process step by step.
Windows 7 usb/dvd tool
Despite the fact that this utility is intended for Windows 7, you can use it to burn a USB flash drive with Windows 8/10. Because This program is the simplest (it couldn’t be simpler) of all and the entire process of recording an image in it consists of only 4 steps, I recommend it first of all.
Step 1: specify an ISO image with Windows OS ("Browse" button, when the image is specified, click "Next").

Specify ISO file
Step 2: select the device on which the recording will be made. In this case, you need to select either a USB device or DVD. Let's choose the first one.

Step 3: select the drive letter to which the recording will be made (i.e., indicate the desired flash drive, because there may be several of them connected to the PC...).

Step 4: Recording process. When a message about the successful completion of the operation (Bootable USB device created successfully) is displayed, you can restart the PC and check the flash drive...

As you can see above, the whole process is extremely simple and does not contain anything superfluous.
Ultra ISO

Rufus
Article update from 01/24/2019: added screenshots of version 3.4. I also have instructions for working with Rufus 3.4 on my blog -

UEFI flash drive
UEFI is a new standard, a new interface (so to speak). It is designed to replace the "old" BIOS. One of the main tasks of UEFI is to protect the computer from boot viruses that are loaded along with (or before) loading the Windows OS (sorry for the tautology).
Therefore, in new computers/laptops, if you connect a flash drive created in the classical way to their USB port, the PC will not see it! In order for this flash drive to become visible: you need to switch UEFI to Legacy (the spelling may differ slightly depending on the BIOS/UEFI version) and turn off Secure Boot.
In this same part of the article, I will look at a couple of ways on how you can create a bootable UEFI flash drive (so that you don’t have to disable Secure Boot protection in the BIOS). So...
Method No. 1 - using the WinSetupFromUSB utility
First, run the utility as an administrator (how to do it: right-click on the executable file, then select the desired function in the context menu).

- Select a flash drive (be careful, when writing, all data on the flash drive will be deleted!);
- Click the "Auto format it with FBinst" checkbox and select the FAT 32 file system (do not touch the other checkboxes);
- Next, select an ISO image file with Windows OS (in the example below I chose Windows 8);
- Press the GO button and wait for the process to complete.

Setting up WinSetupFromUSB for writing a UEFI flash drive.
Method number 2 - using the Rufus utility
Rufus is an excellent utility for burning different types of bootable media. All settings are made in one window, everything is simple and fast.
You also need to run the utility as an administrator (screenshot below).


Rufus 3.4 - creating a flash drive for UEFI (GPT)
Multiboot flash drive (several OS on 1 flash drive!)
You can write not only one version of Windows OS to a flash drive, but several at once! For example, imagine you have the following OS on one flash drive: Windows XP 32 bit, Windows 7 64 bit, Windows 8 64 bit and Windows 10 64 bit. If something happens, you don’t need to carry around a bunch of flash drives with different OSes - you can immediately install the one you need with just one. Below I will consider in detail how and what is done...
To create such a flash drive, you need the following:
- several ISO images with the required systems (for example, Windows XP and Windows 7). By the way, it is better to take the Windows XP image with integrated SATA drivers, otherwise you will get a “blue” screen during installation on new motherboards;
- Daemon Tools or Alcohol (if you want to add Windows 2000, XP to the flash drive): programs that can open an ISO image (i.e. you will see a virtual drive in “my computer”, since this is not an ISO image, but a regular disk inserted into a CD-Rom. Presented in the first part of the article,) ;
- 8-16 GB flash drive (the more OS you are going to write, the more capacious the flash drive should be);
- program (presented at the top of the article,).
Step-by-step instructions for creating a multiboot flash drive
- Launch the program WinSetupFromUSB as administrator. To do this, simply go to the folder with the program, select the executable file and right-click on it, then select “Run as administrator” from the context menu.
- Next, in Daemon Tools, open the image with Windows 2000/2003/XP (those who will not write these OS to a flash drive can skip this step).
Windows XP ISO image opened in Daemon Tools.
- Insert the flash drive into the USB port;
- Next you need to set the following parameters: 1)
indicate the inserted flash drive (in my case, drive “E:\”); 2)
Check the box "Auto Format it with Fbinst", select the NTFS file system (if you plan to create a flash drive for UEFI, choose FAT 32); the rest of the checkboxes are by default; 3)
indicate the virtual drive in which the ISO image with Windows XP/2000 is open; 4)
indicate the ISO image with Windows 10 (in my case, this particular OS was chosen for the multiboot flash drive); 5)
Press the "GO" button - start recording the flash drive. All numbers are illustrated in the screenshot below.

- Next, the program will ask you whether to start recording. By the way, it’s important that all data on the flash drive will be deleted!
- Then the program will ask again - the answer is affirmative.

Warning 2 - click "Yes".
- Next, if everything went well, you will see a “green bar” at the bottom of the window - the program has started working. The recording time depends on the flash drive, the selected images, the speed of your USB port, the PC load, etc. On average, 5-20 minutes. to record multiple OS. At this time, it is better not to touch the computer and not run resource-intensive tasks on it: games, video/graphics editors, etc.

- When the flash drive is written, you will see the inscription “Job Done”. In principle, the flash drive can already be used, it now has 2 Windows XP and 10 operating systems! Screenshot below.
- To add another OS, for example, Windows 7, simply insert the USB flash drive into the USB port again, run WinSetupFromUSB (as administrator). Then: 1)
select the desired flash drive (note: on which we previously recorded 2 OS)
; 2)
specify the ISO image with the Windows OS to be added; 3)
press the "GO" button. Note: Please note that you do not need to check the box next to “Auto format it with FBinst”, as we did before!

- When another OS is added, you will see the usual window - the job is done. Now there are 3 OS on the flash drive: Windows XP (32 bit), 7 and 10 (64 bit).
- If you want to add another OS, for example Windows 8, you need to do step 9 again (see above). In principle, this way you can add quite a lot of OS to your flash drive (let’s say, provide for all the options)...
Checking a multiboot flash drive
To check the created flash drive in operation, you need to do the following:
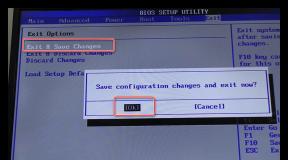
- Go to the BIOS and put a USB flash drive in the boot queue (you can use the BOOT Menu). More details about the buttons for going to Bios and calling the Boot Menu are described here:
- Insert the flash drive into the USB port and restart the computer;
- A window should appear as in the screenshot below: for example, I selected the Windows NT 6 line (this is to select the installation of Windows 7, 8, 10).

After this, if you have 2 or more "new" OSes, you will see a list with all of them. Select the desired option and continue with the installation. The screenshot is below, the flash drive works!

On this positive note I conclude the article; as always, I will be grateful for additions.