How to install unsigned drivers on Windows 7. Install drivers without a digital signature
The digital signature of the driver is used by Microsoft to identify the manufacturer and confirm that the product meets the requirements of the operating system. The presence of such an electronic certificate guarantees that there will be no changes made to it after issue. Thus, the user receives a double guarantee of security and can be confident in the functionality of the resulting driver.
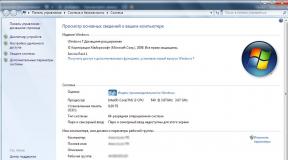
Windows checks the digital certificate automatically. Having detected its absence, the system issues a warning to the user about the danger of installing an unsigned driver. To check components already installed in the OS, you can use built-in tools.
Direct X
Multimedia drivers are the most frequently updated OS components. You can check them for a certificate using the built-in diagnostic tool. We launch it with the command shown in the screenshot.
On the main tab, check the marked box. This way we will enable the utility to automatically check certificates of conformity.

Switching to the next tab, in the “Drivers” field we see a positive response from the system.

We check the remaining pages in the same way, making sure that there is a WHQL certificate.
Signature Verification
You can detect the presence of all components in the system without a digital signature using a special verification utility. Let’s launch it by typing “sigverif” in the text field.

Click the marked button to activate the component testing procedure.

Completing verification will slightly change the appearance of the main utility window. Click on the highlighted button to open additional options.

Select the “View Log” option.

A text editor runs a report on the status of the drivers installed in the system. The designated “Status” column provides information about the presence of a WHQL digital certificate.

Having dealt with the current state of the system, let's look at how to disable driver digital signature verification in Windows 10.
Disable signature
While maintaining OS stability, Microsoft does not recommend installing components that do not have WHQL certificates, but this option remains in the system. The need to install an unsigned driver may arise for various reasons. For example, this may be equipment that has been discontinued but is necessary for operation.
Group Policy
The easiest way to disable electronic signature is to change your security policy. We launch the editor using the “Run” menu.

In the main window, we sequentially expand the underlined items in the navigation area. The last section contains three parameters. The one we need is highlighted with a frame. Open it for editing.

In the control unit, set the switch to the “On” position. In the parameters area we use the drop-down menu. Select the item marked “2”. Apply and save the changes made.

The specified rule should take effect without a reboot.
Special boot options
The next method involves using special operating system boot options. Open the Windows settings menu and go to the section indicated in the screenshot. 
In the navigation area, move to the “Recovery” item. Use the marked button to reboot the system.

Mouse control is available here, so we begin to move through the menu one by one. Open the troubleshooting section.

Select additional options.

Let's move on to the download settings.

This area is informational and only the marked button works in it.

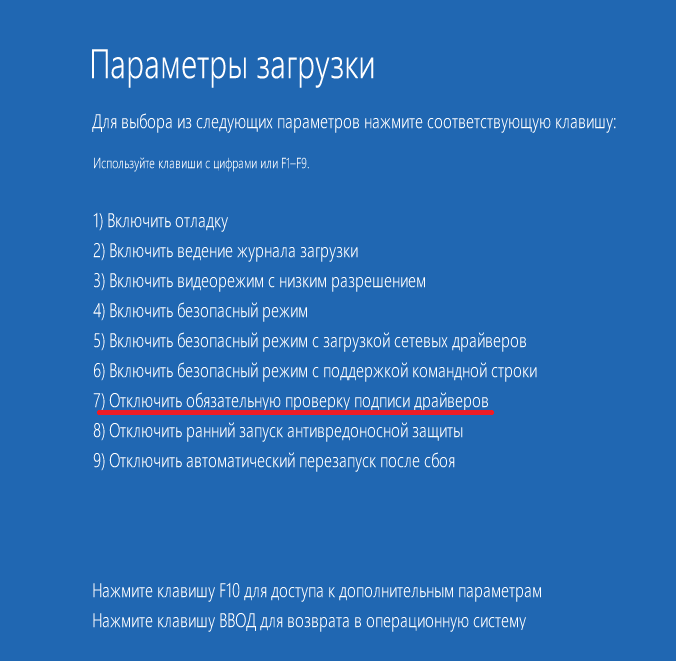
The system enters low screen resolution mode and disables mouse control. The item we need is seventh on the list. Select it by pressing the control key “F7” in the top row of the keyboard.

The computer will reboot, after which installation of unsigned drivers in the OS will become available.
Command line mode
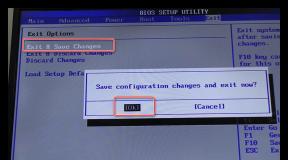
Using this method, you can also disable driver digital signature verification in Windows 7. Launch PowerShell in elevated mode. Enter the commands shown in the screenshot sequentially.

After a reboot, the system will not report that it requires a digitally signed driver. To disable the mode, in the text of the last command we indicate “OFF” instead of “ON”.
Another option to use the command line requires rebooting into safe mode. We have already considered the sequence of actions. Having reached the additional parameters, select the indicated item.

The operating system will reboot again, displaying the Command Prompt in Administrator mode. Enter the command shown in the screenshot. To exit to the graphical menu, type “exit”.

Disabling this mode is also done by replacing “ON” with “OFF” at the end of the control command.
Creating a Digital Signature
In some cases, the methods described may not help. When Windows 7 or 10 driver signature verification is not disabled, you will have to sign it yourself. For this purpose, we will need to unpack the installation package and find the file with the INF extension. It contains the information necessary for installation in the system. Having found the required file, call its properties and go to the “Security” tab. Copy the path specified in the “Object name” field.

Launch PowerShell with elevated rights. Enter the following command: “pnputil -a C:\path\name.inf”. We replace the line “C:\path\name.inf” with the copied path to the file.

As a result of its execution, the selected driver will be registered in the system. The same method is also suitable in cases where the digital signature of the driver constantly fails.
Finally
As we have seen, there are several options for installing the necessary components without an electronic WHQL certificate. The steps are simple and can be performed by any user. However, installing an unsigned driver should not be the norm. Since it has not been tested by Microsoft, the company will not be held responsible for the consequences of installing it, and the user has a high chance of encountering BSOD errors.
Most of the problems of users who are faced with the fact that Windows OS cannot detect the device is due to the fact that starting from Windows 7 and up to the newest version of Windows 10, verification of the digital signature of drivers is enabled. How to bypass this obstacle and install the required driver, read in this material!
What is a signed driver?
A signed driver is a device driver with a digital signature. A digital signature is an electronic security mark that identifies the publisher of the software and changes to the original contents of the driver software package. If the driver is signed by the publisher and verified by a certificate authority, you can be confident that the driver was released by that publisher and has not been modified. Windows will display one of the following warnings: the driver is not signed, the publisher's signature is not verified by a certificate authority, or the driver has changed since release.In short, if a driver has not been signed by MicroSoft, then such driver will not be digitally signed with Windows drivers. It is with such a driver that problems arise during installation.
In this article we will look at how to disable driver digital signature verification in Windows 10, Windows 8 and 8.1, as well as Windows 7.
Method number 1 - reboot menu
Before using this method, save all your work data on the computer and close the programs.
1.Go to " START" and select " Options»

2. Go to “ Update and Security» -> « Recovery» -> « Special download options» -> « Reboot now»

3. Next, the computer will reboot into a special Windows recovery mode; you will need to go to “ Troubleshooting» -> « Extra options» -> « Boot Options» -> « Reboot»

F7

5. Checking the digital signature of drivers in Windows 10 is disabled for a while (until the next reboot), install the necessary driver.
WIN + R gpedit.msc and click Ok

2. In the window, go to the menu “ User Configuration» -> « Administrative Templates» -> « System» -> « Driver installation»

3. Set the parameter to " Disabled"if at the bottom in the window ( If Windows detects a driver file that is not digitally signed:) changes will be available, set the parameter " Skip»

Method No. 3 - command line (test mode)
cmd


4. Confirm the changes and restart your computer; driver digital signature verification is disabled in Windows 10.
1. In the start menu, search - enter cmd
2. Run Command Prompt as Administrator
3. Enter the command:
5. Select “” from the menu

4. Driver digital signature verification is disabled in Windows 10.
(rutube)556f64dc8299f3f67c89bb7cea093c50(/rutube)
Disabling digital signature verification of Windows 8.1/8 drivers
Method number 1 - reboot menu
1. Press the keys simultaneously WIN + I
2. In the side menu that appears on the right, select “ Options»
3. Hold down the “Shift” button and select “” in the shutdown menu
4. Next, the computer will reboot into a special Windows recovery mode; you will need to go to “ Diagnostics» -> « Extra options» -> « Boot Options» -> « Reboot»

4. Windows will reboot again and a menu with boot selection options will appear in front of you, press the key F7

5. Checking the digital signature of drivers in Windows 8.1/8 is disabled for a while (until the next reboot), install the necessary driver.
(rutube)f24ddaa7f79a4e0bd0e046e68304d306(/rutube)
Method No. 2 - Local Group Policy Editor
1. Press and hold the keys at the same time WIN + R and in the “Run” window that appears, write the command gpedit.msc and click Ok
2. In the window Local Group Policy Editor go to the menu " User Configuration» -> « Administrative Templates» -> « System» -> « Driver installation" and select the parameter to change " Digitally signing device drivers»

3. Set the parameter to " Disabled", if at the bottom of the window (If Windows detects a driver file without a digital signature:) changes are available, set the parameter " Skip»

4. Confirm the changes and restart your computer, driver digital signature verification is disabled in Windows 8.1/8.
1. In the start menu, search - enter cmd
2. Run Command Prompt as Administrator
3. Enter the following commands one by one:
bcdedit.exe -set loadoptions DISABLE_INTEGRITY_CHECKS bcdedit.exe -set TESTSIGNING ON4. Confirm the changes and restart your computer; driver digital signature verification is disabled in Windows 10.
Method number 4 - command line (Windows 7 boot option)
1. In the start menu, search - enter cmd
2. Run Command Prompt as Administrator
3. Enter the command:
bcdedit /set "(current)" bootmenupolicy legacy4. Restart your computer and press the F8 key as the computer boots up
5. Select “ Disabling mandatory driver signature verification»

4. Driver digital signature verification is disabled in Windows 8.1/8.
Method number 1 - command line (permanent shutdown)
1. In the start menu, search - enter cmd
2. Run Command Prompt as Administrator
3. Enter the command
bcdedit.exe /set nointegritychecks ON
4. Restart your computer; driver digital signature verification is disabled in Windows 7.
5. To reactivate the scan, enter on the command line:
bcdedit.exe /set nointegritychecks OFF
Method number 2 - command line (temporary disabling)
1. In the start menu, search - enter cmd
2. Run Command Prompt as Administrator
3. Enter the following commands one by one:
bcdedit.exe -set loadoptions DISABLE_INTEGRITY_CHECKS bcdedit.exe -set TESTSIGNING ON4. Confirm the changes and restart the computer; driver digital signature verification is disabled in Windows 7.
Method number 3 - reboot menu
1. Restart your computer and as the computer boots, press the key F8
2. Select “ Disabling mandatory driver signature verification»

Windows 8.1 blocks driver installation without valid digital signature(or changed after its application). This is done for security purposes, since installing unsigned or tampered drivers (possibly using a virus) can lead to unpredictable consequences, including reinstalling the system.
What is a signed driver?
Signed driver is a device driver that has a digital signature. Digital signature is an electronic security label that can indicate the publisher of the software, as well as whether the driver has been modified since it was signed. If the driver is signed by the publisher and the authenticity of the signature is confirmed by a certification authority, then you can be sure that the driver was released by this publisher and has not been modified.
Install drivers without a digital signature or with it?
In this case, it all depends on why you need to install unsigned drivers. If you need to install drivers for an old device, such as a scanner, you can temporarily allow the system to install unsigned drivers.
How to disable signature verification?
To temporarily disable driver digital signature verification, do the following:
1. Move the cursor to the lower right corner of the screen and select the item "Options" or press the keys Win + I. Press the shift key, and while holding it down, select .
2. After the reboot, select " Diagnostics"

3. In the window " Diagnostics"select"

4. In the "" window, select ""

5. In the "" window, click ""

6. Now the most important thing. In the "" window you need to select the desired key, in our case it is F7 or number 7
Conclusion
The next time the system is rebooted, the system for blocking unsigned drivers is automatically activated. Previously installed unsigned drivers will continue to work.
In this non-trivial way, you can solve the problem of installing unsigned drivers, adjusting the operation of all devices connected to the computer.
Starting with Windows 7, for security reasons, Microsoft developers introduced mandatory driver certification. Each driver released by a third-party developer must undergo special testing in the Microsoft laboratory. If the verification is successful, the driver receives an appropriate signature, so it can be installed on the system. As for unsigned drivers, you cannot install them directly, and if you try to do so, Windows will display a message indicating that the file may be corrupted or tampered with.

However, such protection is not any serious obstacle to the installation of drivers that do not have the appropriate digital certificate. So, just today we will get acquainted with a simple way to turn off this very driver signature verification. In the eighth version of Windows this is done as follows. First of all, we need to get into the boot options subsection. To do this, open the Windows console with administrator rights, and then enter and run the following command:

In this case, the computer will reboot, and you will be taken to the action selection menu. Click Diagnostics -> ;


Restart the computer again by pressing the button.

After the system restarts, you will see a menu with boot options. That's exactly where the line should be. She is the seventh in a row.

To boot Windows with this option, press the 7 or F7 key. Now if you try to run the installation of the left driver, the OS will also display a message, but this time it will be a simple security warning. Just select and the stubborn driver will return to normal mode, at least it should be so, and all you have to do is reboot again and check its functionality.

However, it cannot be ruled out that it will not be possible to install an uncertified driver this way. In this case, you can try another method. Windows 8 has a special "test operating mode". Working in this mode, you can install almost any software, including drivers that do not have a Microsoft certificate. You can activate it as follows. Open a command prompt as an administrator and run these two commands one after the other (for a 64-bit system):
bcdedit.exe /set nointegritychecks ON
bcdedit.exe /set testsigning ON

Each executed command must be accompanied by a message "Operation completed successfully". Now close the console, and restart your computer. If everything is done correctly, the inscription should appear in the lower right corner of your watch "Test mode". Now you can try installing the unsigned driver again. After installing and testing the driver, do not forget to exit test mode. To do this, you need to run the same commands, but only the flag ON ( included) replaced by OFF ( turned off) .
Technically, working in an operating system running in debug mode is no different from working in "normal", however, firstly, such a configuration is generally not supported by Microsoft, and secondly, it reduces the level of security and increases the risk of critical system errors.
Tags: ,