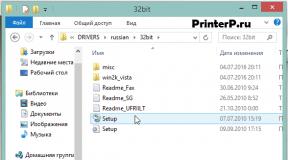
Setting up a wi-fi repeater from China. Connecting and setting up a Wi-Fi repeater Operating instructions for wifi repeater
Find the router's IP address. Most new routers have a sticker with an IP address. In the case of older models, this information can be found in the documentation for the router. If you can’t find the information you need anywhere, you can search the Internet for your router model.
- An IP address is four groups of 3 digits separated by a dot.
- Most standard IP addresses are 192.168.1.1, 192.168.0.1 or 192.168.2.1.
On a computer connected to the router, open a web browser. Enter the router's IP address in the address bar and press Enter. The browser will try to connect to the router's configuration menu.
- If your router came with an installation disk, you can run the configuration program instead. It performs almost the same functions.
Enter login and password. To access the router configuration page, enter the correct username and password. Most routers have a standard username and password that you must use to log in. They vary by model and should be printed on the router or in the documentation.
- The most common login is "admin".
- The most common passwords are "admin" and "password".
- For some routers, it is enough to enter only the login and leave the password blank; in some models, you also don’t have to enter the login.
- If you cannot find the standard login and password, look online for the standard login for your router model. If it has been changed, to reset to factory settings, hold down the Reset button on the back of the router for 10 seconds.
Open your wireless network settings. After logging into the router, you will be taken to the main menu or status screen. There will be several options to choose from. The Internet section can be left unchanged unless you receive special settings from your Internet service provider. In the Wireless Networks section, you can change your wireless network settings.
Enter a name for the wireless network. In the Wireless Networks section, you will see an SSID or "Name" field. Enter a unique name for your wireless network. This is what other devices will see when scanning to wireless networks.
- Check the box to enable broadcast information about the service area. This will enable the wireless network.
Select a security method. Select from the list of available security options. For maximum security, select WPA2-PSK as the encryption method. It is the most resistant to hacking and will best protect you from attacks by hackers and intruders.
Create a passphrase. Once you have chosen the encryption method, enter the passphrase. This must be a complex password consisting of a combination of letters, numbers and symbols. Don't use passwords that can be easily identified by your network name or information about you.
Save your settings. Once you have named and secured your wireless network, click the Apply or Save button. It may take some time for the settings to be applied. Once the router reboots, your wireless network will become available.
Let's look at the features of building wireless networks using Asus equipment as an example, and get acquainted with the concept of wireless router set up. For people who do not speak English, this phrase seems to be incomprehensible. In fact, there is nothing terrible about it, because translated from English, this is setting up a wireless router. Let's figure out what and how. For example, we take the Asus WL-520gC wireless router.
Connecting a computer
This wireless router can be classified in the budget price category, which is what allowed it to gain popularity among many Internet users. The router has a standard interface and the usual set of connectors for connecting to the Internet.
To make settings for your wireless router, you must connect it to your computer. The procedure is not complicated: we take the router, and insert into it the cable from your provider (WAN interface), and the cable from the computer (LAN interface), and supply power to it. The next step is to check the settings of the PC’s network card to automatically obtain an IP address. The picture below shows the option for setting up a network card under Windows XP.
Setting up a network card under Windows XP
In the next picture you can see the setup option for Windows 7.

Setting up a network card under Windows 7
Make sure that the network card settings on your PC are the same as in the pictures above, otherwise the network connection will not be established.
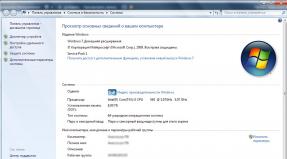
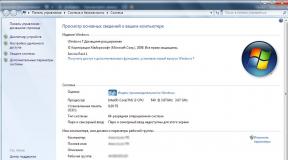
Now, if your network card receives the required values automatically, then it must be assigned its own address, which can be seen in the item - Local network connection status.

Network card connection status
The DHCP assignment message says that your wireless router has successfully assigned its personal IP address to your network card. Go ahead.
Setting up the router
Go to the web interface
Router settings are performed via the web interface. To get into it, open any browser and go to the page with the address – http://192.168.1.1, where you get to the authorization menu.

In this menu, enter the username and password – admin/admin. Click "OK".
Internet setup
After successfully logging into the router settings web menu, you can begin setting up the Internet.
We need to get acquainted with the main access protocols, these are DHCP and PPTP VPN.
Settings in DHCP mode
In this mode, the router receives an IP address from the provider automatically, so setup does not cause any difficulties. Go to the item – IP Config, then – Wan & LAN.

Internet settings menu
In the item – WAN Connection Type, set – Automatic IP. In – Choose WAN Bridge Port, set the LAN port to which the IPTV set-top box is connected; if not, leave it – None.
The WAN DNS Setting item contains information about the addresses of domain name servers, but this item can be left in the machine and then the provider’s DHCP server will assign them.
If your provider is “bound” to a MAC address, then in the MAC Address item you can enter the MAC address of the equipment to which the provider’s cable was previously connected. You can also enter any address of the equipment you need. If you want, you can leave the MAC address of your router, but then you will have to call your provider and inform them about its replacement. Now you can click Finish. The router will save the settings and display the following message.

Router message
This message says that the router "wants" to reboot. Click Save&Restart. We see the following message.

Router message
We wait 20 seconds.
Setting up routing
Now go to IP Config, then to – Route, here in the option – Use DHCP routes set the value to Yes. If you will use IPTV, then activate the item – Enable multicast routing. Click – Finish.

Setting up the router
To check the settings, you can go to the status menu – Status & Log, section – Status.

Menu status
This menu contains all the important data for connecting to the provider. There are two buttons at the bottom that you can use to turn your connection on and off. Now let's move on to the settings of the PPTP VPN connection.
Configuration in PPTP VPN mode
For this mode you need to enter many more values than in the previous mode. Go to – IP Config – WAN & LAN.

PPTP VPN mode settings
Enter the following data:
- WAN Connection Type – set to PPTP.
- Choose WAN Bridge Port – set the LAN port of the IPTV set-top box.
- WAN IP Setting – enter the data issued by the provider.
- WAN DNS Setting – also provider data.
- User Name – login from the provider.
- Password – password from the provider.
- PPTP Options – set to No Encryption.
- MAC Address – enter the desired MAC address.
- Heart-Beat or PPTP/L2TP (VPN) Server – specify the provider’s VPN server.
Now that's it, click Finish.
Wireless setup
Now we can finally move on to consider the concept of wireless router setup. To set up your wireless connection, go to Wireless, then Interface.

Wireless Setup Menu
Here you need to fill in a “bunch” of fields:
- SSID – network name. You can come up with anything.
- Channel – here you select the channel of the wireless network. You can choose any, but it is better to set the automatic mode.
- Wireless mode – the wireless communication standard is selected here. Set the value to 54g onlу.
- Authentication Method – at this point you select the encryption method. Set it to WPA-Auto-Personal.
- WPA Encryption – the data encryption algorithm is assigned here. Set it to TKIP+AES.
- WPA Pre-Shared Key – enter the password. It must have at least 8 characters of the Latin alphabet.
That’s it, to save, click – Apply.
Go to the menu – Advanced. Here are “interesting” settings that can affect the operation of the wireless network.
In the Hide SSID item, you can deactivate the distribution of the network identifier. This will allow you to “hide” the wireless network when wireless devices search for networks. Those. your network name will not be visible in the list of available networks.
In the item – Multicast rate you can set the width of multicast traffic. If you plan to watch IPTV over WiFi, set the value to 36 Mb/s.
With Radio Power you can adjust the emitter power of your WiFi network. If you want to prevent your neighbors from “seeing” your network, you can reduce the radiation level.
In principle, that’s it, click – Finish.
Installing and configuring a WiFi router
A wi-fi repeater is one of the most effective ways to increase the signal coverage area. Among the large number of offers, some prefer more expensive options from a specialized store, others do not want to pay almost double the amount for the same functions. The second only needs to figure out how to set up a wi-fi repeater from China, which will serve as an acceptable source of the Internet.
The repeater is configured via a web browser. The procedure can only be carried out through a computer, having previously established a connection between the devices.
How to connect the repeater to a PC:
- turn on the device by plugging it into the socket. At this moment, the operation indicator will light up. It is recommended to keep the repeater as close as possible to the computer;
- wait for the indicator light to turn on if the repeater is wireless. Otherwise, connect the devices using a cable;
- The repeater must be located among the available wireless networks; the name will include repeater. Click on the icon and select “connect”;
- when a message appears about a new router, which will offer automatic installation and configuration, in the window you need to click the hyperlink with the words “connect to the network.”
Upon completion, the Internet will automatically turn off, and an icon of the connected device will appear in the tray. Next, the setup of the Chinese wi-fi repeater in the interface begins.
Setting parameters
Setup is necessary to connect to the desired Wi-Fi network and enable the main function - expanding the coverage area.

How to set up a wi-fi repeater from China:
- The IP address of the repeater is entered in the address bar of the working browser, which must be indicated either on the browser itself or in the instructions. To set up a wi-fi repeater from China, you can dial 192.168.10.1;
- in the next window, enter the word admin in both the login and password fields;
- In the menu that opens, configure the connection mode in the “wireless repeater mode” field. Select “Repeater Mode” and “AP mode” for wireless and wired connections, respectively;
- In the next window, you need to find your wi-fi network from those proposed, click on it and confirm by clicking the “Apply” button. If available, enter the password;
- if the required network is not available, refresh the window by clicking “refresh”.
The success message will display the following message: the setup of the Chinese wi-fi repeater is complete. The interface is no longer needed, and the signal level should be at maximum.
If there is no access to the interface
The previous instructions describe the sequence of actions for a network with untouched settings. If any changes were made, then there is a chance that you won’t even get into the interface. In this case, you will have to configure the computer first.
A wi-fi repeater is primarily a signal repeater, and it is necessary to increase the wi-fi coverage area. The quality of the outgoing signal depends on the correct settings of the repeater.
Setting up a PC if you don’t have access to the repeater settings:
- The repeater, plugged in, is connected to the computer with a cable. You need to find and click on “network center” and select “change adapter settings”;
- then click on the local network icon. By right-clicking on the last one, the “properties” line is selected. In the new window you need to select the TCP/IPv4 setting;
- A menu will appear in which you click “use the following IP address.” After this, the following parameters are entered in the IP, mask, gateway fields: 192.168.1.111, 255.255.255.0, 192.168.10.1, respectively. At this point the setup is completed and click “OK”.

Setting up a PC without access to the repeater panel
When all actions are completed and saved, entering the repeater interface should be successful. It is not recommended to change PC settings unless absolutely necessary, that is, without absolute certainty that they are the only problem.
For a recently purchased repeater, it will not be difficult to carry out the entire process described above, especially if there have been no previous changes in the computer settings.
Many people face some problems with the instructions of Chinese-made products, but the versatility of installing repeaters solves this problem. In this case, the result of use will be noticeable immediately in the form of a full indicator of the wi-fi signal level.
A Wi-Fi repeater (or repeater) is a device whose task is to relay the signal from a wireless router or access point. Used to expand wireless network coverage. Many modern equipment models can operate in different modes:
- access point (AP=Access Point);
- repeater;
- universal repeater;
- wireless network client;
- bridge with access point function.
Operating modes of wireless equipment
If you want to take advantage of the wireless repeater feature today, you need to look for equipment that is referred to in manufacturers' catalogs as:
- Access point (in English terminology Wireless Access Point) ;
- Wireless repeater or wireless signal booster(in English terminology Range Extender) ;
Attention! Routers (i.e. routers) rarely have wireless repeater functionality these days. Some router models can be used as a repeater by installing alternative DD-WRT firmware. However, the device may be unstable on alternative firmware.
Let's take a low-cost access point as an example. TP-Link TL-WA701ND. But the instructions are also suitable for other models like TL-WA730RE, TL-WA801ND and similar ones.
The device can operate in several modes:
Access Point Mode
Convert your existing wired network to wireless.
Repeater mode
Expanding the coverage of an existing Wi-Fi network by relaying a wireless signal.
Wireless Client Mode
The device functions as a wireless adapter for connecting wired devices to a wireless network.
Bridge+AP mode
Connecting two local networks using a wireless channel.
What is the difference between a repeater and an access point?
A wireless access point connects to the network using a cable and creates a wireless network around itself. And the repeater mode implies both connecting to the network and relaying it exclusively via a radio channel.
Setting up a Wi-Fi repeater
Before setting up the repeater, configure the main router to a specific broadcast channel. If auto channel selection is set on the main router, the repeater will lose connection with it more often:

Different manufacturers have different web interfaces for their equipment, but the essence of setting up a wireless repeater is the same: in the device settings you need to specify the MAC address (BSSID) of the main access point and its security parameters. We will tell you how to set up network relay using the example of the same budget access point TP-Link TL-WA701ND, which can operate in repeater mode.
Before setting up, place the signal repeater in the area of reliable reception of the wireless network whose coverage you are going to expand. Later, once the relay setup is complete, you can experiment by moving the repeater and observing the quality of the relay.
To connect the repeater with the head router or access point, you need to perform the following steps:
1 Connect the repeater using an Ethernet cable (patch cord) to LAN-port of your existing router or access point:

You cannot connect via a wireless network to an unconfigured repeater, because... it itself does not broadcast the wireless network and does not issue an IP address. An exception may be if your repeater defaults to access points and you will configure it from a device equipped with a Wi-Fi module. But we still recommend using a patch cord.
2 Connect to your main router's network from any computer, as you did before.
Go to the properties of the network adapter on your computer and manually assign an IP address from same address range, to which your new wireless repeater (or access point with repeater function) is configured (). Read the instructions for the device and you will find out exactly what its default IP address is. Often the IP address is also indicated on the bottom of the device:

If we talk about TP-Link equipment, then usually their routers have a default IP address of 192.168.0.1, and access points with a repeater function have IP 192.168.0.254.
Let's say the default IP address for the new extender is 192.168.0.254. This means that to configure it, you can temporarily assign the IP address 192.168.0.20 to the computer’s network adapter:

3 Go to the repeater web interface ().
By default, TP-Link equipment has the following credentials:
IP address: 192.168.0.254;
Login: admin;
Password admin.

4 Click EXIT to exit the setup wizard.

5 Go to the section Network. The only setting in this section will open LAN.
As we said above, by default the device uses the IP address 192.168.0.254. If you are using a different address range on your network, set a new IP address from the same range. For example, if your router, whose signal you are going to relay, operates in the 192.168.1.1-192.168.1.254 subnet, change the repeater address to 192.168.1.254 or any free one from the 192.168.1.* subnet.
When setting up a repeater, you need to make sure that:
- The IP address of the signal repeater belongs to the same subnet as the IP address of the main router;
- there is no conflict between the addresses of the router, signal repeater and other devices on the network.
If your network uses addresses in the range 192.168.0.1-254 with a mask of 255.255.255.0, do not change the setting LAN on the repeater.
In this case, continue reading these instructions with paragraph 8 with the words “Select mode Repeater(Range Extender)«
In our example, we are using the subnet 192.168.95.0.1-192.168.95.254. Therefore, let's change the IP address from 192.168.0.254 on 192.168.95.254.
If you have changed the access point's IP address, click Save

Then click OK in the following window to reboot the device:

Wait for the reboot to complete:

6 Because Now the repeater will fall into the working range of IP addresses of your existing network, return automatic receipt of parameters in the properties of the computer’s network card:

7 Log in to the repeater web interface using the new IP address:
(if you did not change the IP address, then go to http://192.168.0.254 again)

8 Select a mode Repeater(Range Extender).
Click the button Save:

After changing the operating mode of the device, you must reboot it again. Click OK to reboot the device:

Wait for the device to boot:
9 Go to section Wireless. This will open the setting Wireless Settings.
Repeater mode has two subtypes: WDS Repeater And Universal Repeater. The easiest way is to use the mode Universal repeater. It will work in most cases. Use WDS repeater only if you know for sure that the root access point supports WDS.
After selecting the operating mode, you must specify the details of the main access point whose signal the repeater should relay. In field Wireless Name of Root AP enter the wireless network name (SSID) of the main access point, and in the field MAC Address of Root AP Enter the MAC address of the main access point.
In the web interface of TP-Link devices there is a button for these purposes Survey.

It is used to search for available wireless networks. By clicking on it, you can select any available wireless network and add it to the repeater with one click on the link Connect. In this case, you do not need to enter either the SSID or the MAC address of the access point (BSSID). These details will be entered automatically.
After pressing the button Survey wait about 10-15 seconds until a window appears with a list of available wireless networks, and then click Connect in the line with your network:

Click Save to save settings:

10 Go to settings Wireless Security.
Select the security mode that is used on the root access point (WPA2-Personal is recommended).
Enter the appropriate security key.
Click Save:

In the pop-up window, click OK:

11 Go to section DHCP. This will open the setting DHCP Settings.
Set the switch DHCP Server to position Disabled and press the button Save:

If you leave the DHCP server enabled, the Internet will not work on devices that will connect to the repeater.
12 Go to section System Tools.
Click the button Reboot:

In the window with a question Are you sure to reboot the Device click the button OK:

Wait for the device to reboot:

13 Disconnect the patch cord from the LAN port of the device.
After rebooting for 1-2 minutes, the device should connect to the root access point (or main router) and start relaying the signal. In this case, the first indicator on the right should light up:
Your devices, such as a smartphone, tablet, laptop, will see the same network as before, only the signal should become several notches stronger. There is no need to do any reconnections on client devices, because the repeater relays a network with the same name and the same security settings.
How to check the repeater operation
Question: Why check? After all, if devices connect to the network, then everything is fine?
Answer: This statement is incorrect. Devices may connect to a more distant access point or router, but the repeater may not function. Therefore, the verification needs to be approached more scrupulously.
Method 1: Try to access the web interface of the access point after disconnecting the patch cord from its LAN port.
Go to page Status. If in the area Wireless you see the SSID of the relayed network and the signal strength of the root access point, and in the area Traffic Statistics— the number of sent and received packets, then the signal repeater functions correctly:

Method 2: Launch the application Wi-Fi Analyzer on Android device ().
You should see two access points with the same SSID running on the same channel:

What is a wifi repeater and how can this device be useful?
A wifi repeater is a device that allows you to expand the coverage area of a WI-FI signal. This device is also called a signal repeater.
For example, the router is installed in one of the rooms - there the signal is excellent and stable, but in the far room there are problems with speed.
To eliminate this phenomenon, install a wifi repeater that expands the range router and makes the signal more stable.
How to make a wifi repeater from a router
If you do not have a repeater, but have two routers, you can establish a wireless connection between them.
To make a wifi repeater with your own hands, you need in the router, which will be the main one in the circuit, change the transmission channel.
To do this in router settings you need to open the Wireless section. Opposite the Channel parameter, you must enter the channel number in the empty field.
The number can be any, the main thing is to remember its meaning - this information will be useful when setting up a router that acts as a repeater.
To save all changes made, click the “Save” button.

Now let's start setting up the router, which will act as a repeater.
To open the settings, enter the address indicated on the back cover of the router into the address bar of the browser.
For company devices tp-link this is , or 192.168.1.1.
If you did not change the standard data when connecting the router, then enter the word admin in the login and password fields; if there were changes, enter your own data.

Now you need to disable the WPS function - to do this, select the section of the same name in the menu and click “Disable WPS”.
For all changes to take effect, you must restart the device. Then you need to click on “click here”.

Once the reboot is complete, the settings menu will open again, let’s proceed to changing the router’s IP address - go to the Network section and from there to the LAN tab.
Now the last number IP addresses you need to replace it with the number “2” and save the changes with the “Save” button.

After rebooting the device, the changes should already take effect.
Setting up a wireless bridge
Select the Wireless tab from the menu. Opposite the Wireless Network Name line, enter the name of the new network, and opposite Region, enter your region.
Next to Channel, enter the channel number that you specified when setting up the main router.

Advice! If the Internet does not work when specifying the same channels, try entering different numbers.
Now all that remains is to activate the WDS mode - to do this, check the box next to the Enable WDS Bridging line and start searching for available routers with the “Survey” button.

If there are several proposed networks, select the one broadcast by the main router and confirm your choice.

On the settings page that opens, the SSID and BSSID fields will be automatically filled in.
If the network transmitted by the main device is password-protected, then in the field opposite Key type you need to indicate the encryption type, and in the Password field enter the network password.
Save the settings and reboot the router.

The network is ready to use.
The connection status can be seen on the main settings page - if Run is indicated next to the WDS Status line, this confirms the correctness of the actions performed.
Connecting and setting up WIFI Repeater.

The wifi tp-link repeater is connected to a PC or laptop using a special cable, better known to most users as “twisted pair”.
The repeater is powered through a POE injector.

Now you need to configure the network card. Go to “Start” - then to “Control Panel” and select “Network and Sharing Center”.


Place the cursor on the line “Local Area Connection” and right-click on it. Next, select “Properties”.

Now you need to select the line “Internet Protocol 4 (TCP/IPv4)”, and then on “Properties”.

In the window that opens, check the box next to “Use the following IP address.” The IP address must match the address set by the manufacturer.
For the wifi tp-link repeater it is 192.168.1.21, the mask is 255.255.255.0.
Having selected all the desired values, confirm the changes by clicking on the “OK” button.

Now you need to configure access in the Wi-Fi repeater. To do this, go to your browser and enter the IP address - 192.168.1.254 - into the address bar.
Before performing this, check to see if the proxy server is enabled in your browser settings. Disable it if necessary.

In the personalization window that opens, enter the login admin and password admin.

Go to the Wireless menu, select the Wireless Settings section. Opposite the Operation Mode line, set the status to Universal Repeater. We confirm the changes.

In the Survey menu you will see a list of available networks. Select the one you need by clicking on the Connect button.

Save your settings changes.


In the Wireless menu, select the Wireless Security section and in the required fields, specify the encryption type and password corresponding to the router.

Please note that if WEP encryption is activated on the TP-Link router, then Type, WEP Key Format, WEP Key, Key Type - the parameters should be similar to the router settings.
Otherwise, the TP-Link receiver will not establish a connection with the signal distributor.
You can check the connection status by checking the Status menu.
If, when refreshing the Channel page, you see a constant change in the number, it means that the security settings were entered incorrectly.

After checking that the security settings have been entered correctly, save the changes and restart the device.
To check the connection status of the repeater and router, go to the Status menu and pay attention to the connection parameters.
The name of the router with which the connection is being made should appear opposite the Name field; the Channel and MAC Address fields should be filled in.
In the Traffic Statistics field you will observe a continuous change of data packets.
WiFi signal booster - how a WiFi repeater will help expand your network coverage area
Strengthening the WiFi signal and thereby increasing the range of the wireless network is a problem that faces owners of large apartments or country houses when the WiFi signal needs to be received not only in neighboring rooms, but also in the garage