I can't register with Hamachi. How to register in Hamachi if an error occurs
Why might it be necessary to connect computers located in different places and significantly distant from each other into a local network via the Internet? The reasons may be different. Some people want to play with friends over a local network, others need it for work. For example, we have already considered and discussed the issue of the need to have a “white” static IP address.
In this article we will talk about how to connect remote computers into a network if it is not possible to obtain a static IP and . This can be done using various specialized programs. Let's look at this task using LogMeIn Hamachi as an example.
Installing LogMeIn Hamachi
LogMeIn Hamachi is a simple small program for creating private virtual networks.
2. Run the installation file
3. Select the installation language, click Next once again Further on the next screen
4. We accept the terms of the license agreement

5. Select installation options. I'll leave the installation path and menu group as default and check the box Create a shortcut on the desktop . Click Install .

6. Wait for the installation to complete. Leave the checkbox Launch Hamachi and press Ready .

7. If you did not uncheck the box in the previous paragraph, the program will start automatically. When you first launch the program, it will automatically check for the need for updates and install them if necessary.
8. Press the power button

9. After a while, a window will appear asking you what type of network to classify Hamachi networks as: home, work or public. I'll choose public.

10. The Hamachi registration window will open. If you have already registered, please provide your details. If not, then go to the tab Registration, Enter your email address and create a password. And press Create an account (sometimes this inscription is not completely visible).

When registering in the program, a profile is automatically created on the LogMeIn Hamachi website. It can later be used to manage your networks.
The program is installed.
Creating a VLAN via Hamachi
1. To create a network in Hamachi, click on the button Create a new network... or through the menu Net - Create a new network...

2. In the window that appears Network creation enter the network identifier (must be unique), set a password to connect to the network and confirm it. Click Create .

3. Our network appears in the main program window. There is no one in it yet. In order for someone else to connect to this network, you need to tell them the network ID (I have spvcomp1) and password.
Connect to an existing network
1. To connect to an existing network, click on the menu Net - Connect to an existing network...

2. In the window that opens Network connection enter the ID and password of the network you want to join and click Connect .

3. A new network has appeared in the list of our networks. It displays a computer that is also connected to this network. A green icon next to the computer name indicates that a connection with it has been established.

Additional settings LogMeIn Hamachi
Let's look at some of the settings of the LogMeIn Hamachi program.
1. Click menu System - Options .

2. On the tab Status you can see which email address the program is linked to, and also change Name. By default, the Name contains the name of your computer. You can install anything. You will be seen under this name on all Hamachi networks.

3. On the tab Safety can be checked Block new network members by default , if you don't want anyone else to join your network.

4. On the tab Options You can configure the display of a splash screen when the program starts, chat display, automatic updates, encryption and compression settings. And also go to additional settings.

5. Additional settings open quite wide program options. We will not describe all the parameters. The purpose of many of them is clear from the name. In most cases, the program will work stably and without the need to make deep settings. I will only note that if the connection between network participants is slow, you can try to disable the use of the proxy server, as shown in the figure.

6. After making all the changes, don’t forget to click OK at the bottom of the window.
Using Hamachi Network for Remote Desktop Access or Other Connection
Once your computer is networked with others through Hamachi, you can access those computers as if they were on the same local network as you.
If you have configured file and folder sharing settings, you will see the shared folders of other computers on the network in your network environment.
In other cases, you can access other computers using the IP addresses assigned by the Hamachi program.

Other computers can access yours using your IP address.

If you have connected computers into a network with the goal of connecting everyone to one of them via remote desktop, then you will not need a static IP address and . You can connect directly to the IP address of this computer in Hamachi.
Note. Hamachi has a limit on the maximum number of computers on a network (5 computers). However, you can create as many of these networks as you like.
If your goal was to connect computers to connect to a remote desktop, then the main computer in this case should be on each network. For example, there is a server and 6 client machines. We create two networks, each of which includes a server and 3 client machines (or 4 and 2, or in any other ratio).
That's all. Thank you for your attention.
In order to be able to establish a direct network connection with another subscriber, Hamachi provides each user with a unique permanent external IP address, which will be used as the main means of connection in the future.
Hamachi interface
Despite its apparent apparent complexity, setting up and using the Hamachi utility is quite easy, because this program has a terribly simplified, well-thought-out and intuitive interface.

Registering an account in Hamachi
After downloading and installing the program on your computer, first you need to register. Create a username/password, register and log into the program. Now all you have to do is add some networks to Hamachi to find other users. After this, you can negotiate with them through chat about playing, transferring files, etc.

Creating your own network in Hamachi
In Hamachi you can easily create your own network, for example, to allow only certain people into it, as well as fully manage it (differentiate statuses and access rights of users) and control all subscribers. To do this, click on the option "Create a new network" in the central program window or on the control panel in the column "Net". Give it a name (network ID) and a password (be sure to have more than three characters!). After that, you must provide this data to all users you want to see in it. Use icq, skype, e-mail, or simply post a message on the forum or in the comments on some website. There are actually quite a lot of options for notifying the right people! As soon as they receive the login/password for your network, they will immediately be able to join it. Both group and personal chat will be available to communicate with them. In addition, you will see the external IP address of each of them, which you will later use to establish a connection.

Connecting to third party networks in Hamachi
There are many different Hamachi networks on the Internet today dedicated to different games and the like. They are easy to find on all kinds of gaming sites and portals. All you need to connect to any of them is a login (network ID) and password! Find a site, look at the network you like, launch Hamachi, click on the option in the central program window or in the “Network” column "Connect to an existing network", enter correctly (or better yet, copy and paste!) your login/password and go ahead! The local public has probably already been waiting for you! On a third-party network, you will have access to almost the same functions (personal and group chat, file transfer, viewing data about other subscribers), with the exception of those that its admin and moderators have, as well as certain restrictions set by them (if any).


How to play through Hamachi
So, you have done everything correctly and the program is installed, configured, networks are created/added, the players are waiting... A logical question arises: “How to play through Hamachi?!”
Everything is extremely simple. To begin with, via chat, agree on a game with one of your opponents. Then, without turning off Hamachi, both players launch the game on their computers, enter the network mode (in each game it can be called differently: “multiplayer”, "collective game", “network game”, “online game”, etc.) and select the “local network” game option (it can also be called differently in different games). Next (by agreement in advance), one player creates a server, and the second gamer connects to it by entering the opponent’s login and IP address, which are available in Hamachi, into the required fields. As you can see, it couldn’t be simpler! However, do not forget to take into account that both players must have the same version of the game(taking into account options and modifications of repacks, patches and additions), otherwise there may be problems with the connection and game!
Some problems with Hamachi
Like any network program, Hamachi may encounter certain problems when working. Try to fix them by following these steps.
1) Connection failures often occur if users have installed different versions of the program. Try updating to one version or installing the latest one.
2) Disable it while playing antiviruses and firewalls(including the firewall on the router/router) or add Hamachi to them in "Exceptions".
3) Disable Firewall in Windows(press successively Start --> Control Panel --> system and safety --> Windows Firewall) or disable Hamachi restrictions in it.
4) On Windows 7 and Vista you need make the Hamachi network your "Home Network"(open Control Panel --> Network and Internet--> " and look at the Hamachi network icon, there should be a house with the inscription "Home Network", if this is not the case, then select the Home Network option).

5) To troubleshoot connection problems, you need to increase Hamachi network priority(open sequentially Control Panel --> Network and Internet --> Network and Sharing Center --> Change adapter settings --> Network connections--> click Alt, to call function menu --> Additionally --> Extra options--> select Hamachi by clicking the mouse and clicking the green arrow on the right to raise Hamachi to the very top).


Despite the efforts of Hamachi developers to make this program as “friendly” and simple as possible, many users still have difficulty setting it up. By following the instructions below, you can easily configure Hamachi correctly for gaming or work.
General setup of Hamachi on Windows
In this article we will look at how to configure Hamachi 2.2.0.541 - the most available today. The example demonstrates the setting Hamachi for Windows 7, since this OS is the most common today.
In general, Hamachi does not require any additional configuration; all you need is to install the program, run it, and click on the “power” button (Fig. 1).
After this, you need to connect to the network of interest by clicking “connect to an existing network” (Fig. 2) or “network” -> “connect to an existing network” (Fig. 3).


A network details window will appear in front of you, where you will need to enter the network ID and password (Fig. 4).

If there are enough free slots in the network, you will connect and see a window with a list of participants (Fig. 5).

If Hamachi is launched on your PC for the first time, or information about previous launches is damaged, the program will display an authorization error message (Fig. 6).

In this case, you need to either register for free in the LogMenIn system (Fig. 7), or log in if you already have a LogMenIn account.


First, you should check if everything is ok with the network you are interested in. To do this, enter “hamachi test network” into a search engine and try to connect using any of the details that appear in the search results.
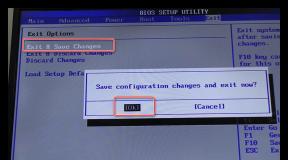
If Hamachi does not connect to any network, click “system” -> “parameters” (Fig. 9).

Select the lowest item in the left panel - “Parameters”, find “Encryption” there and set the type to “Any” (Fig. 10).

Then click the “Advanced settings” item located at the bottom of the window (Fig. 11).

If you do not use a proxy server, set the corresponding attribute with the “no” flag (Fig. 12).

Please note that when using a proxy, connection problems may be caused by it.
Then resolve names using the mDNS protocol (Fig. 13).

Disable traffic filtering by selecting the “allow all” flag in the corresponding field (Fig. 14).

Enable presence in the Hamachi virtual network (Fig. 15).

Confirm the changes made (Fig. 16).

Close the program and enter it again.
If the above does not help, try temporarily disabling your antivirus.
Also, sometimes Hamachi does not connect due to the Firewall blocking it.
To turn it off, click " Start» -> Control Panel -> Firewall-> Enabling or disabling Firewall
(Fig. 17) (Fig. 18) (Fig. 19) (Fig. 20)

Sometimes the source of problems is not an incorrect Hamachi configuration or an overly “vigilant” Anti-Virus, but the port through which your router broadcasts.
Open two arbitrary free ports in the settings of your router (each specific router model has its own specifics for opening ports - see the instructions). Then configure Hamachi to use them by specifying the local TCP address and local UDP address attributes in the already familiar “advanced settings” window (Fig. 21).

After that, restart the router and restart Hamachi. An important point - when “forwarding” ports, do not confuse the addresses for the TCP and UDP protocols!
Special cases of Hamachi configuration
It is worth noting that this program is often used by gamers to build gaming networks, as well as various organizations to create corporate file sharing systems. In such cases, you should strictly follow the instructions of the gaming community or your company. However, at the same time, you must understand that if you decide to download and install a third-party unofficial Hamachi distribution, you are endangering the security of your PC - unless absolutely necessary, refrain from connecting to such networks.
How to set the language in Hamachi?
Unfortunately, there is no optional language selection in the program. In order not to run for a dictionary, it is enough that you have the Russian version of Hamachi. If for some reason you need a different language, reinstall the program after downloading the “hamster” localization corresponding to the language you are interested in.
notice, that Hamachi official website provides the ability to download only the English version of Hamachi. We can.
Hamachi is an application for creating virtual local communications based on VPN tunneling technology. Participants in a secure network exchange data via an Internet channel, just as in a physical local area. Connection to Hamachi networks is carried out through authorization: the user specifies the network ID (its name) and password to enter. To create your own network, you need to specify the login and password for your account in the Logmein system (the main developer site).
Hamachi is especially popular in the gaming community. Because it provides the opportunity to play old and new multiplayer games online to a limited circle of people (invited only).
Registration
To register in the Hamachi system, follow the instructions below:
1. Open the official website - vpn.net.
3. In the form that opens, enter your work email address and the password you entered twice.
Note. Please note the password rating below the field. It is recommended to use character combinations for entry with the status “Excellent” (that is, at least 10 characters long).

4. Click “Create an account”.
5. On the new page, enter your personal information:

- First and last name;
- position held;
- mobile number in international format;
- place of work;
- specialty (select the appropriate status from the drop-down list);
- the estimated number of computers in the virtual network.
6. Click "Registration".
Upon completion of creating a profile, the service will offer to download and install LogMein software to organize remote access to your computer. To use this feature, click “Download and install software.”

Email Verification
2. Open a LogMeIn message.
3. To confirm your profile, follow the link in the middle of the text.

Download and Install Hamachi
1. On the vpn.net page, click the green “Download now” button.

2. Launch the downloaded distribution.
3. If necessary, set a different interface language in the “Choose... language” menu (Russian by default). Click Next.

4. In the “Select Parameters” window, if you need to change the installation path, use the “Browse” button to select a different directory. Select the checkbox in the “Create a shortcut...” setting to launch the application from the desktop.

5. Click the “Install” button.
- Launch the Hamachi application.
- Click the “Enable” icon on the panel.
- In the window that appears, enter your username and password to log into the LogMein system (see “Registration”). And then click “Login”.

Network creation
1. Click in the “Create a new network” panel or select the function of the same name in the “Network” menu section.

2. In the “Network Creation” panel, set the network ID (an arbitrary name from English letters and numbers) and login password (repeat it 2 times).
So, you are launching Hamachi for the first time and are already eager to connect to some network with players, but an error appears about the impossibility of connecting to the LogMeIn service.
In this article we will look at all the nuances of registration.
1. The easiest way to register is through. The function is also available in the program itself, but sometimes an error occurs.
2. On the Sign up page, just enter your current email and desired password 2 times.

3. All that remains is to confirm your entry via email (you will need a link to it).
4. Registration in Hamachi was successful, now the program has no questions for you, you can log in and use it!
In case of problems
1. In the program, click “System > Join a LogMeIn account...”.

2. In the window that appears, enter the email address of the registered account. A notification will appear indicating that a “join request” has been sent.

3. Now all the action is transferred to the site where work is done with existing computers and networks.

Select “Networks > My Networks” on the left. We see that 1 new connection request has appeared.

Now click on this line, put a dot next to “Accept” and click “Save”.
4. Now, after confirming the request, the program will successfully join any network. You will have access to all functions, parameters, connecting to networks or creating them.
Download the Hamachi client for Windows from our website:
Download the archive, unpack it to any location and install the program itself
You can download the latest version and other platforms from the official website
Note: Don't forget to uncheck Install LastPass

Installed and now launch. Sometimes a system reboot may be required.

Here's a hint:
Click the "Enable" button to get started.
which is what we do. The login/account registration window appears. Let's imagine that we don't have an account and we need to register. If you already have a Hamachi account, feel free to skip this step.
Registration
Enter your valid email details and password, not forgetting to check the box

Creating a Hamachi Server
So, we have successfully registered and now we need to create our own server where we will log in. In the main menu of the program, click on the button “ Create a new network«

Here we enter the identifier of our network (name) and any password to connect to it
Upon successful creation, our newly created server will appear in the list

Here we can see our IP address issued by the program:
Note: The IP address is permanent and is issued once. It cannot be repeated with others.
Connecting to a Hamachi server
And now the second person, having previously installed the program and registered, simply logs into your server using our ID and password
Click " Net» -> « Connect to an existing network"and enter our data

If everything went well, then our friend will be on the list of our Hamachi server:

Now we need to check whether the connection between computers is working? To do this, simply right-click ( RMB) to our friend and select the item “ Check availability«
The console will open and sending/receiving packets will begin. If all is well, it will look something like this:

If you can see
Timed out request.
then there is no connection between computers, there are problems and the main ones are Firewall And Antivirus- they need to be turned off.
After disabling the firewall and antivirus, we try to check the connection with a friend again, in theory, everything should work
Connecting to a Minecraft server
Note: All players must have exactly the same client versions! This is especially true for clients with mods.
There are 2 server options: built-in (run in the client) and dedicated (download separately)
Let's consider connecting to each of them
1. Connect to the built-in server
The server creates/enters the world, enters the menu ( Esc) and opens the server to the network ( Open for the web)
Here it is important for us to find out the port that will be written in the game chat
Note: With this type of server creation, the port will always be random
The second player simply starts the game, goes to " Online game", selects " Direct connection" or " By the address" and enter the Hamachi IP address and port separated by a colon ( : ), which we learned earlier

2. Connect to a dedicated server(recommended)
So, we have a ready and configured server, now we need to enter Hamachi’s IP address in the server settings so that we can log into it
In contact with
Registration in Hamachi occurs in two ways. To do this, you can use the program or the direct official website of the manufacturer Logmein.
The first way to register in Hamachi
The Hamachi program will need to be downloaded, and then installed and launched. Try trying to connect to any network. The program will display a warning on the screen about logging into your account or completing registration, since without this the system will not let you into the network.
You will need to click the “Registration” button, and then enter a valid email in the window that opens. This is necessary in order to confirm the information and create a secure password.
After you click on “Create an account”, you will need to open your email and click on the link to confirm that you are not a bot. You can consider everything ready!
The second way to register in Hamachi
You can register with Logmein Hamachi within the official website.
A window will open in front of you in which you should maintain your own email, a topic, create a password and click on the “Create account” item.
Now you can safely move on to further actions, since everything is ready!
You might be interested in:
-
 How to increase slots in Hamachi
 -
 Error: "Unable to verify the digital signature of Hamachi drivers"
 -
 Solving problems with creating a network adapter in Hamachi
Hamachi is an application for creating virtual local communications based on VPN tunneling technology. Participants in a secure network exchange data via an Internet channel, just as in a physical local area. Connection to Hamachi networks is carried out through authorization: the user specifies the network ID (its name) and password to enter. To create your own network, you need to specify the login and password for your account in the Logmein system (the main developer site).
Hamachi is especially popular in the gaming community. Because it provides the opportunity to play old and new multiplayer games online to a limited circle of people (invited only).
Registration
To register in the Hamachi system, follow the instructions below:
1. Open the official website - vpn.net.
3. In the form that opens, enter your work email address and the password you entered twice.
Note. Please note the password rating below the field. It is recommended to use character combinations for entry with the status “Excellent” (that is, at least 10 characters long).
4. Click “Create an account”.
5. On the new page, enter your personal information:

- First and last name;
- position held;
- mobile number in international format;
- place of work;
- specialty (select the appropriate status from the drop-down list);
- the estimated number of computers in the virtual network.
6. Click "Registration".
Upon completion of creating a profile, the service will offer to download and install LogMein software to organize remote access to your computer. To use this feature, click “Download and install software.”

Email Verification
2. Open a LogMeIn message.
3. To confirm your profile, follow the link in the middle of the text.

1. On the vpn.net page, click the green “Download now” button.

2. Launch the downloaded distribution.
3. If necessary, set a different interface language in the “Choose... language” menu (Russian by default). Click Next.

4. In the “Select Parameters” window, if you need to change the installation path, use the “Browse” button to select a different directory. Select the checkbox in the “Create a shortcut...” setting to launch the application from the desktop.

5. Click the “Install” button.
- Launch the Hamachi application.
- Click the “Enable” icon on the panel.
- In the window that appears, enter your username and password to log into the LogMein system (see “Registration”). And then click “Login”.

Network creation
1. Click in the “Create a new network” panel or select the function of the same name in the “Network” menu section.

2. In the “Network Creation” panel, set the network ID (an arbitrary name from English letters and numbers) and login password (repeat it 2 times).
In order to be able to establish a direct network connection with another subscriber, Hamachi provides each user with a unique permanent external IP address, which will be used as the main means of connection in the future.
Hamachi interface
Despite its apparent apparent complexity, setting up and using the Hamachi utility is quite easy, because this program has a terribly simplified, well-thought-out and intuitive interface.


Registering an account in Hamachi
After downloading and installing the program on your computer, first you need to register
. Create a username/password, register and log into the program. Now all you have to do is add some networks to Hamachi to find other users. After this, you can negotiate with them through chat about playing, transferring files, etc.

Creating your own network in Hamachi
In Hamachi you can easily create your own network, for example, to allow only certain people into it, as well as fully manage it (differentiate statuses and access rights of users) and control all subscribers. To do this, click on the option "Create a new network"
in the central program window or on the control panel in the column "Net"
. Give it a name (network ID) and a password (be sure to have more than three characters!). After that, you must provide this data to all users you want to see in it. Use icq, skype, e-mail, or simply post a message on the forum or in the comments on some website. There are actually quite a lot of options for notifying the right people! As soon as they receive the login/password for your network, they will immediately be able to join it. Both group and personal chat will be available to communicate with them. In addition, you will see the external IP address of each of them, which you will later use to establish a connection.

Connecting to third party networks in Hamachi
There are many different Hamachi networks on the Internet today dedicated to different games and the like. They are easy to find on all kinds of gaming sites and portals. All you need to connect to any of them is a login (network ID) and password! Find a site, look at the network you like, launch Hamachi, click on the option in the central window of the program or in the “Network” column "Connect to an existing network"
, enter correctly (or better yet, copy and paste!) your login/password and go ahead! The local public has probably already been waiting for you! On a third-party network, you will have access to almost the same functions (personal and group chat, file transfer, viewing data about other subscribers), with the exception of those that its admin and moderators have, as well as certain restrictions set by them (if any).


How to play through Hamachi
So, you have done everything correctly and the program is installed, configured, networks are created/added, the players are waiting... A logical question arises: “But how to play through Hamachi?!”
Everything is extremely simple. To begin with, via chat, agree on a game with one of your opponents. Then, without turning off Hamachi, both players launch the game on their computers, enter the network mode (in each game it can be called differently: “multiplayer”, "collective game"
, “network game”, “online game”, etc.) and select the “local network” game option (it can also be called differently in different games). Next (by agreement in advance), one player creates a server, and the second gamer connects to it by entering the opponent’s login and IP address, which are available in Hamachi, into the required fields. As you can see, it couldn’t be simpler! However, do not forget to take into account that both players must have the same version of the game
(taking into account options and modifications of repacks, patches and additions), otherwise there may be problems with the connection and game!
Some problems with Hamachi
Like any network program, Hamachi may encounter certain problems when working. Try to fix them by following these steps.
1)
Connection failures often occur if users have installed different versions of the program
. Try updating to one version or installing the latest one.
2)
Disable it while playing antiviruses and firewalls
(including the firewall on the router/router) or add Hamachi to them in "Exceptions"
.
3)
Disable Firewall in Windows
(press successively Start
—> Control Panel
—> system and safety
—> Windows Firewall
) or disable Hamachi restrictions in it.
4)
On Windows 7 and Vista you need make the Hamachi network your “Home Network”
(open Control Panel
—> Network and Internet
-> " and look at the Hamachi network icon, there should be a house with the inscription “Home network”, if this is not the case, then select the home network option).

5)
To troubleshoot connection problems, you need to increase Hamachi network priority
(open sequentially Control Panel
—> Network and Internet
—> Network and Sharing Center
—> Change adapter settings
—> Network connections
—> click Alt
, to call function menu
—> Additionally
—> Extra options
-> select Hamachi by clicking the mouse and clicking the green arrow on the right, raise Hamachi to the very top).


- Application for creating virtual networks
Hamachi from LogMeIn is a convenient and easy-to-learn tool for creating private virtual networks. With its help, you can not only organize some kind of local network, but also get a completely legal “white” IP address. And if in the first case everything is quite clear - on a local network you can safely share files, play multiplayer games or open access to your devices, then we will have to decipher the second point a little. Today, many providers use only a few dozen “white” IP addresses in their network, so as not to strain network equipment and not pay extra money for renting address space. They give most users so-called “gray” (internal) network addresses.
At this point, the problems begin: how to “reach” the right user on such a network, how to access him on the “share” or how to connect to his game server? This is where the Hamachi program comes to our aid, or rather, one of its capabilities is to provide the computer on which it is installed with a “white” IP address and, using its servers, broadcast it to the World Wide Web.
Well, we've sorted out the theory. Let's start practicing and look at how to use Hamachi. According to the established tradition, let's start with the installation process of the application.
The Hamachi installation package can be obtained in several ways: from our website, taken from third-party resources, or obtained from the official website of the program after registering. Naturally, we strongly advise using software only from trusted “suppliers”, i.e. download it from our portal.
In any case, regardless of your choice, we would recommend registering on the developer company's page. This will take literally a few minutes of your precious time, but will add many useful tools to your arsenal. Go to the application developer's page and fill in the required fields:

After entering your personal information, you will be able to access the LogMeIn software download page:
And cunning developers will show you step by step how and what to do:
After this, you will see a summary page of your registered account, which displays the main features and characteristics of those installed using the LogMeIn software. connections: who established these connections, who connected, when this happened and for what purpose. Agree, it’s convenient to always have such information at hand!

But let's return to the Hamachi program. So, you have downloaded the installation package from our website. What's next? Feel free to run it and follow the installer prompts:

Installing the application is more than trivial, we will not dwell on all its stages. Let us only emphasize that if you are not a fan of additional software, then at the point

do something like this, i.e. uncheck the agreements for installing weird and incomprehensible applications))

Congratulations! Installation successfully completed!

It's time to start setting up the application.
We launch the installed program using the shortcut that appears on the desktop and see that the Hamachi interface is completely Russified. For this, we’ll mentally add one more point to the developer’s piggy bank))
As the main application window advises us, click the “Enable” button in the upper left corner:

We are asked to enter the name of the computer on which the program is installed. Let's enter. For example, "Laptop":

In the next step, Hamachi assigns us an external address, which is displayed to the right of the “Enable” button. Now with a pure soul we can begin to create a new virtual network. Click “Create a new network”

and fill in the required fields in the network settings dialog:

After you finish entering data and click the “Create” button, an icon of the created network and its network status will appear in the main application window: “online”:

You can check the network settings of the new connection and its parameters through the standard “Network Connections” snap-in of the operating system. For example, if you are the owner of the “seven” (Windows 7), then do the following: go to the “Control Panel”, go to the “Network and Sharing Center” tab and on the left click the “Change adapter settings” link:

You should see something like this:

A new connection has appeared with the name “Hamachi” and the status “Connected”.
This completes the configuration of the program in the direct IP address allocation mode. Now your friends and acquaintances can easily find your network resources or game server on the Internet.
The same steps should be repeated for other computers that you plan to connect to a private virtual network or use for joint multiplayer games.
Program interface:
Russian
Platform:XP/7/Vista
Manufacturer:
LogMeIn
LogMeIn
is software for creating your own secure VPN (Virtual Private Network) networks. It has a number of quite interesting features and fairly simple controls. In addition, to create a network there is no need to install additional equipment.
Key Features of LogMeIn
First of all, for the uninitiated users, let's say that such a network is virtual, not physical. It does not need additional devices to connect computers to each other. All terminals included in the network are connected via the Internet. Therefore, connection to the World Wide Web is the main condition for the functioning of the network. However, the fact that this is a virtual network does not mean at all that applications running on a regular local network will not work on a virtual network. Just the opposite. Everything that can work locally works here too.
The principle of operation of the program is quite simple. All nodes that are connected to the network use one additional node to discover each other. In this case, data exchange is carried out using peer-to-peer mode, that is, a mode characteristic of peer-to-peer networks. At the same time, all transmitted and received data are reliably protected by tunneling encrypted data. In addition, such networks interact quite easily with the SSL protocol and can be connected using the IP-sec protocol. What’s most interesting is that such virtual networks can be managed from anywhere. For this, a web interface is used, or, more simply, a computer connected to the Internet. By the way, for such a network it makes absolutely no difference whether the connected node is protected by a firewall. Indeed, in many cases, firewalls provide some restrictions when working on the Internet.
In conclusion, I would like to note that creating such a virtual network does not require any special skills or knowledge. This program may be especially convenient for those who want to quickly and easily create a network of several computers, without spending much time and effort on it. Moreover, the program supports many languages, including Russian.
Download the Hamachi client for Windows from our website:
Note: Don't forget to uncheck Install LastPass

Installed and now launch. Sometimes a system reboot may be required.

Here's a hint:
Click the "Enable" button to get started.
which is what we do. The login/account registration window appears. Let's imagine that we don't have an account and we need to register. If you already have a Hamachi account, feel free to skip this step.
Registration
Enter your valid email details and password, not forgetting to check the box

Creating a Hamachi Server
So, we have successfully registered and now we need to create our own server where we will log in. In the main menu of the program, click on the button “ Create a new network
«

Here we enter the identifier of our network (name) and any password to connect to it
Upon successful creation, our newly created server will appear in the list

Here we can see our IP address issued by the program:
Note: The IP address is permanent and is issued once. It cannot be repeated with others.
Connecting to a Hamachi server
And now the second person, having previously installed the program and registered, simply logs into your server using our ID and password
Click " Net
» -> « Connect to an existing network
"and enter our data

If everything went well, then our friend will be on the list of our Hamachi server:

Now we need to check whether the connection between computers is working? To do this, simply right-click ( RMB
) to our friend and select the item “ Check availability
“The console will open and send/receive packets. If all is well, it will look something like this:

If you can see
Timed out request. then there is no connection between computers, there are problems and the main ones are Firewall
And Antivirus
- they need to be turned off.
After disabling the firewall and antivirus, we try to check the connection with a friend again, in theory, everything should work
Connecting to a Minecraft server
Note: All players must have exactly the same client versions! This is especially true for clients with mods.
There are 2 server options: built-in (run in the client) and dedicated (download separately)
Let's consider connecting to each of them
1. Connect to the built-in server
The server creates/enters the world, enters the menu ( Esc
) and opens the server to the network ( Open for the web
) Here it is important for us to find out the port that will be written in the game chat
Note: With this type of server creation, the port will always be random
The second player simply starts the game, goes to " Online game
", selects " Direct connection
" or " By the address
" and enter the Hamachi IP address and port separated by a colon ( :
), which we learned earlier

2. Connect to a dedicated server
(recommended)
So, we have a ready and configured server, now we need to enter Hamachi’s IP address in the server settings so that we can log into it
Hamachi is an application for creating virtual local communications based on VPN tunneling technology. Participants in a secure network exchange data via an Internet channel, just as in a physical local area. Connection to Hamachi networks is carried out through authorization: the user specifies the network ID (its name) and password to enter. To create your own network, you need to specify the login and password for your account in the Logmein system (the main developer site).
Hamachi is especially popular in the gaming community. Because it provides the opportunity to play old and new multiplayer games online to a limited circle of people (invited only).
Registration
To register in the Hamachi system, follow the instructions below:
1. Open the official website - vpn.net.
3. In the form that opens, enter your work email address and the password you entered twice.
Note. Please note the password rating below the field. It is recommended to use character combinations for entry with the status “Excellent” (that is, at least 10 characters long).
4. Click “Create an account”.
5. On the new page, enter your personal information:

- First and last name;
- position held;
- mobile number in international format;
- place of work;
- specialty (select the appropriate status from the drop-down list);
- the estimated number of computers in the virtual network.
6. Click "Registration".
Upon completion of creating a profile, the service will offer to download and install LogMein software to organize remote access to your computer. To use this feature, click “Download and install software.”

Email Verification
2. Open a LogMeIn message.
3. To confirm your profile, follow the link in the middle of the text.

Download and Install Hamachi
1. On the vpn.net page, click the green “Download now” button.

2. Launch the downloaded distribution.
3. If necessary, set a different interface language in the “Choose... language” menu (Russian by default). Click Next.

4. In the “Select Parameters” window, if you need to change the installation path, use the “Browse” button to select a different directory. Select the checkbox in the “Create a shortcut...” setting to launch the application from the desktop.

5. Click the “Install” button.
- Launch the Hamachi application.
- Click the “Enable” icon on the panel.
- In the window that appears, enter your username and password to log into the LogMein system (see “Registration”). And then click “Login”.

Network creation
1. Click in the “Create a new network” panel or select the function of the same name in the “Network” menu section.
2. In the “Network Creation” panel, set the network ID (an arbitrary name from English letters and numbers) and login password (repeat it 2 times).