Installing Windows from a hard drive. How to install Windows directly from a hard drive using different methods? Windows 7 installation from hard drive
Hello friends! At your numerous requests, Vladimir wrote an article about the features of installing Windows on a computer with two or more hard drives (MBR). The article is very important and reveals the meaning of many errors that plague users when installing an operating system on a computer with two or more HDDs. For example:
- If your PC has two hard drives (Disk 0 and Disk 1) and you install Windows on Disk 1, the bootloader for the OS will be located on Disk 0, and not on the disk on which the OS is installed (Disk 1).
- If Disk 0 turns out to be Dynamic, the installer will refuse to install Windows.
- If there is no main partition on Disk 0, but, for example, a logical partition, then the OS installation will again end in a fiasco.
- If Disk 0 is converted to GPT style and Disk 1 to MBR, the system installer will again generate an error.
- There are also nuances of automatic recovery of the Windows bootloader using the recovery environment (Windows RE), located on a bootable USB flash drive or installation disk with the OS. For example, your system with the bootloader is not located on Disk 0, in this case there will be no automatic OS search, because the recovery environment (Windows RE) will not see the active partition on Disk 0. In short, read the article, it will be interesting.
When installing Windows on a computer with two or more hard drives (MBR), the OS installer always creates a boot loader on Disk 0, even if there is no operating system on Disk 0 and there is no active partition, the installer will create an active partition and place the boot files there, and Windows will install to the drive you specify
A friend of mine had one HDD and Windows 7 was installed on it. He bought solid state driveand transferred the operating system to SSD , and deleted the partitions with the system from the HDD and began to use the disk as file storage. Over time, Windows began to fail and he decided to reinstall it.
Having reached the window with the selection of partitions, I formatted the partitions on disk 1,

After that, I selected the partition and successfully installed the operating system.


The only thing that confused him was the bootloader, which moved from the active SSD partition (Disk 1) to the HDD partition (Disk 0), which was not active, and in a running Windows the label (System, Active) is the partition with the bootloader of the running system. I explain why this happened.

This is what the disks look like in the preinstallation environment after installationoperating system, System and all Active partitions (with and without bootloader).

When choosing a partition to install Windows, we select the partition on which the OS will be located, and the installation program creates the bootloader only on Disk 0; if there is no active partition on Disk 0, it will be created.


The nuances of automatically restoring the Windows boot loader using the recovery environment (Windows RE) located on a bootable USB flash drive or disk with the OS
The installation distribution contains recovery tools.

and after selecting this option, the search for the installed operating system begins.

Windows has been found and the recovery tools will work with the selected OS.

If you install an operating system with a bootloader not on Disk 0, there will be no OS search, because the environment recovery (Windows RE) (mini OS) did not see the active partition on Disk 0.
- The installation of an operating system with a bootloader may not occur on Disk 0, for example, if you disconnected Disk 0 and then connected it or when installing the OS using diskpart dism and bcdboot.

If Disk 0 has a GPT style, an incompatibility error will appear: " This version of System Recovery Options is not compatible with the version of Windows being restored".

When installing on MBR- Windows 8-10 disk, the same thing happens, the only means of recovery in all three cases is the OS will not be found.

The window with found Windows looks like this.

Tags for the article:
An interesting situation happened the other day, I’ll tell you now.
I needed to reinstall Windows 7 on my computer. It would seem like the most banal thing, is the author really having a crisis of the genre and he decided to talk about how to put a seven? Calm down, I won’t stoop to that level, I just wanted to create some intrigue :)
So, we have a completely working computer on which Windows 7 lived happily for about a year without any reinstallations. In connection with the sale of the computer, it was necessary to fill in a clean system to the delight of the new owner. The distribution is the same, the equipment is also unchanged, but the seven stubbornly does not work.
Windows has encountered a problem communicating with a device connected to your computer.
This error can be caused by unplugging a removable storage device such as an external usb drive while the device is in use, or by faulty hardware such as a hard drive or cd-rom drive that is failing. Make sure any removable storage is properly connected and then restart your computer.
If you continue to receive this error message, contact the hardware manufacturer.
Status: 0xc00000e9
Info: An unexpected i/o error occurred
Here's my verdict: 0xc00000e9- 100% hardware problem, in my case the DVD drive, which was last used to install Windows a year ago, was faulty (the problem also occurs when the quality of the disc itself is poor or the mutual dislike of a particular drive for a particular disc). Yes... everything is going to the point that DVDs, like CD drives, are becoming obsolete. For example, it is no longer available on my new Mac mini, as well as on my netbook.
The situation was aggravated by the fact that the two blanks with the Windows distribution were no longer girls, and even on a known working drive they refused to install and crashed with the same error - so how can you not believe in coincidences.
I would like to note that from the official licensed Windows 7 Pro disc, I was able to install the system even from my own DVD drive. Apparently stamped discs, no matter how you look at them, are read better than self-written ones. Enough with the introductions, because the story is actually about something else.
I was faced with the question of how to install an operating system without a DVD?
There are no blank discs at hand, nor flash drives, but there is an image of the distribution disk in the format ISO, a hard drive from some old laptop and an adapter for connecting the latter to USB (i.e., in other words, an external hard drive).
It turned out that installing Windows 7 from a USB HDD is even easier than from a USB FLASH and much faster than from a DVD. The entire installation took me about 10 minutes (the time here, of course, depends on the performance of your computer). This installation method is suitable for both desktop PCs and laptops with netbooks.
Preparing a boot HDD
Everything is simple here. We will need to create a primary partition (approximately 4Gb) on our external USB drive and make it active. The remaining space can be taken by another section and used for its intended purpose (for example, to organize a file dump).
I will describe in detail the process of creating a partition without third-party software, using exclusively Windows tools. ALL DATA ON THE EXTERNAL HDD WILL BE DELETED!
1. Control Panel -> Administration -> Computer Management (Disk Management)
2. Choose your USB HDD
(right click) - Delete volume;
(right click) - Create a simple volume;
In the window that appears, select the volume size of 4200 Megabytes (distribution size), and click next. If asked, select any free drive letter. After which we need to format our new partition FAT 32, click next and you're done.
Now we make the created section active (right-click) - make the section active. The second section (if you created it) does not need to be made active.
3. Copy Windows 7 to USB HDD
This stage should be taken very seriously. To do this, simply click LMB on the icon with binoculars and open the data volume. In the “Sources” section, select the “boot.wim” file. In the EasyBCD application window, click on “Add”. If all of the above steps were completed without errors, then you can safely proceed to the final stage of the entire installation process.

Final stage
Find the "Edit Boot Menu" tab. Here you need to click on the “Save” item. Be sure to restart your personal computer. This will eliminate the risk of various errors occurring and the system simply freezing. On the operating system selection screen, find the Data tab for the Windows 10 installer to start.

Important: if you need to perform a clean installation of the OS, you need to completely clear the system partition. To avoid errors and other troubles later, create it again and be sure to format it.
Windows 10 on a virtual machine
With this I would like to conclude this article. Don't forget to tell your friends on social networks and subscribe to my blog. And you won’t even notice how more and more new, interesting and, most importantly, the most useful articles for you will appear every day.
Even non-advanced Windows users have probably heard at some point that there are several ways to reinstall this operating system: using a DVD and a USB drive. These two options are now most common among users. However, there is another one that allows you to perform a “clean” installation of Windows OS or update it to a newer version using a hard drive partition. It can help in cases where there is neither a USB drive nor a DVD on hand on which to burn an operating system image. If you are interested to know, how to install Windows 10 from a hard drive partition, we recommend that you read these instructions. Perhaps it will be useful to you in the future.
Make sure you have:
- ISO file with Windows 10 operating system.
- EasyBCD and UltraISO programs.
- At least 5 GB of free space on the system partition.
Installing Windows 10 from a hard drive
- Install EasyBCD and UltraISO programs on your computer.
- Launch the Disk Management console. To do this, press the Win+R key combination, enter the command diskmgmt.msc and press the Enter key or the "OK" button.
- Select the system partition by right-clicking on it and select “Shrink Volume” from the drop-down menu.

- In the field opposite "Size of space to be compressed (MB)", enter 6000, and then click on the "Compress" button. After this, the new space should appear in the Disk Management window.

- Right-click on the new space and select “Create simple volume” from the context menu.

- In the wizard window, click the “Next” button three times.

- At the "Format partition" stage, in the field opposite "Volume Label" enter the name winsetup
, and then click on the “Next” and “Finish” buttons.

- After this, open “Explorer”, go to “Computer” and make sure that a new partition appears in it with the name you specified and a volume of 5.86 GB.
- Mount the Windows 10 ISO file, open a new partition and copy the files from the mounted image to it. If you have Windows 8, 8.1 or 10 installed on your computer, you just need to double-click on the ISO file to mount it. If you have Windows 7 installed on your PC, you need to use the UltraISO program to open the system image and copy files from it to a new volume.
- Launch EasyBCD.
- In the program window, select the "Add entry" section.
- Click on the "WinPE" tab.
- Opposite "Type" select "WIM Image (Ramdisk)".
- Opposite the inscription "Name" enter winsetup
.

- Specify the path to the "boot.wim" file. To do this, open the “Explorer” window by clicking on the icon with binoculars and a folder opposite the “Path” field, expand the winsetup volume, go to the “Sources” directory and select “boot.wim” in it.

- Return to the "EasyBCD" program window and click on the "Add" button.

- Go to "Edit Boot Menu" and click on the "Save" button.

- Click on "Tools" and "Restart your computer".

- On the OS selection screen, tap winsetup to launch the Windows 10 installer.
Interestingly, this way you can install not only Windows 10, but also Windows 7, 8 and 8.1. If you want to install any of these OSes, you will only need to delete the Windows 10 files, copy the files of your preferred system and specify the path to “boot.wim”.
This article describes how to install or reinstall Windows 7.
Before installation begins, you need to complete several preparatory steps. At the beginning of the article we have placed detailed content so that you can quickly view the entire sequence of actions and move on to the necessary part of the instructions.
If you are interested in a specific question (such as installation errors, how to enter and configure the BIOS, etc.), the links in the content will take you directly to it.
If you are a beginner, then simply follow the guide from start to finish: each point is described in as much detail as possible and includes links to supporting instructions.
What should be ready before installation
Review the list below to ensure your computer and system are ready to install or reinstall Windows 7 and follow the steps required to complete the preparations.
What types of installation are there, how to save personal files and programs
There are two types of installation:- A complete reinstallation of the operating system (OS), which completely erases a hard drive partition (or the entire drive), including all your programs, documents and files.
- An OS update that only updates system files.
If you haven't done this yet, read the article on preparing for installation, from it you will learn:
- how to save all important personal data;
- what programs will be needed immediately after installation and where to download them;
- Is it possible to copy installed drivers, where can I find the drivers after installation;
- analysis of some special cases;
How to legally download the original image of Windows 7 x64 or x32 for free.
Download original image can be done legally using the program "Windows ISO Downloader": the file with the Windows image will be downloaded with Microsoft official website.
Program file "Windows ISO Downloader"
with version 5.21
(dated September 20, 2017) is attached to the article (to the right of this text).
How to download the image correctly is shown in the figure below:
 Select the Windows 7 partition, then the desired edition of the Windows 7 image and the “Confirm” button.
Attention!
We strongly we do not recommend use Windows 7 builds - use only original system images.
Microsoft has several aircraft hangars with a variety of equipment designed to test the operation of the operating system on various combinations of devices. Therefore, the official OS image works correctly for the vast majority of users.
The authors of assemblies do not have such testing capabilities, so a certain percentage of users will experience problems during the operation of the assembly, which can only be resolved by completely reinstalling Windows.
Which image version to choose: 32 bit or 64 bit
Everything is very simple: a 64-bit OS is needed in two cases: so that the computer can “see” 4GB or more of RAM and so that you can work with “heavy” programs or games. Attention!
Some new programs and games may not run on 32-bit Windows.
Conclusions:
- If the amount of RAM is 4GB or more, feel free to choose x64 (64 bits).
- If the computer is old and complex programs (for example, audio and video editors, design systems, multimedia packages) are not used, choose x32 (32 bits).
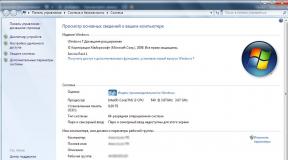
The easiest way to see how much RAM you have is to right-click on the icon "My computer" → select item "Properties" in the context menu.
The window that opens will indicate the amount of RAM, as well as the bit capacity of the system currently installed.
Which version of Windows 7 should you choose: Home, Professional or Ultimate?
There are different versions (editions) of Windows 7, some of which differ greatly in functionality. You can read more about Windows versions.
Most often, when installing, they choose between versions of “ Professional
" And " Ultimate
».
The best choice in terms of image version would be «
Windows
7
Professional
»
.
But don’t worry if you have a different edition of Windows - the installation process will be similar. In the edition " Professional
" Unlike "Ultimate"
there are a number of services that most users will never use.
You probably haven't even heard their names: DirectAccess, Unix Application Launch Subsystem, BranchCache, BitLocker, etc. Accordingly, hard disk space version «
Professional
»
will take less.
How to properly burn an image to a DVD or USB flash drive?
If you have already recorded the image and the installation from it went smoothly, then you can immediately move on to the next chapter. If you don’t know which programs can be used to burn an image to a disk or flash drive, then the following auxiliary articles will help you: Please note that installation from a flash drive is more reliable and also faster. If you have a flash drive with a capacity of 4GB or more, then it is better to install from it.
Windows reinstallation process.
So, preparation for installation is complete: all personal data has been saved, the media with the operating system distribution has been created, and the partition on which the image will be installed has been prepared.
Setting boot device priority in BIOS
- Restart your computer and enter the BIOS.
- on personal computers, buttons are most often used to enter the BIOS « DELETE» (« Del»), « F2", "F1", "Esc»
- on laptops - keys «
F8", "F9", "F12", "Esc»
- After going to the BIOS, you need to find the menu section responsible for installing devices to boot the OS.
The partition may be located in different places (depending on the type of motherboard and BIOS version), so you need to find the menu « FIRST BOOT DEVICE », « BOOT » or « BOOT DEVICE ».
- You need to go to this section of the menu and set the drive to first place DVD or HDD(your Flash drive) depending on what media the image was recorded on.
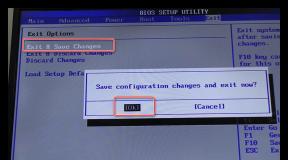
- After this, you need to exit the BIOS and save the changes.
Most often, to save changes, you need to press the key before exiting. « F 10" , and then confirm saving by pressing « Y » or by selecting « Yes » in the dialog box.
In the article you will find instructions with examples:
- how to enter BIOS or UEFI with examples of different BIOS screens.
- how to find the option "BOOT DEVICA PRIORITY".
- table with a list of keys for entering the BIOS on laptops from different manufacturers.
Autorun Windows installation from a DVD or flash drive
If you did everything correctly, then after restarting your computer you will see the following:
- if you are using DVD media, you will see the message “Press any key to load from CD...” (press any key to boot from CD). You must immediately press any key, because after a short amount of time (about 10 seconds) the boot will begin from the next boot device installed in the BIOS.
- if you used a flash drive, the installation will begin immediately
When installing an operating system, you should be careful and careful with functions that you do not fully understand.
The site administration is not responsible for the results of your actions.
Start installation
Attention!Your computer may have gray and blue USB connectors. If you are installing the OS from a flash drive, be sure to plug the flash drive into the connector USB2.0 (gray), otherwise the installer may not see it.
You can judge that the operating system installer has started working by the line that appears at the bottom of the screen.
 Figure 1. Installer Windows 7 copies files from the media for further installation of the OS.
When preparation for installation is complete, you will see the message "Starting Windows"
.
After this, the Windows 7 installation window will appear.
 Figure 2. Starting installation Windows 7: Select the language, time format and layout to be installed.
We will leave the time format, installed language and keyboard layout unchanged (as shown in Figure 2). Click on the button "Further"
, after which you can start the process by clicking on the button "Install"
.
 Figure 3. Start of installation Windows 7
You should now read and agree to the Microsoft License Agreement and click the button again "Further"
.
 Figure 4. License agreement for installation and subsequent use Windows 7.
Selecting the installation type
- A system update will allow you to reinstall Windows on top of your existing operating system.
- A full installation will allow you to select an existing partition for installation or re-partition the hard drive. The system will be installed completely, so this option is more acceptable (we wrote more about installation types at the beginning of the article).
 Figure 5. Selecting the operating system installation type.
Choose "Full installation (advanced options)", as shown in Figure 5.
 Figure 6. Selecting a hard drive for further installation Windows 7.
Hard disk partitions for system installation
After proceeding to the full installation, we will be presented with a list of hard drives on which we can create or select partitions for installation. At this step there may be several options for the development of events.
- You only have one hard drive in your system.
- You have a separate hard drive (possibly an SSD) where the operating system will be installed, and separate drives for storing data.
- The installer does not see the hard drive or other errors occur (below are links to articles that discuss these problems step by step)
If you have several hard drives, then transfer all important data to the drive where you will store personal files and disconnect it so as not to accidentally mix up the drives when creating partitions or formatting. If you only have one hard drive (or SSD), then it is advisable to split it into parts (if the disk space allows it).
The disk must be divided into parts so that at least 50GB is allocated for the system, possibly even more, because For normal operation of Windows 7, it is desirable that there be at least 15-20% free space on the system partition.
The disk is divided into partitions to make it easier to reinstall the operating system in the future.
For example, you have only 1 hard drive in your computer with a capacity of 500GB.
You split it into 2 parts: 120GB (disk " C:") and 380GB (Disk " D:» )
Now on disk « D:» you store music, movies, photos, program installers, folders with drivers, games, etc., and on the disk « C:» you install programs to work.
Files from the “Desktop” and “My Documents” folders are also stored on the disk «
C:».
When in the future you want to reinstall Windows, you just need to transfer (copy) all important files from the desktop and other disk folders «
C:»
to disk «
D:»
, then do a complete reinstallation with disk formatting «
C:»
.
If the disk is not partitioned, then you will have nowhere to transfer data from the disk «
C:»,
and you won't be able to format it.
Creating disk partitions
At this step, you can create partitions on your hard drive if:
- the hard drive is not partitioned (new or all partitions were previously deleted);
- There are no important files on the hard drive, and all information can be deleted.
If you are going to repartition the disk (and all important files have already been transferred from it), then you need to:
- Sequentially delete all partitions of your disk using the button "delete" . Attention! All files on these partitions will be deleted!
- Select the unallocated partition that appears with the mouse, click the button "Create" (See Figure 6).
- Specify the size first for the system partition (which will be the disk « C :» ), then create a partition for the disk « D :» (and other disks if necessary).
Selecting a partition for installation
If disk partitions have been created previously:
- Select the system partition (on which the OS was previously installed).
- Click on the button "Format".
- After formatting, select the erased partition and click on the button "Further".
- Analysis of various types of errors when installing Windows 7 (including by code).
- What to do if the installer does not see the device (drive, hard drive, keyboard or mouse, etc.).
 Figure 7. Creating a partition on the hard drive
In our case, no partition has been created yet, so we need to click on the button "Create" (Figure 7), then indicate the volume of the partition to be created (Figure 8) and click on the button "Apply" .
Figure 8. Selecting the volume for a partition on the hard drive
 Figure 9. Partition creation confirmation window
After this, the operating system installer will inform you that an additional partition will be created to store system files:
 Figure 10. Installing Windows 7.
Click on the button "Further", after which the installation will begin (copying all system files and the process of setting up the OS).
The process of copying files will take 15-30 minutes and will not require any action from you.
 Figure 11. Installation completion window
Once the files are copied and unpacked, the computer will restart.
At this point, you must remove the DVD or Flash drive from the computer, as the installation will continue from the hard drive to which the necessary files were copied.
After the reboot, you will see a window indicating that the installation is complete.
 Figure 12. Entering the username and network name of the computer for the installed system.
The completion process will take a few minutes, after which the initial setup of the operating system will begin.
Completing Windows installation and initial setup
When the setup process comes to an end, you will be prompted to enter a user name to create your account, as well as a computer name for subsequent network identification (under this name your computer will be visible on Windows local networks).
 Figure 13. Setting a password for the account (optional).
Next, you will be prompted to enter a password and a password hint. If you want to protect access to your account with a password, enter it. Or you can skip this step by clicking the button "Further"
.

If you bought a new hard drive or solid-state SSD drive for your computer, it is very likely that you have no great desire to reinstall Windows, drivers and all programs. In this case, you can clone or, otherwise, transfer Windows to another disk, not only the operating system itself, but also all installed components, programs, etc. Separate instructions for 10 installed on a GPT disk in a UEFI system: .
In fact, Seagate DiscWizard is a complete copy of the previous program, only to work it requires at least one Seagate hard drive on the computer.

All actions that allow you to transfer Windows to another disk and completely clone it are similar to Acronis True Image WD Edition (in fact, it is the same program), the interface is the same.
You can download the Seagate DiscWizard program from the official website https://www.seagate.com/ru/ru/support/downloads/discwizard/
Samsung Data Migration
The Samsung Data Migration program is designed specifically for transferring Windows and data to a Samsung SSD from any other drive. So, if you are the owner of such a solid-state drive, this is what you need.

The transfer process is carried out in the form of a wizard with several steps. At the same time, in the latest versions of the program it is possible not only to completely clone a disk with operating systems and files, but also to selectively transfer data, which may be relevant, given that the size of SSDs is still smaller than modern hard drives.
The Samsung Data Migration program in Russian is available on the official website https://www.samsung.com/semiconductor/minisite/ssd/download/tools/
Important: Other SSD and HDD manufacturers also have the same utilities for transferring Windows to another disk. Typically, you can find it by asking a query consisting of the brand and the phrase “Data Migration”, this is how you will find, for example, Intel Data Migration Tool and similar programs for other brands of drives.How to transfer Windows from HDD to SSD (or other HDD) in Aomei Partition Assistant Standard Edition
Another free program, also in Russian, that allows you to conveniently transfer the operating system from a hard drive to a solid-state drive or to a new HDD - Aomei Partition Assistant Standard Edition.
Note: this method only works for Windows 10, 8 and 7 installed on an MBR disk on computers with BIOS (or UEFI and Legacy boot), when you try to transfer the OS from a GPT disk, the program reports that it cannot do this (possibly , here simple copying of disks in Aomei will work, but it was not possible to experiment - failures when rebooting to complete the operation, despite Secure Boot being disabled and checking the digital signature of drivers).
The steps for copying the system to another disk are simple and, I think, will be clear even to a novice user:

If everything goes well, upon completion you will receive a copy of the system that can be booted from your new SSD or hard drive.
You can download Aomei Partition Assistant Standard Edition for free from the official website https://www.disk-partition.com/free-partition-manager.html
Transfer Windows 10, 8 and Windows 7 to another disk in Minitool Partition Wizard Bootable
Minitool Partition Wizard Free, along with Aomei Partition Assistant Standard, I would classify as one of the best free programs for working with disks and partitions. One of the advantages of Minitool's product is the availability of a fully functional bootable ISO image of Partition Wizard on the official website (the free Aomei allows you to create a demo image with important functions disabled).
By writing this image to a disk or flash drive (the developers recommend using Rufus for this) and booting your computer from it, you can transfer your Windows or other system to another hard drive or SSD, and in this case we will not be hampered by possible OS limitations, since it is not running.
Note: I tested cloning the system to another disk in Minitool Partition Wizard Free only without EFI boot and only on MBR disks (Windows 10 was transferred), I can’t vouch for its performance in EFI/GPT systems (I couldn’t get the program to work in this mode, despite Secure Boot being disabled, it looks like this is a bug specifically on my equipment).
The process of transferring a system to another disk consists of the following steps:

Once complete, you can close the Minitool Partition Wizard, reboot your computer and set it to boot from the new disk to which the system was transferred: in my test (as I already mentioned, BIOS+MBR, Windows 10) everything went well and the system booted as usual which did not happen with the source disk disconnected.
You can download the Minitool Partition Wizard Free boot image for free from the official website https://www.partitionwizard.com/partition-wizard-bootable-cd.html
Macrium Reflect
The free Macrium Reflect program allows you to clone entire drives (both hard drives and SSDs) or individual sections, no matter what brand your drive is. In addition, you can create an image of a separate disk partition (including Windows) and later use it to restore the system. Creating bootable recovery disks based on Windows PE is also supported.

After launching the program, in the main window you will see a list of connected hard drives and SSDs. Mark the disk where the operating system is located and click “Clone this disk”.
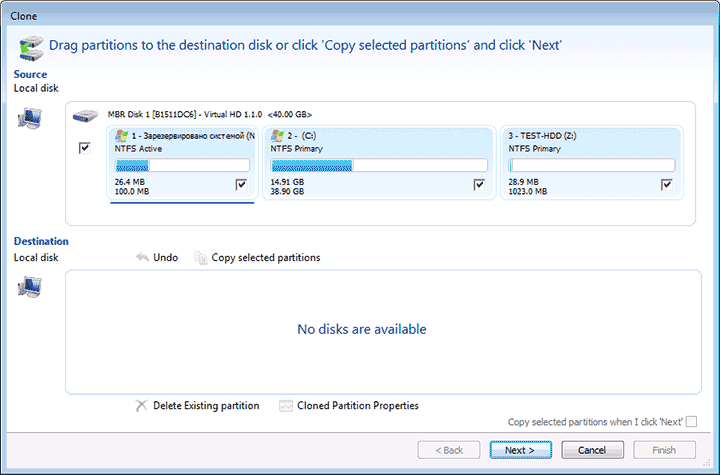
At the next stage, in the “Source” item the source hard drive will already be selected, and in the “Destination” item you will need to indicate the one to which you want to transfer the data. You can also select only individual partitions on the disk to copy. Everything else happens automatically and is not difficult even for a novice user.
Official download site: https://www.macrium.com/reflectfree
Additional Information
Once you have transferred Windows and files, be sure to either set the new drive to boot in the BIOS or disconnect the old drive from the computer.


