Installing Windows XR from a flash drive to a computer. Easy installation on a Windows XP laptop from a flash drive
The process of installing the Windows XP operating system is very simple, but without knowing some of the nuances, or rather, the actions that need to be performed at different stages of installation, such a simple task as installing Windows XP from a flash drive on a computer may be overwhelming for an inexperienced user.
So let's get started:
Before we start installing the Windows XP operating system from a flash drive, we need to carry out some manipulations. In particular, we need bootable media - a USB flash drive with a capacity of at least 2 GB. If the image has two versions, 32 and 64-bit, then more media may be required. You need to copy all important data from the flash drive to a safe place. Write to disk or copy to a removable hard drive, since in order to write a boot disk, the flash drive will be formatted. The installation process on a computer and on a laptop is fundamentally no different. With the exception of the BIOS entry key to change the boot priority from removable media. Here, we will not tell you how to make a bootable USB flash drive; this is described in detail in another article - How to make a bootable USB flash drive for Windows XP. Here we will directly install/reinstall Windows XP.
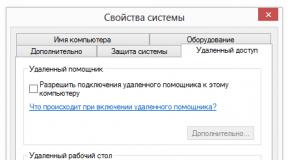
First, we need to set the boot priority from removable media, this can be done in the menu BIOS.
- Reboot the computer or turn it on.
- At the moment of reboot, we begin to actively press the key in order to get into BIOS. Usually this is a key Del . But it may differ in different models, it may also be F2 And F10 You can find out for sure if you pay attention at the time of inspection POST.

- Loading into the menu BIOS and move with the arrows on the keyboard to the tab Boot .
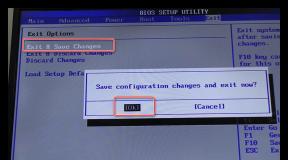
- Here we select our bootable USB flash drive and place it first. Save changes with the key F10 and restart the computer by pressing Esc .
- Now, if everything is done correctly, you will need to press any, any key on the keyboard when the corresponding message appears on the screen, otherwise the computer will start booting as normal.
How to install Windows XP from a flash drive
Now the fun begins.
- We are waiting for all Windows components to load.

- The next step is to create a partition. Press the key (WITH) to create a partition. In the input field, write in MB what size disk you need to install Windows.

- Afterwards, the created partition needs to be formatted, click Enter, and again confirm the action and wait until the disk is formatted.

At this stage, when rebooting the computer, you need to remove the USB flash drive, otherwise the Windows installation process will begin again.
- The computer will restart and the installation of Windows XP will begin.
- Here you need to be patient, the whole process will last about 30-40 minutes.

Next you need to set the date and time, as well as the time zone. If necessary, create an administrator account and set a password for it.
After which the computer will restart again and you can install drivers and utilities.
@
Greetings to you friends and readers of my blog!
I understand that most of you switched to the brand new Windows 10, while the rest remained faithful to the good seven. However, there are still those who use the much-loved XP. For example, it is perfect for an office netbook or an old desktop computer in some run-down post office or somewhere else.
Therefore, I keep this OS on one of the weaker laptops so that, if something happens, I can find or check something on a new machine. Therefore, today I will tell you what creating a bootable Windows XP flash drive is, how it happens and what is needed for this. Go!
What flash drives are suitable?
Of course, the carrier is the most important part of our entire enterprise. Since we are talking about the Windows XP operating system, we can immediately say that it takes up little space, both packaged and unpacked from the iso image. Let's first understand the media type.

USB type. The most suitable option. Firstly, all computers have such a port. secondly, you don't need a card reader. Thirdly, these are the cheapest flash drives you can find on the market. You can try to order more original models from online stores with a protected case, a waterproof shell, and also with a full set of protection, even from a magnetic storm. But in general, among all these parameters, simplicity is important. The fewer parts there are in the device, the less there will be things to break. Consequently, the gadget will last longer.

SD and MMS. A type of media for which there is already a port in laptops and all card readers. Used in cameras and video recorders. They are quite cheap and are quite suitable for us to record a bootable device with a “piggy” (Windows XP) on board. To boot from such a card, you will need a card reader that will connect via USB.

MicroSD. Such a device is found in almost every cell phone, tablet and camera. It will require either a card reader or an adapter to SD type. The drives are cheap, but the cost depends on the class of the gadget. They are divided into 2, 4, 6, 10. The higher, the faster the flash drive will work.

Now let's look at the ports. This applies to USB devices. They come in versions 2.0 and 3.0. The first type works on all computers and laptops. These are standard USB connectors. But the second ones are the blue ports, which are faster. If your computer does not have USB 3.0, but the flash drive runs on this format, it doesn’t matter, it will function quite well on 2.0, however, the speed will be standard. Accordingly, the cost of devices differs greatly due to these parameters. I do not advise spending money for the sake of an increase of several megabits per second, if we are talking specifically about the XP operating system.

Volume. This is an important aspect of choice. New operating systems take up a lot of storage space before they are installed. From 6 to 20 gigabytes. At the same time, they take much longer to install. And the operating system discussed in the article weighs very little. Only 4 GB will be enough, and there will still be plenty of space left for drivers, office programs and other software.
What needs to be done before recording?

Since I want to describe the whole process to you in detail, with all possible software, here is a list of software. which needs to be downloaded.

Ulta ISO – download here. The main tool for creating bootable flash drives. The most popular among ordinary users without special skills.

Rufus - take right here. A very useful thing. The software writes bootloaders very quickly. There are more settings here than in the previous software, but the software is also more professional. Download, install.

Winsetupfromusb 1.7 and another product that works on more modern systems. For example, with some versions of the programs described above, problems may arise in Windows 10. And this software works great on new operating systems.

Follow the link here.

Scroll the page to the very bottom.

You open the downloaded file in the browser directly through it.

poke this rectangle on the right

Then you click it again.

Text will appear in English, which you don’t really need, just move on.

Again text about licenses and other things. Let's move forward.

An offer will appear that we do not need. Click here.

Check the boxes everywhere if they are not there (although usually they are immediately by default).

Again, we poke the squares once and move on...

There will be unpacking, then the installation of the software itself. This will scan your laptop. You may be able to install several useful programs for free.

Click on the finish button.

A client window will appear, which means the installation is complete.
With the help of this software we pull from here- XP 64 bit version.
You can start burning.
Flash drive recording
We'll start the process with Rufus.
Rufus open the software as administrator. In the first position we place our flash card. In the second – the recording method is set to “ MBR for computers with BIOS or UEFI" This is an important aspect. Otherwise, when loading, the BIOS simply will not be able to detect our device and we will have to redo everything all over again. But we don’t need it, do we? Now let's start.

We agree with the warning that appears that all files will be erased and the device cannot be turned off.

Now we can see the recording progress, which will be right on the screen. It displays the creation of the boot sector itself and the transfer of files. 5 minutes is the average waiting time. Don't rush to leave the computer.

After completion, our flash drive can be used!
Now let's look at UltaISO.
So, we start our software exclusively on behalf of the administrator.


In this position you indicate the storage medium (flash drive), our recording method is always USB HDD+ and no other. I wouldn't do any formatting, but if you want to, you can. It’s just that the container will still be erased when recording starts.

That's it, now, after the burning process is completed, you can use our card to boot Windows.
Well, now let's try to do the same with winsetupfromusb.
First you need to select our flash drive in the program interface. It is advisable to format it first, just in case.

We check the box in auto-format, specify the system FAT32, then in the align department, and also click in copy BPB. That's it, we're done with putting down what we need here.

Here you need to indicate where exactly on your hard drive the ISO image file with the operating system is located.

Now let's start and write.
If you see a picture like this, it means the recording went well.

How to do this on UNIX systems?
Among you, my dear readers, there are those who use Linux systems. I will explain to you how to make a bootable USB flash drive in Ubuntu.
From here download the WinUSB software. By the way, there are instructions on how to install it. Be sure to read it if you have no skills in this aspect of computer topics.

Click here.

This is the interface that opens.

In the top position we select our flash drive. At the bottom we position (target) our information carrier. Next we make a recording.

When the process is finished, you will see a sign like this. Don't be afraid of the red icon; it only warns you that the operation has completed.

Afterword
I would like to immediately explain why “piggy” is better on older PCs. The system not only weighs little and works quite quickly. The most important thing is that it does not require a lot of resources from the computer. For example, even with a laptop with 2 gigs of RAM and a single-core processor, the OS will work stably and quickly. However, for Windows 10, such parameters are minimal, not even recommended. Therefore, it will simply slow down, or it will not start at all.
I will also mention that you cannot create a bootable USB flash drive using daemon tools. A disk is possible, but a USB drive is impossible. Therefore, without the additional programs described above, such an operation is almost impossible, unless you use the command line. Remember this.
And one last piece of advice. Such procedures cannot be performed on mac os. All the programs that I mentioned above only work under Windows or Linux. They simply will not be installed on a Mac OS. There is other software for it, which I will talk about in another article.
Conclusion
This is where I will end the article. By the way, here is a video on our topic. Take a look, you will learn a lot of new things for yourself if you are not familiar with this aspect.
All the methods that I gave you above will allow you to create a Windows bootloader completely free of charge. I hope you will share this article with your colleagues and friends on social networks. And also subscribe to my blog, and you will always know when new materials appear. With this I say goodbye to you, all the best to you and see you again on the site, my dear readers! See you in touch!
After Windows XP, Microsoft has already released several new versions, and despite this, many users continue to use it due to its wide support for various devices, user-friendly interface, and stable operation. Installing XP has only minor features; the basic principle does not have any important differences from installing newer versions of Windows operating systems.
Important points before installation - what you need to know
The first thing you will encounter after installing Windows XP is the need to install drivers for the correct operation of all devices. Unfortunately, new hardware often does not support older versions of Windows. Therefore, we strongly recommend that you check the availability of drivers for all components of your computer before proceeding with the installation. This can be done on the device manufacturer's website.
There are two versions of Windows XP - 32 and 64 bit. The 32-bit version (or x86) supports up to 4 GB of RAM while the 64-bit version supports up to 192 GB. Not all processors support a 64-bit operating system, so you should also check with the manufacturer about your computer's capabilities.
Preparation process
To install Windows XP from a flash drive you will need:
- an ISO image of Windows XP that you can download from many sites. It is advisable to choose a licensed or the cleanest version of the operating system;
- flash drive with a capacity of 1 GB or more. Remember that Windows XP does not support USB 3.0 so you should use USB 2.0 port (usually version 3 ports are highlighted in blue);
- WinSetupFromUSB program. You can download the program from various software sites.
Installation steps
The entire installation process can be divided into 4 main stages:
- preparing a bootable flash drive;
- writing an OS image to a flash device;
- changing BIOS settings;
- installation of drivers and programs.
Video: Bootable USB flash drive with Windows XP
Preparing a flash drive with Windows XP distribution
Before recording the image of the operating room, you need to format the flash drive.
To do this, perform the following steps:
- right-click on the flash drive;
- select “Format”;
- In the menu that appears, you need to set “NTFS” as the file system. Select cluster size 4096;
- Check the box next to “Quick Clean” and click “Start”.

This completes the preparation of the flash drive, after which you can proceed to recording the WindowsXP image.
Creating a bootable USB flash drive
If there is a special program from Microsoft to record images of Windows 7 and 8, then WinSetupFromUSB is used to create a flash drive with Windows XP installation files. The program can be downloaded for free on many software portals.
To record you need to do the following:


Photo: choosing the path to the unpacked image
Creating a flash drive will take some time; after completion, the message “Jobdone” will appear in the window, indicating that the image was successfully written.
Boot into BIOS
After creating a bootable flash drive with WindowsXP, you can begin installing the operating system. In order for the computer to boot the flash device first and not the hard drive, you should go into the BIOS and set the priority for reading devices.
Unfortunately, each BIOS manufacturer arranges the settings in its own order and the path to the read parameter may be slightly different, but the principle of setting remains the same.
To enter the BIOS, use this table; on most PCs the Del key is used, and on laptops F2.

After you have entered the BIOS you must:

After exiting the BIOS, the computer will reboot, and if all operations were performed correctly, the program will offer to boot from a flash drive.
Installing Windows XP SP3 Zver from a USB flash drive


- in the next window the user can select the partition in which the operating system will be installed. In addition, you can delete and create new partitions of the required size. It is recommended to install Windows on the same disk partition in which the previous OS was installed;

- after selecting the disk, the installer will offer to format the disk, select “Format partition in the NTFS system (Quick)”;

- after copying and installing the files, the system will prompt you to select the language, as well as the Name and Organization Name;
- if you are installing a licensed copy of Windows XP, the installer will require you to enter the key indicated on the box or stuck on the back of the laptop;
- After specifying computer security settings and creating an account, the installation of Windows XP can be considered complete.
Drivers for the system
After installing the operating system, you can begin installing drivers. If you cannot find drivers for yours, you can use the Driver Pack Solution program, which provides the ability to select the necessary drivers for your computer or laptop.

Utilities and programs
After installing the drivers, you can install all the necessary programs. It is recommended to start the installation with an antivirus and the most extensive programs.
Completing the installation and configuring the OS
The last stage is setting up and personalizing the system, including setting up the interface, Internet connection, and the operation of certain Windows XP services.
To connect to the Internet, you should contact your provider to obtain connection parameters.
If I have Windows 7, can I install WIndows XP?
The installation of a particular operating system depends on the availability of drivers for your devices for a specific OS. Therefore, if the component or laptop manufacturer provided drivers, then installation is possible, but if not, then some devices may not work correctly or not work at all.
Video: Windows XP installation error
Installation errors - causes and solutions
The most difficult moments are creating a flash drive and setting up the BIOS; these points should be approached with maximum responsibility. Changing certain BIOS settings can affect the operation of your computer, so it is not recommended to change settings that you are not familiar with. You can also check the information provided online to find out where the necessary settings are located.
Could not find CD drive
The cause of this error is the use of the UltraISO program to create a bootable USB flash drive for Windows XP. To create a bootable Windows XP flash device, you must use the Win Setup From USB, WinToFlash programs.

Installing the Windows XP operating system is quite simple. Thanks to the instructions provided, both experienced users and beginners can handle OS installation. One of the important points worth paying attention to is the choice of operating system build.
It is strongly recommended to download and install Windows images that are as close as possible to the licensed copy. This option provides the highest system stability for further use. In addition, you can select and download the latest versions of the programs you need to work.
For some people, it sounds crazy when you explain to them that on the new netbook they bought with Windows 7 Starter, you cannot install a picture on the desktop using the standard method. Yes, you can install a special program that will hang in memory and constantly display the image on the desktop.
After this, many demand to install their “native” Windows XP and even offer money. Since the system administrator is a highly moral being who cannot refuse the money offered, he has to take on the job of reinstalling Windows XP on a netbook without a CD-ROM.
Personally, for me, from a moral point of view, it is wrong to install Windows XP on a netbook with a real and valid Windows 7 license, although Starter, but as they say, the master is the master. Consistent with my moral principles and putting money in my pocket, I install Windows XP on clients' netbooks every time.
I have already installed Windows XP on a large number of netbooks and I can say that, in principle, the algorithm of actions is the same for all of them. For these purposes, I use a popular distribution - ZverCD, which I would not use for personal purposes, since it is a bit heavy. And it’s just right for clients, as it makes it easier to find drivers after installation.
What do we need to install Windows XP on a netbook?
To install Windows XP on a netbook we need:- Windows distribution. I think it won’t be difficult for you to find, since there is a lot of this shit on the Internet. Take at least ZverCD.
- A flash drive or, smarter, a USB drive that can store 1GB of information.
- Program WinToFlash which you need to download from here.
The latest WinToFlash program, in turn, can do one thing - create a bootable USB flash drive with WIndows. In our case with XP.
I would like to say right away that WinToFlash does not work with CDs and ISO images. It works with operating system system files, that is, if you have an ISO image of Windows XP, then you need to unpack it with any archiver.
The algorithm for installing Windows XP on a netbook can be described as follows:

Windows XP was used when USB drives were just gaining popularity. Therefore, it is not intended for installation from a flash drive. It is much easier to create an image on disk and install from it. But today many have abandoned DVD-ROM, so installing from a flash drive is the only possible solution. There are several ways to create a bootable USB flash drive with Windows.
You can install the system:
- via “My Computer”;
- via BIOS;
A bootable USB flash drive is created using CMS clients, which include UltraISO, WinSetupFromUSB and others.

Installing Windows XP - selecting driver packages for unpacking
Important! When installing this Windows from a USB flash drive by creating an image via, the error “txtsetup inf file is corrupted or missing” often occurs. This is due to the use of modern boot image recording algorithms that were not used when using Windows XP. To avoid this problem, it is recommended to use other programs.
Video - how to burn Windows XP to a USB flash drive
Using various programs during the installation process
If you do not have a disk with Windows XP, you need to download the image from the Internet. The computer won't read it when it boots, so it won't be able to start the installation. To solve the problem, there are various CMS clients that allow you to create a bootable USB flash drive. Let's look at the most popular ones.

This is a very simple and understandable program that is necessary for writing operating system images to a disk or flash drive. Supports all existing systems, starting with Windows 2000. If you plan to install from the original image, then 1 GB on a flash drive will be enough for you. But it’s better to take care and find in advance an image that has drivers and the minimum number of necessary programs. It is recommended to use 4 GB Flash drives.
To record Win XP, you must:
- download and install the program (there are Russian versions);
- launch the client and insert the USB flash drive into the computer;
- Click “Open” and select the operating system. The file must be in ISO format;
- Click “Boot” and “Burn hard disk image”;
- check that the recording method is USB-HDD+ and click “Burn”;

Using WinSetupFromUSB
This program does not support the ISO image of this operating system, so you will first need to emulate it using special programs such as daemon Tools and copy the existing information to your hard drive.
- download and install the program;
- run the program and insert the USB flash drive into the computer. It should be determined automatically;
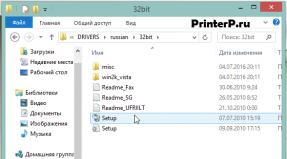
- specify the path to the location where the Windows folder is located;
- Click on the “Go” button. The program will prompt you to format the flash drive before starting recording. It is recommended to agree;
After some time, the installation flash drive will be completely ready for use.

Installation via “My Computer”
This is possible if you have a working operating system. If you already have a Windows image, you need to insert the electronic drive, select it through “My Computer,” find the installation file in exe format and double-click on it. You will be prompted to restore the system, update or install. After selecting the required parameter, everything happens automatically.
Important! The big disadvantage of this method is the inability to format the C drive, which contains the previous operating system. As a result of this, . There is a high risk of a conflict causing the computer to not work correctly. It is necessary to resort to this method if it is impossible to use others.
Setting up boot via BIOS
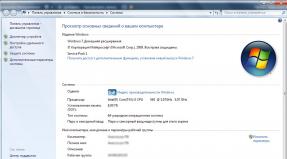
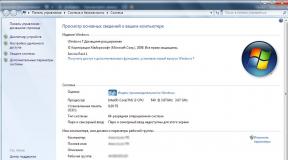
Before using this method, you will need to ensure that you have the boot file. Next, you need to restart the computer and, when the first boot page appears, where the characteristics of the device are described, you will need to press “Del” to enter the BIOS. On some devices, the F2 button is responsible for this.
After loading the BIOS system, you need to go to Downloads or Boot. Here you must specify that the computer boots not from the hard drive, but from a flash drive. This is done by selecting the drive and pressing the F6 button until it is the first one. If you have Award Bios, you will need to do the following: Advanced BIOS Features -> First Boot Device -> USB-HDD -> Save and Exit. After the device reboots, recording of the operating system will begin.
Important! It is not necessary to go into the BIOS settings. While the computer is booting, just press the F6 or F8 button, depending on the manufacturer, and select boot from the flash drive.
Installation process
The installation itself takes place manually or automatically. If manual mode is selected, you will need to enter the program key yourself and indicate which programs will be required during the installation process. When the system operates automatically (recommended), everything will be completed without user assistance.
You will have to wait about 20 minutes until the operating system is recorded on the PC. Next, you will need to independently install video, audio and network drivers for normal operation. If there are distribution kits on the flash drive, you can use them. If they are missing, you should take care in advance and download them.
Video - How to properly burn Windows XP to a USB flash drive