Diagram for connecting an adsl modem to a telephone line. How to connect an ADSL modem to a Wi-Fi router using a network cable? Connection diagram and setup
Rostelecom is one of the leading providers in the Russian market of communications services. It is not surprising that many users prefer its services. On top of that, the company, along with the tariff package, also provides the basic equipment necessary to connect to the Internet. But many people try to set access parameters on their own, which sometimes causes some difficulties. Meanwhile, if you figure it out, there shouldn’t be any special difficulties. Next, we propose to consider setting up a Rostelecom modem of any type. This instruction will be useful not only for the equipment supplied directly by the company, but also for any other similar models.
Modem market overview
Before setting up the Rostelecom modem is considered directly, it is necessary to dwell on the equipment that will be used to organize an Internet connection at home or in the office.
What can you use at the moment? Among the most popular options, there are several main groups of devices:
- modems-routers (DSL/ADSL);
- Ethernet modems;
- USB modems;
- 3G modems.
The first group is the most popular and is suitable for installation at home or in offices. The approximate cost of the simplest model is about 800 rubles, but models of a higher rank will cost about 1,500 rubles.

USB routers have not gained much popularity, although they are quite cheap. Their main problem is that very often there are situations with “gathering” of drivers. 3G devices are mainly used when moving around the city with a laptop.
Which model should you prefer?
Which of all this to choose for installing at home? It seems that the best option would be to use modems that combine the capabilities of a DSL or ADSL router (for access via Wi-Fi).
Among the most commonly used devices are models D-Link, TP-Link, Intercross, Zyxel, etc. The settings of some of them will be discussed below.
General rules for connecting ADSL modems
As follows from the basic understanding of ADSL technology itself, a modem uses a regular telephone line to provide access to the Internet.

When connecting a modem to it, the best option is to install a special one that allows you to simultaneously access the Internet and make phone calls. In other words, the telephone line is not blocked, unlike a direct connection.
Connecting all devices follows the sequential diagram: computer - modem - splitter - telephone line. Actually, even a child can figure this out, especially since the splitter has two sockets for different cables, so it’s simply impossible to confuse something.
Driver installation issues
After the entire circuit is assembled and the power supply is connected, you need to install special control software called drivers (so that the operating system installed on the computer can initialize the device, and it, in turn, works without failures).
Standard models, as a rule, are recognized automatically by the system, and installing drivers does not raise any questions. If something goes wrong, you can always use the special disk that should come with the modem. If you did not purchase the modem from the provider or if there is no disk, you can download the necessary drivers directly on the official website.
When the entire procedure is completed and the device becomes fully operational, the Rostelecom modem should be directly configured. The first step is to access the web interface of the device itself.
Enabling and accessing the web interface
As a rule, for all devices, the combination 192.168.1.1 is entered in the address bar of any web browser installed on the computer. Setting up a Rostelecom modem in the first stages involves setting the correct parameters for accessing the Internet. If Wi-Fi is supported, you will then need to install these options.

The login and password that will be requested when attempting to access is admin. If for some reason the modem does not accept the entered data, you must reset all parameters by pressing the Reset button on the back of the modem and re-enter the information.
To configure any modem in the simplest case, if manual intervention is not required, you can use the disk supplied with the device, which contains a specialized utility in the form of a kind of “Hardware Configuration Wizard”. After it starts, you just need to follow the instructions of the installer.
Setting up a Rostelecom DSL modem or ADSL device
But let’s assume that the user does not have the disk at his disposal (it got lost, became unusable). What to do in this case? There is no need to despair, since setting up any type of equipment is quite simple.

So, for Rostelecom, setting up a D-Link modem (just taking it as an example) begins with setting the connection type. It is advisable to set the value of this parameter to PPPoE and not use a “bridge” scheme, which can block access to the Network when the main terminal is turned off.
Next, you should manually enter the VPI and VCI parameters, which must correspond to the selected region of the user’s location (for Moscow these are values 0 and 35). These parameters must be included in the contract, but you can find them out from the technical support service, even just by calling (although they are almost always set automatically).
Next, you need to enter the registered user name (PPP), specify the login, enter and confirm the password, select the name of the service, check the Keep Alive checkbox and specify the values of the LCP interval and LCP failure options (15 and 2, respectively).
Finally, at the very bottom you need to check the IGMP box and save the changes made. After exiting the modem interface, you can use the Internet even without rebooting the operating system, but with a mandatory reboot of the modem (just click on the appropriate button).
Setting up a TP-Link Rostelecom modem
With devices of this series the situation is much simpler. The fact is that the devices themselves already have, so to speak, a built-in utility called Quick Start.

In fact, setting up the Rostelecom TP-Link modem comes down to just selecting the connection mode (PPPoE), setting the time zone and entering a login and password. Basically, why not the same “Setup Wizard”?
Nuances of setting Intercross parameters
The settings of the Intercross (Rostelecom) modem are somewhat different from what was described above.

When entering the web interface, you first need to select to launch the “Wizard”, leave the value of the VCI parameter, set by default at 35, unchanged, and enter the value 8 for the VPI parameter.
Next, the connection type is set to PPPoE, and the points for automatically obtaining an address (Obtain an IP address automatically) and NAT availability (Enable NAT) are also noted. The address field is left blank. After this, the username and password are entered.
In the following steps, you don’t have to change anything, and after viewing the information, in the final step you just need to save the settings.
Wi-Fi options
Finally, let's see what it means to set up a Rostelecom WiFi modem. In fact, such a modem can be used as a regular router for distributing a wireless signal.

There is nothing particularly complicated here either. Setting up the Rostelecom modem in this case involves entering the following values and parameters:
- Authentication Type - WPAPSK.
- Encryption - AES.
- SSID - arbitrary connection name.
- Pre-shared Key - your own password for accessing the Wi-Fi connection.
After completing all the settings, you need to go to the Maintenance tab and use the browse button to select the romfile.cfg file with automatic add-in parameters. At this point, the setup can be considered complete.
Brief summary
As a summary, it remains to be said that setting up a Rostelecom modem of any known type is not particularly difficult. The main thing is to choose the right parameters that were presented in the material above.
As for the choice of equipment, ADSL devices, when using a connection from the Rostelecom provider, are the best option compared to the same Ethernet or USB devices, which are quite limited in their capabilities.
The settings of 3G modems were not considered, since, after all, users at home or in the office give the main preference to modems that combine the functions of routers with wireless communications. Well, in terms of settings, if I would recommend something very simple, it is best to use the “Wizard” disk so as not to deal with unnecessary things. But if this is not possible, you can safely use the instructions given above.
An ADSL modem is used to establish an Internet connection using a telephone line. It can be used as a router or a bridge, and most modern models are equipped with Wi-Fi functionality. Users who are new to setting up this device may experience some difficulties, since all parameters must be specified manually.
Setting up an ADSL modem
The easiest way is to purchase modems that come with an installation disk. After it starts, the settings are determined automatically. If there is no disk drive, you will need to set the parameters yourself. This article will describe step by step the method of working with an ADSL modem.
Step 1: Reset settings
In most situations, it is much easier to roll back the settings to factory defaults than to change each item in the settings separately. This mainly applies to devices that have already been used to connect to the Internet. To restore settings to factory defaults, follow these steps:

This way you can quickly roll back your settings. The method is universal for modems from most manufacturers.
Step 2: Connect your device to your PC and network
Before changing the parameters of the ADSL modem, you must connect it to your computer and network. To do this, you need to have a splitter, an Internet cable and, equipped with connectors, a telephone cable. The connection is made in this way:

Step 3: Set connection parameters
The easiest way to change connection settings is through the web interface. To open it, you must enter the IP address in the search bar of any browser. You can find it in the instructions.
If the address is specified correctly, but the interface does not open, most likely the device was not connected correctly. Check the cables and try again. If no changes have occurred, and you still cannot go to the router page, you need to change the network card settings. To do this, follow these steps:
Here you can perform a factory reset. This is done this way:
- Open the “System” section and go to the “Configuration” block.
- Click on the “Factory settings” item.
Step 4: Setting up an ADSL modem
Usually the parameters are determined automatically, but if this does not happen, you will need to configure it manually. The instructions may vary slightly depending on the provider and device brand you are using, but the general configuration steps are similar for all models.
- After opening the web interface, go to the “Net” section.
- Go to the “Connections” tab and click on “Add”.
- Now you need to fill in all the empty fields as thoroughly as possible; the values for each item will be indicated below:
- Connection type – PPPoE;
- VPI and PCI – information to be confirmed with the provider;
- Username and password are specified individually.
In addition, you need to check the boxes next to “Keep Alive” and “IGMP”. It is also advisable to indicate intervals and dips. They are needed to determine the frequency of requests. For an unstable connection, it is better to specify the minimum interval parameter.
- Confirm the changes made by clicking on the “Save” button.
- Now all that remains is to restart the device for the new settings to take effect.
Some devices have a Quick Settings feature. It helps to set the correct configurations automatically.
Step 5: Connecting the modem to the router
The procedure for connecting this equipment is quite simple. It is done this way:
- First of all, you need to set up your DSL device. This is required in order to be connected to the network.
- Connect the Internet cable coming from the router (WAN slot) to the appropriate socket (LAN). After this, it is recommended to reset the router to factory settings.
- Connect the router to your computer and go to the router page.
- Go to the “WAN” section and opposite the “Connection type” item, select the “Dynamic IP” option.
- Now you need to set the “PPPoE” parameter and enter authorization data (username and password).
- All that remains is to save the changes and reactivate the device.
Usually these steps are enough to connect. If no visible changes occur, contact your operator for assistance. You may need to use some special configurations.
Step 6: IPTV Configurations
The ADSL modem can be used to work with IPTV. To do this, you need to create a bridge and perform the correct configuration. The procedure looks like this:
- Go to the web page and go to the “Connections” tab.
- Set the connection type to “Bridge”, then configure VPI/VPI.
- Save your changes and go to the "Advanced" section.
- Go to the “Interface Grouping” section and click on “Create a group”, then give it a name.
- All that remains is to move the lan-port and bridge to the column on the right, then save the settings and restart the device.
Now IPTV will function on the specified connector.
ADSL modems are very convenient to work through a telephone line, but setting them up is very difficult for novice users. Try to follow the instructions as closely as possible and do not be afraid to seek advice from providers; they are obliged to provide you with all the information necessary for setup.
In this article we will talk about how to connect to the ADSL Internet after setting it up, and the written information will be clear even to beginners.
The main options for connecting to the Internet: fiber optic, ADSL, 3G, GPRS. In our article we will talk about one of the Internet connection options - ADSL.
What is ADSL
Asymmetric Digital Subscriber Line is a technology that allows for high-speed data transmission over a telephone line (ordinary copper telephone wire).
At the same time, the differences from voice-frequency telephone modems are significant - transmission is organized at a higher frequency than that of an analog telephone signal.
Result: you have streams independent from each other and can carry on conversations while simultaneously being online. ADSL is currently capable of providing an incoming data stream speed of up to 8 Mbit/s and an outgoing speed of up to 1 Mbit/s, a huge advantage over modem access, in which it will not be possible to squeeze out more than 56 Kbit/s. Access via LAN can, of course, compete, but it has a drawback - it is necessary to have a suitable network in the area and stretch the cable, with which you can have a lot of problems during installation and operation.
In the case of ADSL, you simply connect to the telephone socket through a special device that performs frequency division - this is a splitter, a modem and telephone are connected to it, and the device receives output directly to your telephone line. The splitter can be built into the modem, which then simplifies the connection even more. 
Now let's turn to the equipment that is installed on your PBX. This is DSLAM (DSL Access Multiplexer) - a hardware complex that includes a huge amount of complex electronics, including modems with splitters. It turned out to be something like a telephone exchange for servicing DSL connections. It is with him that you establish a connection, and after you have passed authorization, you get access to the Internet.
Choosing equipment
You need to make sure that your PBX can accommodate you with an ADSL modem, and there will be no problems when connecting. The provider himself must deal with the issue - you need to make an application to verify your phone number, and after a positive result you can purchase equipment. 
Currently available are ADSL modems with Ethernet and USB connection interfaces, and a wireless device with a Wi-Fi interface. The choice depends on your needs - the difference here is in the connection features and the capabilities provided: modems that connect as network devices offer more of them than their USB counterparts.
For example, to connect one computer to the Internet, a simple model will be enough, but if there are two or more of them, then you need to pay attention to devices with a router function - the modem will in any case have an Ethernet or Wi-Fi interface.
You can find options from Ethernet models with and without a built-in hub (in this case, you will need to use an additional hub when connecting several computers). If you need increased security, then you can look at models with Firewall functions, anti-virus scanning, the ability to work with a virtual private network and other “useful things”.
An important detail: if there are telephones connected in parallel in the apartment, and it is impossible to connect them through a splitter (they are located in other rooms), then each incoming call will cause a lot of headaches, which are associated with constant disconnections.
To avoid this, it is necessary for each of the devices to buy an additional device, a microfilter, and connect them through it.
ADSL setup is a very simple task if an agreement has been concluded with the provider from whom you received a login and password, as well as a notification that the line was connected to the Internet.
For example, we bought a D-Link modem. Let's unpack it. First, you need to connect the modem to the phone network through a splitter (a small box with telephone inputs).
One of the sides of the splitter has two inputs (Phone and DSL), the DSL input includes the telephone cord from the modem, but the Phone does not. A splitter is a frequency divider, or, to put it more simply, it allows you to surf the Internet and communicate on the phone without any interference.
Now we need to turn on the modem itself and look at it. The lights should come on and blink. The main indicator is the DSL light, which should be on without blinking after the modem is restarted. If the light is on correctly, you can connect the modem to your laptop or computer using an RJ45 Ethernet network cable. It happens that the light flashes quickly or simply does not light up. You can solve the problem by calling your provider.
Go ahead. The lights light up as they should. When you turn on the computer, connect the modem to the network card output, which is slightly wider than the telephone output.
When creating a new Internet connection, you simply need to configure the modem.
Do you want to connect a modem to one computer? You can do this in the so-called bridge mode. You need to go to any browser that is available on your computer, and enter “http://192.168.1.1” in the address bar (if you have D-link), when asked for a name and password, enter the data that was not issued by the provider, and just enter the word "admin" in both fields.
After this, a window will open with different settings buttons. If you have a D-link, then go to WAN (one of the menu items), click the Add button, and set the VPI value to 0, and VCI to 33, then click the Next button, and select Bridging from the list, after which , click the Next button again, and then Apply.
The last window will contain a sign that says: VPI / VCI: 0 / 35 Connection Type: Bridge Service Name: br_0_35 Service Category: UBR IP Address: Not Applicable Service State: Enabled NAT: Disabled Firewall: Disabled IGMP Multicast: Not Applicable Quality Of Service :Disabled
After clicking on the “Finish” button, the modem will restart, and within a minute you can create a new Internet connection on your computer. Now everything is simple. We follow the path: Start - Connection - Create a new connection, and select “High-speed”, then “Configure manually”, now enter the name of the provider, and in the last window the name and password issued by the provider.
A shortcut for this connection has been created on the desktop. Launch the shortcut and go to the desired page on the Internet.
More than one
Setting up a modem is quite trivial for connecting one machine to the network and is unlikely to cause any difficulties, especially since the connection process is usually described in detail by the provider itself.
But what if you want to connect two computers connected by an Ethernet cable, or an entire network connected by a hub? In this case, there are several ways out of the situation. The first and simple one is to make the connection to the net common for network users. We do it this way: you need to open the properties of your ADSL connection and in the window that opens, go to the “Advanced” tab.
There, other network users need to enable permission to use this connection (several more active items will appear, they should be left checked). After this, the address 192.168.0.1 will be assigned to the network card of the machine - the remaining computers in the TCP-IP network connection settings must accordingly be assigned addresses 192.168.0.2, 192.168.0.3, etc., in the “Subnet mask” field enter 255.255.255.0, and the system with a connected modem, set the gateway as 192.168.0.1. Now you can access the Internet from any computer and use an open connection for access. The advantage of this method is that it is the only way to organize access to the Network if you have a USB modem. There are more disadvantages: the gateway computer must have 2 network cards installed when using an Ethernet device.
The condition for this method is that the gateway must be turned on at all times, otherwise computers will not be able to use the much-desired connection. But if you thought everything through and purchased an Ethernet modem with a router function, everything can be organized much more competently! Such devices can operate in two modes: bridge and router. The first mode is usually enabled “by default”
in them
and has just been described - this is gaining access to the network through one computer. The second modem, thanks to the support of the PPPoE protocol, will establish a connection to the Internet, receive an IP address and take on the functions of a gateway. You will need to connect a network hub to it, if the modem itself does not have one, and you can freely use the Internet from any computer on equal terms!
Let's say you directly connected the modem to the hub of your network, computers are also connected to it - now you need to configure the device itself.
Its settings menu can be accessed either via WEB or via the not so “kind” Telnet. Of course, it’s more convenient to use the first method, so you’ll have to open your browser and type the modem’s IP address in the address bar. It is easy to find out from the attached documentation; there we also take the login and password, which you must immediately enter to get into your device. By the way, before doing this, make sure that the system with which the setup is being done has an IP address from the same range as the modem - for example, if the modem address is 10.20.0.2, then the “wheelbarrow” must be set to 10.20.0.1 - otherwise You won't be able to access the settings.
Now in the service menu of the device, you will definitely see many different incomprehensible items in front of you, among them there may be a configuration wizard - “Setup Wizard”. I will explain the process using the example of Zyxel modems - models from other manufacturers are configured almost identically, with differences in the layout of the settings. Let's take the popular Tochka.Ru and its Stream as an example of a provider.
After launching the “wizard”, in the first window you will see the basic connection settings. In “Mode” you should immediately set “Routing”, in the “Encapsulation” field there should be “PPPoE”, in addition, the “Multiplex” parameter should be set to “LLC”, and “VPI” and “VCI” (identification) = 1 and 50, respectively.
The next window is the PPPoE protocol settings, which are necessary to connect the modem to the Network, and here everything is simple: the “Service Name” field is the name of the connection, and you can enter anything into it. Then in the “User Name” and “Password” fields you need to enter your login and password to access the Internet and check the “Obtain IP Address Automatically” field. There you also need to set the desired connection mode “Connection”.
If you select “Nailed-Up Connection”, the connection will be maintained continuously, and if “Connect On Demand” you can set the inactivity time, after which the device will disconnect the connection.
“Network Address Translation” - to access computers from the internal network to the external one, you need to change their IP address to the one that was issued to the modem, and vice versa, and this is exactly what this function does. In our case, we need to set the “SUA Only” parameter.
Click “Next” and go to the next window, there is a button “Change LAN Configuration”, behind it there is another important menu - network settings. We are interested in the following settings: enter the IP address of the modem on the network in the “LAN IP Address” field, followed by the network mask – 255.255.255.0, and the DHCP settings group. More about it: if NAT is responsible for translating the internal IP address of the modem to the external one and vice versa, then DHCP is responsible for issuing internal addresses to connected computers. Accordingly, we need the “DHCP Server” in the “ON” position, and the “Client IP Pool Starting Address”, the starting address from which it will begin issuing them to users, can be set next after the modem address (for example, with the device IP = 10.20.0.2 , enter 10.20.0.3).
We set the parameter “Size Of Client IP Pool” = 32, and the DNS servers, accordingly, are registered as specified by the provider. Click “Finish” and reboot the modem, and you can start using the Internet from any computer!
In addition, you can configure additional “chips” in the modem menu: a firewall or - they are not difficult to set up, they can serve a good purpose, ensuring the security of the intranet space.
Possible problems
If the modem cannot establish a connection with the DSLAM or it is there, but it is unstable, check the splitter - this device should be connected exclusively at the beginning of the line. In other words, there should not be any parallel connected devices between the “Line” socket of the splitter and your panel.
Some older caller ID models can negatively affect the quality of the connection. If you experience problems with incoming calls with connection, try disabling the identifier - maybe that’s the reason. If you did not purchase the modem from a provider or dealer, the connection settings may be set to default, and you will have to register them manually, otherwise the device simply will not connect to the DSLAM. The required parameters are “VPI” and “VCI” (identification characteristics), “Encapsulation”, and they must be set in accordance with the requirements of the provider.
The actual data transfer speed may be lower than stated. Don’t rush to immediately look for the cause of the problem. Take a look at the difference - if it is a couple of kilobytes per second, then this is normal, because the provider indicates the maximum throughput under ideal conditions.
If the losses are serious, it may be problems with the DSLAM or incorrect channel settings. In this case, it is better to contact technical support. Some ADSL modems/routers have the ability to update their firmware, and this is good - they are corrected, improved and supplemented
built-in functions with new versions.
That seems to be all for now and see you again for new educational meetings, dear friends.
One of the most common connection methods today is using an ADSL modem. Setting up this device is not difficult; you just need to have a minimal understanding of the principle of its operation, as well as computer skills at the user level.
There are still some nuances. They vary depending on the provider, since the connection parameters for each can vary significantly.
Some may assign static IP addresses to their clients, and there may be various other configuration features. Many users want to set up the Internet through a combination of provider->ADSL modem->Wi-Fi router. To create a connection in bridge mode, you should already have some skills in configuring network equipment. Since this kind of setup is not so easy to do.
Connecting equipment (ADSL modem, Wi-Fi router)

To connect an ADSL modem, you need not only the device itself, but also other parts. Without them, connecting to a PC and telephone line will be impossible. You will need a network card and a splitter. A network card is required to transfer data between the modem and PC. The splitter will be needed for other purposes. Even when the ADSL modem is connected to the Internet, the telephone line is available for calls. Therefore, a splitter is most often used; it allows you to connect both a modem and a regular telephone to the telephone line at the same time.
- The splitter has several slots. Most often this is:
- line (to connect a telephone line);
- modem (modem is connected);
phone (to connect a telephone).

Connecting the modem to the PC and telephone line is carried out in the following order:
Login to WEB interface
When the ADSL modem is connected, all that remains is to configure it via the WEB interface. It is typical for most models of devices of this type.

The setup is performed as follows (D-Link DSL-2500U):
After this, you can configure your ADSL modem according to the requirements of your provider. All old settings have been removed.
How to configure an ADSL modem in router mode
First of all, you need to reset the ADSL modem settings. Only after this you can proceed directly to setting it up in router mode.


When this operation is successfully completed, you can go to the WEB interface to start setting up: in the address bar of the browser you must enter 192.168.1.1 (for the D-LinkDSL-2500UBRU modem):
After the setup is completed, you can safely click the “Apply” button. ADSL is configured as a router. Next, you can begin setting up the modem via Wi-Fi.
Video: setting up an ADSL modem in bridge mode
PPPoE connections
Setting up a PPPoE connection correctly on Windows 7 is quite simple.

PPPoE is a link-level network protocol used to transmit PPP frames over the global Internet. Most often used by various xDSL services.
Wireless network
Today, most different devices access the Internet using built-in Wi-Fi modules. This is why most users configure their ADSL modems to work together with Wi-Fi routers.
You can make this connection as follows:

Many people ask themselves the question: how to configure an ADSL modem and Wi-Fi router in a mode that eliminates the occurrence of various errors? This is quite simple to do; you just need to carefully read the accompanying documentation.
Setting up a modem in bridge mode
To configure an ADSL modem in bridge mode, you must perform the following steps:

The setup is complete.
Internet settings
Internet settings vary for different operators. Thus, if the ADSL modem and WI-FI routers were configured to work with the Rostelecom operator, they will not work on the MGTS line.
Internet parameters for Rostelecom
ADSL modem settings for this operator are typical:

- encapsulation mode – LLC;
- connection type – Bridge;
- VPI – 0;
- VCI-100;
- QoS – UBR.
After entering all the parameters, you must click “Apply”. Setting up the Rostelecom ADSL modem, like all others, is not difficult; you just need to correctly enter all the necessary parameters through the WEB interface.
Internet settings for "CSO"
For normal operation on the Internet through the OGO provider, when setting up the modem, you must enter the following data:

Internet settings for MGTS
The settings that need to be specified for the ADSL modem to connect to the MGTS operator are specific:
- encapsulation mode – LLC/SNAP;
- VPI-1;
- VCI-50;
- "Bridging" operating mode.
You also need to check the box confirming that you automatically receive an IP address from your provider.
The local network
If necessary, you can easily create a local network with a shared Internet connection via an ADSL modem. The best option would be to organize a network using a Wi-Fi router, as this will avoid a tangle of wires.
In order to set up a local network, you just need to follow these steps in strict order:
- configure a connection via TCP/IP protocol (mask, DNS server);
- configure various related services (DHCP and others);
- configure the parameters of the local wireless network, while it is important to pay special attention to security (in the settings, select the WPA-PSK encryption type);
- connection to the Internet is configured.
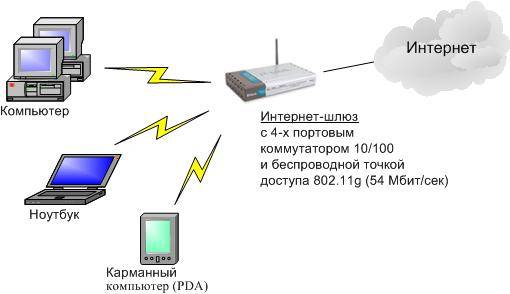
The scheme implemented in this way is quite simple. There are only two devices between the global network and the PC: a Wi-Fi router and an ADSL modem. Or one, if the ADSL modem has a built-in Wi-Fi module that allows it to operate in router mode.
Setting up an ADSL modem in conjunction with a Wi-Fi router is not difficult. It is only important to carefully study the technical documentation that comes with the network equipment. As well as a setup guide provided by the provider.
ADSL technology is not new, but still continues to be used quite widely by various providers. Although it is not convenient because it requires a specialized ADSL modem.
>But its cost is not high, and many operators also provide this network equipment for rent. Setting up this type of connection is quite simple, it is only important to take into account all the nuances and features of creating a connection, as well as connecting a Wi-Fi router and an ADSL modem
D-LINK DSL-2500U belongs to the entry-level network devices. Judge for yourself: there is no wireless communication module, there is only one network port, the processor is modest, the amount of memory is small. The scope of application of this modem can be described by the phrase “one modem - one computer”. There are still many places in the periphery where a connection from Rostelecom is the only way to get broadband Internet access. The DSL-2500U was specially designed for the countries of the former CIS, so it will work perfectly even on old telephone lines, the quality of which in the provinces leaves much to be desired. From our article you will learn how to connect it, configure it and make it work effectively.
Contents and price of the D-Link 2500U modem
The device comes in a cardboard box with a branded orange and black design. Inside are:
The D-Link 2500U has been in production for a good ten years, so it can still be found on sale, although the advisability of purchasing such equipment is questionable, because it costs around a thousand rubles, and for this amount you can already buy an ADSL Wi-Fi router. The price of a modem on the secondary market varies widely. A “bare” device without cables and a splitter can be found for 100 rubles. A complete set with a box and a network adapter will cost 500–800 rubles.
Appearance, purpose of indicators and technical characteristics
The modem case is made of matte black plastic with ventilation holes on top. On the front panel there are LEDs indicating operating modes, and on the rear panel there are interface connectors and a socket for connecting a network adapter.
The presence of only one LAN port indicates that this device is clearly not intended for the office
Table: purpose of indicators on the front panel of the modem
Modem specifications
Several varieties (revisions) of the DSL-2500U were released, which differ only in the type of processor and flash memory. Their characteristics are almost the same.
Table: comparison of models of different versions
| Model | Audit | CPU | Flash memory size | Flash memory type | RAM capacity | Number of network ports |
| DSL-2500U | A1 | BCM6338 | 2 MB | Parallel | 8MB | 1 |
| DSL-2500U/BRU/C | C1 | BCM6332 | 2 MB | Serial | 8MB | 1 |
| DSL-2500U/BRU/D | D1 | BCM6332 | 2 MB | Serial | 8MB | 1 |
| DSL-2500U/BRU/D | D2 | BCM6332 | 2 MB | Serial | 8MB | 1 |
| DSL-2500U/BRU/D | D3 | BCM6332 | 2 MB | Serial | 8MB | 1 |
| DSL-2500U/BRU/D | D4 | BCM6332 | 2 MB | Serial | 8MB | 1 |
Video: review of the D-link DSL-2500U router
Connecting the modem to client equipment
To install and configure an Internet connection using ADSL technology, you need to complete several steps:
- Connecting a modem-router to a telephone line and a computer.
- Configuring the computer's network interface to successfully work with the modem.
- Configuring Internet connection parameters via the PPPoE protocol using the modem’s web interface.
Let's look at each of these processes in more detail.
Connection diagram
The DSL-2500U connection is typical: a filter-splitter is connected to the telephone line, and a modem port labeled ADSL is connected to it. The Ethernet port connects to the computer's network card or the input of a wireless router.
The modem-router is connected to the telephone line using a splitter
Connecting a modem to a telephone line
During operation, the ADSL modem transmits and receives a broadband signal with a frequency of several megahertz, therefore the connection speed greatly depends on the quality of the telephone line. This is especially true for wiring in old houses, where it is made of low-quality single-core “noodles” - low-current telephone wire from Soviet times. If there are several telephone sockets in a house/apartment connected in parallel, the connection diagram needs to be redone. The splitter is installed at the cable entry into the apartment, and the telephone wiring is connected to it. If the phone and modem are connected in parallel, the Internet will not work.
Connecting a modem to a computer
If the location of the telephone jack does not allow you to place the modem next to the computer, you will have to buy a patch cord of the required length or crimp it yourself. Two RJ-45 standard plugs are crimped onto a piece of UTP-8 wire in accordance with the diagram.
The cable for connecting the modem-router to the computer must be crimped in accordance with the standard color distribution scheme
Preparing your computer for connection - network adapter settings
Almost any router also works as a DHCP server, that is, it distributes IP addresses to client devices. Addresses are issued from the range specified in the router settings. For this mechanism to work correctly, you must configure the network adapter to automatically obtain a TCP/IP address and DNS server address. On computers running Windows, you may encounter a situation where the network adapter is assigned a static (permanent) address. This may lead to a conflict with another device on the network that receives the address automatically. The result will be loss of access to the Wi-Fi network (and the Internet too) on both devices.
To prevent such an error from occurring, you need to check the properties of the wireless adapter and switch (if necessary) it to automatically obtain addresses.
- Click on the “Start” button with the right mouse button and select “Network Connections” from the user menu.
Call the network connections section from the user menu
- In the network connections window, select the desired adapter and use the right mouse button to open its properties.
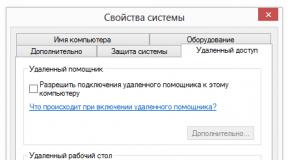
The network adapter properties contain TCP/IP protocol settings
- From the list of protocols, select TCP/IP and double-click to bring up its settings.
All IP address values are set in the TCP/IP protocol settings for the network adapter
- Configure to automatically obtain the network address and DNS server address and click OK.
The mode for automatically obtaining addresses is set by checking the boxes in the corresponding fields of the TCP/IP properties window
Modem web interface, configuration and access protection
After the computer’s network card is configured to automatically obtain an IP address, you can access the modem’s WEB interface at 192.168.1.1. The username is admin, and the default password is blank, meaning you do not need to enter it. To protect your network from third-party interference, change your access password immediately after the initial setup of the modem.

Setting up an Internet connection
After the modem is connected to the telephone line, the computer and there is access to the web interface, it’s time to set up an Internet connection. Let's do this using the example of the largest provider working with ADSL technology - Rostelecom.
- Click the Add button and in the new window that opens, specify the VPI and VCI values issued by the provider. If you forgot to provide them, you can clarify the necessary data by calling the toll-free technical support line. From the Service Category drop-down list, select the UBR Without PCR option.
On the first screen of the setup wizard, enter the VPI and VCI parameters
- Connection to Rostelecom is carried out using the PPPoE protocol. Select it from the list of protocols.
Connection to the Rostelecom provider is carried out using the PPPoE protocol
- From the agreement with the provider, take the login and password assigned to your account and enter them in the appropriate fields of the settings window. Enable the Keep Alive option to automatically restore the connection after a connection loss.
Enter your Internet login and password, which are specified in the agreement with the provider
- On the WAN settings page, enable Firewall and NAT. Be sure to activate the Enable WAN service checkbox. If you plan to watch digital TV on your computer, check the Enable IGMP Multicast option. In the Service Name field, enter the name of the created connection and click the NEXT button.
Don't forget to enable firewall and NAT options
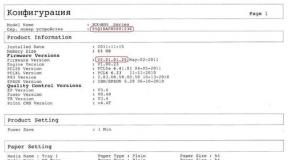
- On the settings report page, check that the entered data is correct and click Finish. The modem-router will reboot and establish a connection with the provider, so in a few minutes you will have Internet access.
After the modem reboots, a short report about the settings will appear on the screen
Video: setting up D-Link DSL-2500U
Port forwarding
Some users need to access their local network resources from the Internet: home network folders, images from a home IP camera, remote administration using Remote Administrator or Team Viewer programs, and dozens of other necessary applications. To organize the possibility of such access, so-called port forwarding is required, when a router combines an external network port and one of the internal network ports. Setting up port forwarding is easy using the modem's web interface functions.

Setting up a modem in bridge mode
The computing capabilities of the DSL-2500U are very modest. If you are using the device in router mode, then even with just one computer connected, programs with a large number of connections (torrent client or web server) can create excessive load on your modem. The result will be interruptions in operation, or even freezing of the device. The best way to operate it is to put the DSL-2500U into bridge mode and connect an inexpensive router to it, for example, DLINK DIR-300.
- Open the window with the modem setup wizard (Wizard). Uncheck the DSL Auto-connect item and enter the values VPI=0 VCI=33 in the field that opens. Click Next.
The VPI and VCI parameters must be entered based on the settings of your provider
- In the next Connection Type window, select Bridging, Encapsulation Mode - LLC/SNAP Bridging, click Next.
Set the network connection type to Bridging - this will put the modem in bridge mode
- In the next window, check the Enable Bridge Service checkbox.
Activate the Bridge Service option
- In the next window, if necessary, you can change the modem’s IP address. If the modem will be used in conjunction with a wireless router, set the address from the range provided by the wireless router's DHCP server. The subnet mask must also match.
Enter the address to access the modem settings
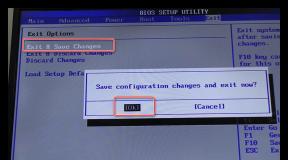
- The final window of the setup wizard displays summary information. If all values are correct, click the Save/Reboot button to save the settings and reboot the modem.
Check the data and save changes if everything is entered correctly
Possible problems and malfunctions with the modem: diagnostics and elimination
DLINK DSL-2500U is a simple and reliable equipment, but it can also experience malfunctions that prevent normal operation. This is especially noticeable when purchasing a used modem. The table below lists common problems and their causes.
Table: typical problems with the DLINK-2500U modem-router
| Symptom of the problem | Cause | Remedy |
| The power on indicator does not light up | The power supply is faulty | Replace the power supply with a working one. Any one with a voltage of 12V and a current of 0.5A and above is suitable |
| The power on indicator glows orange | The modem is in emergency recovery mode | The modem firmware is damaged. Upload new firmware using the patch cord as described in the instruction manual |
| DSL indicator blinks continuously | The modem cannot establish a connection with the provider's equipment | Check the condition of the connecting cables between the modem, splitter and line, as well as the splitter itself. If they are ok, contact your provider's technical support. |
| The modem restarts every 2–3 minutes | The power supply has failed | Replace the power supply with a working one or repair the old one |
| The Internet connection icon does not light up, there is no network access | The login and password in the PPPoE connection settings were entered incorrectly | Using the web interface, check your account information settings and enter the correct parameters |
| The modem gets very hot, the network access speed has dropped | Modem CPU load is too high | If it is not possible to reduce the number of connected clients, switch the modem to bridge mode and use it in conjunction with a regular router |
Several years ago, when I was a client of the Rostelecom provider, I had a combination of a DSL-2500U modem and a cheap DIR-300 wireless router. Even though the modem was in bridge mode, it got very hot and, as a result, froze every few hours. Since the modem was already old and its warranty had long expired, it was decided to improve its thermal conditions by installing a cooling system. I installed a heatsink from an old motherboard on the processor chip, and cut a round hole in the upper part of the case where I installed a computer cooler. The temperature of the modem dropped noticeably, and then it worked without failures.
A fan from an old video card will help you forget about modem overheating forever
The power supply (network adapter) of the modem operates in an even more severe thermal regime than the device itself. The result is failure of the filter capacitors (capacitors) in the power circuits. If you are even a little comfortable with a soldering iron, you can repair the adapter yourself. A failed capacitor is easy to find: its housing will be swollen and deformed.
The first sign of a faulty network adapter is a swollen capacitor
Video: improving the cooling of the D-Link 2500U DSL modem
The D-LINK DSL-2500 modem-router is a time-tested, but very old solution, so if you are just connecting to the Rostelecom (or similar) network, purchasing it will not be a rational choice, because a combination of a modem plus a wireless router will cost more than purchasing an ADSL router with a wireless module. But if you live in the periphery and the state of telephone lines or the provider’s policy does not allow you to take advantage of high-speed tariff plans, the capabilities of the DSL-2500 are more than enough. After all, as wise ancestors wrote, an old horse does not spoil a furrow.